System with the purpose of helping entrepreneurs formalized as Individual Microentrepreneurs (MEI) who seek an automatic way to organize their Revenues (generation of Invoices) to avoid surprises with tax payments at the end of the year
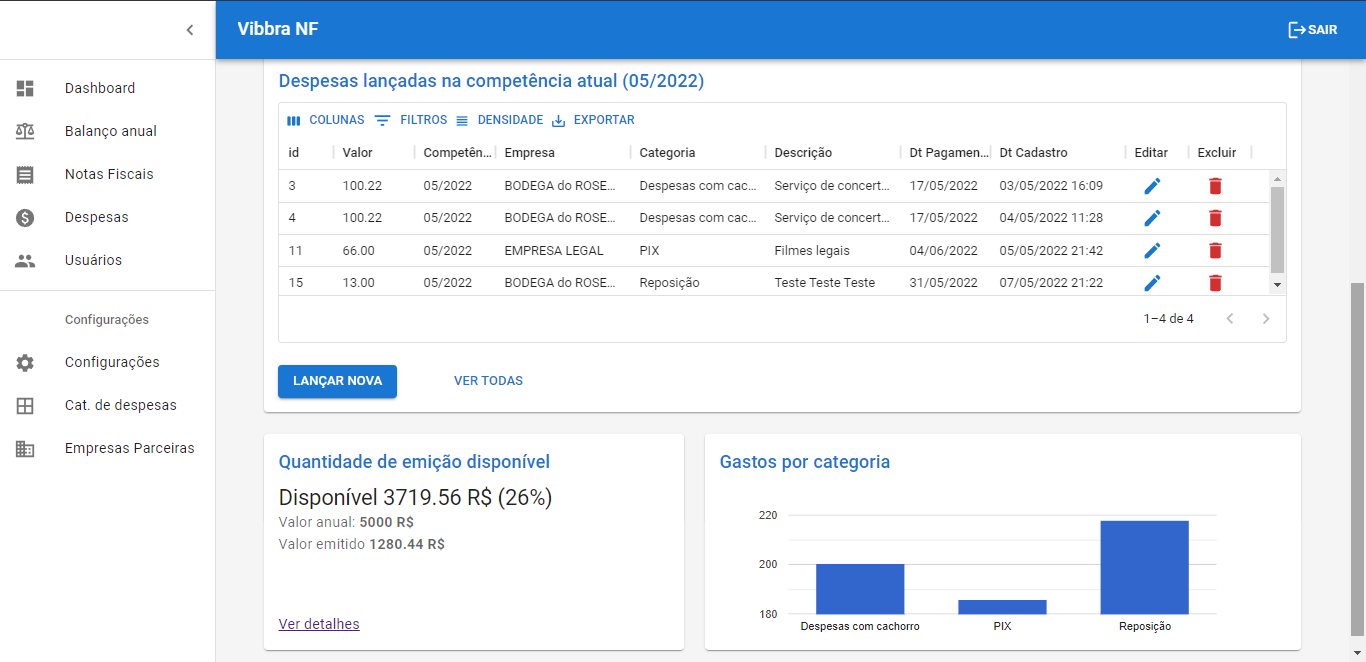


- Post invoice
- Post expenses
- Register partner companies
- Register expense categories
- configure the maximum MEI billing limit
- graphs with expenses by category
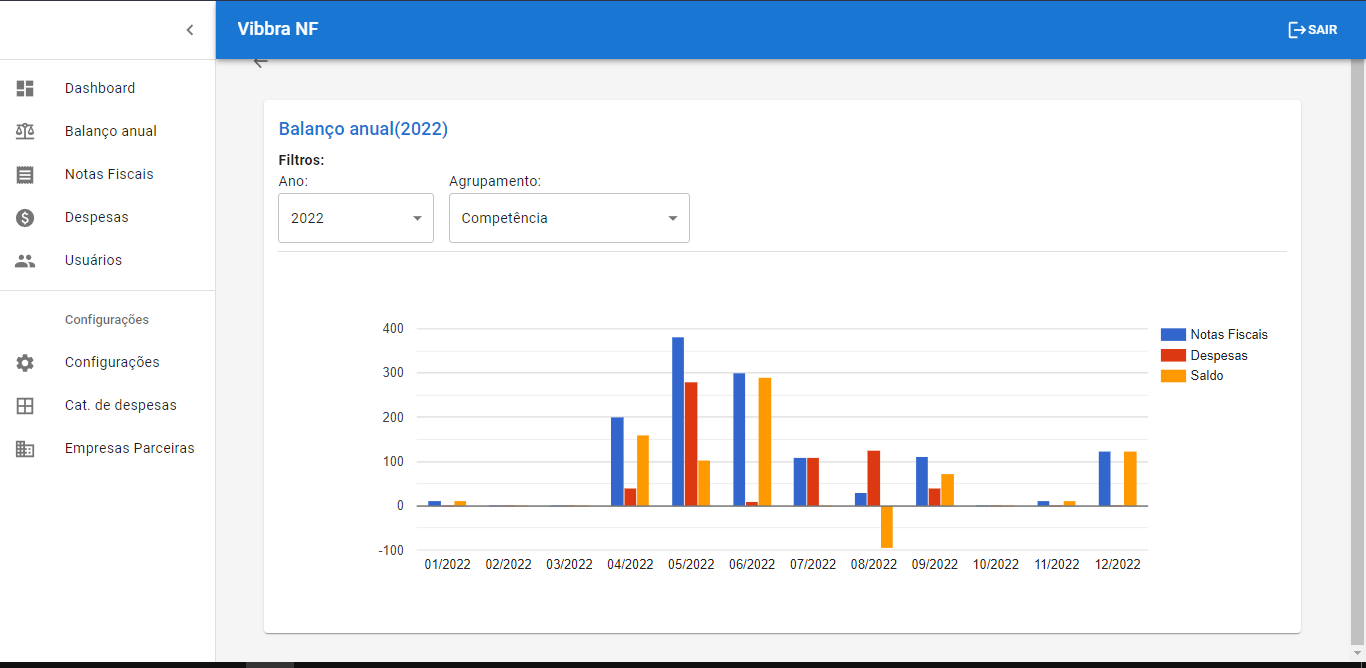
- graphs with the generated NF value, month by month
- graphs with the amount of expenses month by month
- charts with simple balance
- indicative of how much billing is still available for the issuance of Invoices
- send alerts after exceeding x% of annual billing threshold
- send alerts via email
- send alerts via SMS
- archive expense categories
this application was developped using
node (typescript)react
Before start you need have in your PC:
- Have the
node =>14.19.0 - Have the
mysql =>8.0.0(if you no want use mysql read the section use other databases) - Have the
yarn =>1.22.17 (recommended)ornpm =>6.14.16
first clone the project
git clone https://git.vibbra.com.br/antonio-matheus/vibbranf.git
next step install the dependences
cd backend
yarn install
cd frontend
yarn install
create an database (on mysql use)
create database <dbname>
now configure the .env file for backend
create an file called .env on backend root folder with the structure
JWT_SECRET = <your_secret_here>
JWT_EXPIRES_IN = 3h
DB_HOST = <your_mysql_host_here> #localhost is the default value
DB_PORT = <your_mysql_port_here> #3306 is the default value
DB_USER = <your_mysql_user_here> #root is the default value
DB_PASSWORD = <your_mysql_password_here>
DB_DATABASE = <your_mysql_database_here>
MIGRATION_DIR = ./src/shared/infra/typeorm/migrations/**.ts
MIGRATION_CLI_DIR = ./src/shared/infra/typeorm/migrations
MIGRATION_ENTITIES_DIR = ./src/modules/**/models/entities/**.ts
PORT = <here_the_port_you_need_use>
now configure the .env file for frontend
create an file called .env on backend root folder with the structure
REACT_APP_API_URL = <here_set_the_backend_baseurl> #example http://localhost:3008/
run migrations
yarn typeorm migration:run
💡 Developemnt tip: for this project is important know about typeorm CLI commom commands are
yarn typeorm migration:run,yarn typeorm migration:create -n <migration name>,yarn typeorm migration:revert,yarn typeorm migration:show,yarn typeorm query "<query here>"
now you only need run the script on backend
npm run dev
or
yarn dev
on frontend
npm run start
or
yarn start
here some useful links:
- how install MySql on windows, linux or macOS.
- how download node.
- need use more one version of node? use nvm.
- install the yarn.
With typeorm you can you mysql,mariadb, posgres, sqlite, mssql, mongodb and others that you can see on typeorm documentation.
for use other databases you need
- Install on backend the dependency
- go to file
backend/ormconfig.js - edit the file to database that you want to use (here the link for typeorm documentation)
BACKEND
├── node_modules
├── src
│ ├── @types                  # Here are the custom types used by typescript
│ ├── modules                 # In this folder are all modules of system
|    └── <module name>
|         └── controllers     # here are all the Controllers called by the routes and responsible for calling the service
|         └── interfaces      # in this folder are defined interfaces of types used by the module
|         └── routes          # in this folder are the files used by controll the module routes
|         └── models
|              └── entities   # Here are the methods that make all interactions and operations with the database
|              └── repository # here are the entities abstraction of database tables
|         └── services        # in this folder are the services
|         └── views           # in this folder are the views where is defined the JSON format that are sended for responses
│ └── shared                  # Here are functionaties shared by all modules
|    └── container            # where are all dependency injection configuration
|    └── errors               # where is the class used by custom errors
|    └── helpers              # where are util functions used by all system
|    └── providers            # here are shared providers
|    └── http                 # here are the http configurations
|         └── routes          # here is configured the general routes for modules
|    └── infra                # here is infra functionalities
|         └── typeorm         # here are the typeorm configurations
|              └── migrations # here are the database migrations configurations
└── temp
💡 Developemnt tip (IMPORTANT) : on
src/module/<module_name>/interfacesthere is an especial interface, the REPOSITORY INTERFACE where are the signature for all methods implemented by model repository
💡 Developemnt tip: for protect routes use the middleware ensureAuthenticate
- Create and run the migration
yarn typeorm migration:create -n <name>yarn typeorm migration:run - Create the module entity
- Create the repository interface and the create and update interface DTO
default methods
findAll():  Promise<Array<EntityName>>;
findByID(id:  number):  Promise<EntityName>;
create(data:  ICreateInvoiceDTO):  Promise<EntityName>;
update(data:  IUpdateDTO):  Promise<EntityName>;
delete(id:  number):  Promise<void>;
- Implement the model repository methods
- Create the Container injection dependency on file
src/shared/container/index.ts
container.registerSingleton<InterfaceRepository>('< injection alias>', ModelRepository);read the tsrynge doc
- Create the services (create, update, delete and others that you need)
- Create the controllers using the services
- Create the routes using controllers and call it in general route file
src/shared/infra/http/routes/index.routes.ts - Create the view and use on controller responses
To contribute to this project send suggestions or bug reports send an email to [email protected] or follow these steps:
-
Fork this repository.
-
Create a branch:
git checkout -b <branch_name>. -
Make your changes and commit them:
git commit -m '<message_commit>' -
Push to the original branch:
git push origin <project_name> / <local> -
Create the pull request.
see here on GitHub docs how create an pull request.

Matheus Lima
Software developer