
![]()

Timeline-kun is an integrated graphical interface tool for planning and executing experimental protocols.
- Download the latest
.exefrom TimelineKun101.zip. - Double-click
TimelineKun.exeto launch the Previewer. - The Previewer can launch the timer (
TimelinekunTimer.exe) via Send to timer.
pip install timeline-kun
python -m timeline_kun
Timeline-kun integrates four primary functionalities:
-
Simplifying the planning of complex experimental schedules
- Visually represents experimental schedules
- Stores schedule data in CSV format
- Edit schedules with Excel or the built-in table editor (Insert/Edit/Remove)
-
Integrating schedule planning and execution in a single tool
- Schedules created with this tool can be directly used as timers
- Timer can be started from any point, allowing test executions or real-time schedule modifications
- Supports custom alarm sounds using 3-second WAV files
-
Controlling GoPro devices
- Start/stop recording based on schedules via BLE
- Simultaneous control of multiple devices
- Keep-alive is sent periodically while connected (for long standby)
-
Improving methodological transparency and reproducibility
- TSV logs in BIDS
events.tsvformat - Deviations (skip, intermission, recording triggers) can be reviewed later
- SVG export for planning discussions and record-keeping
- TSV logs in BIDS
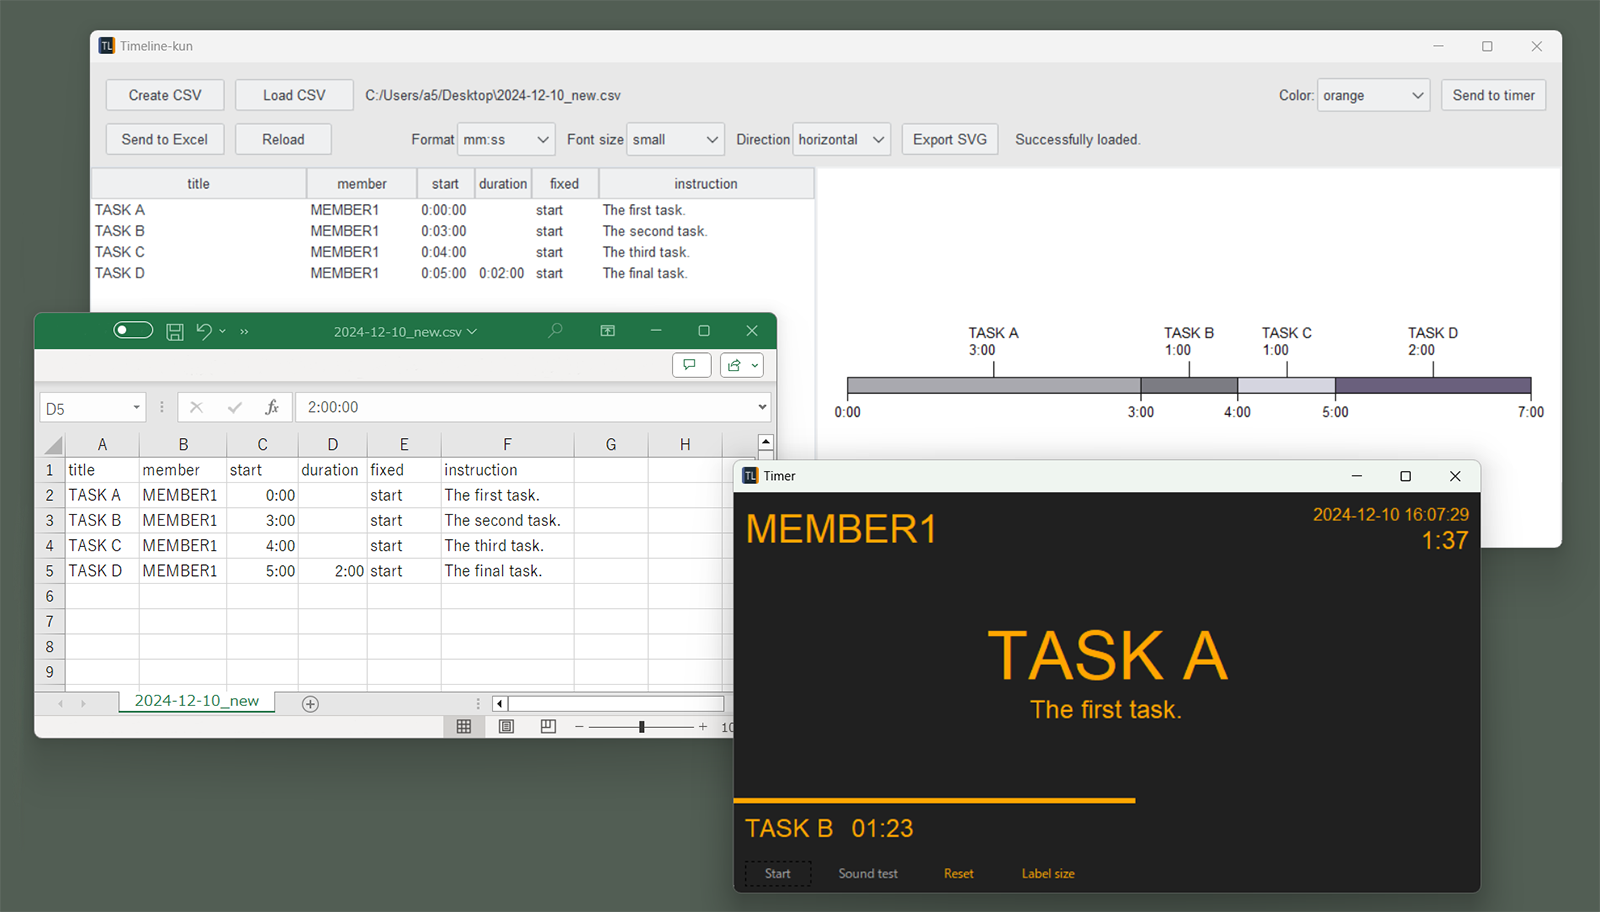
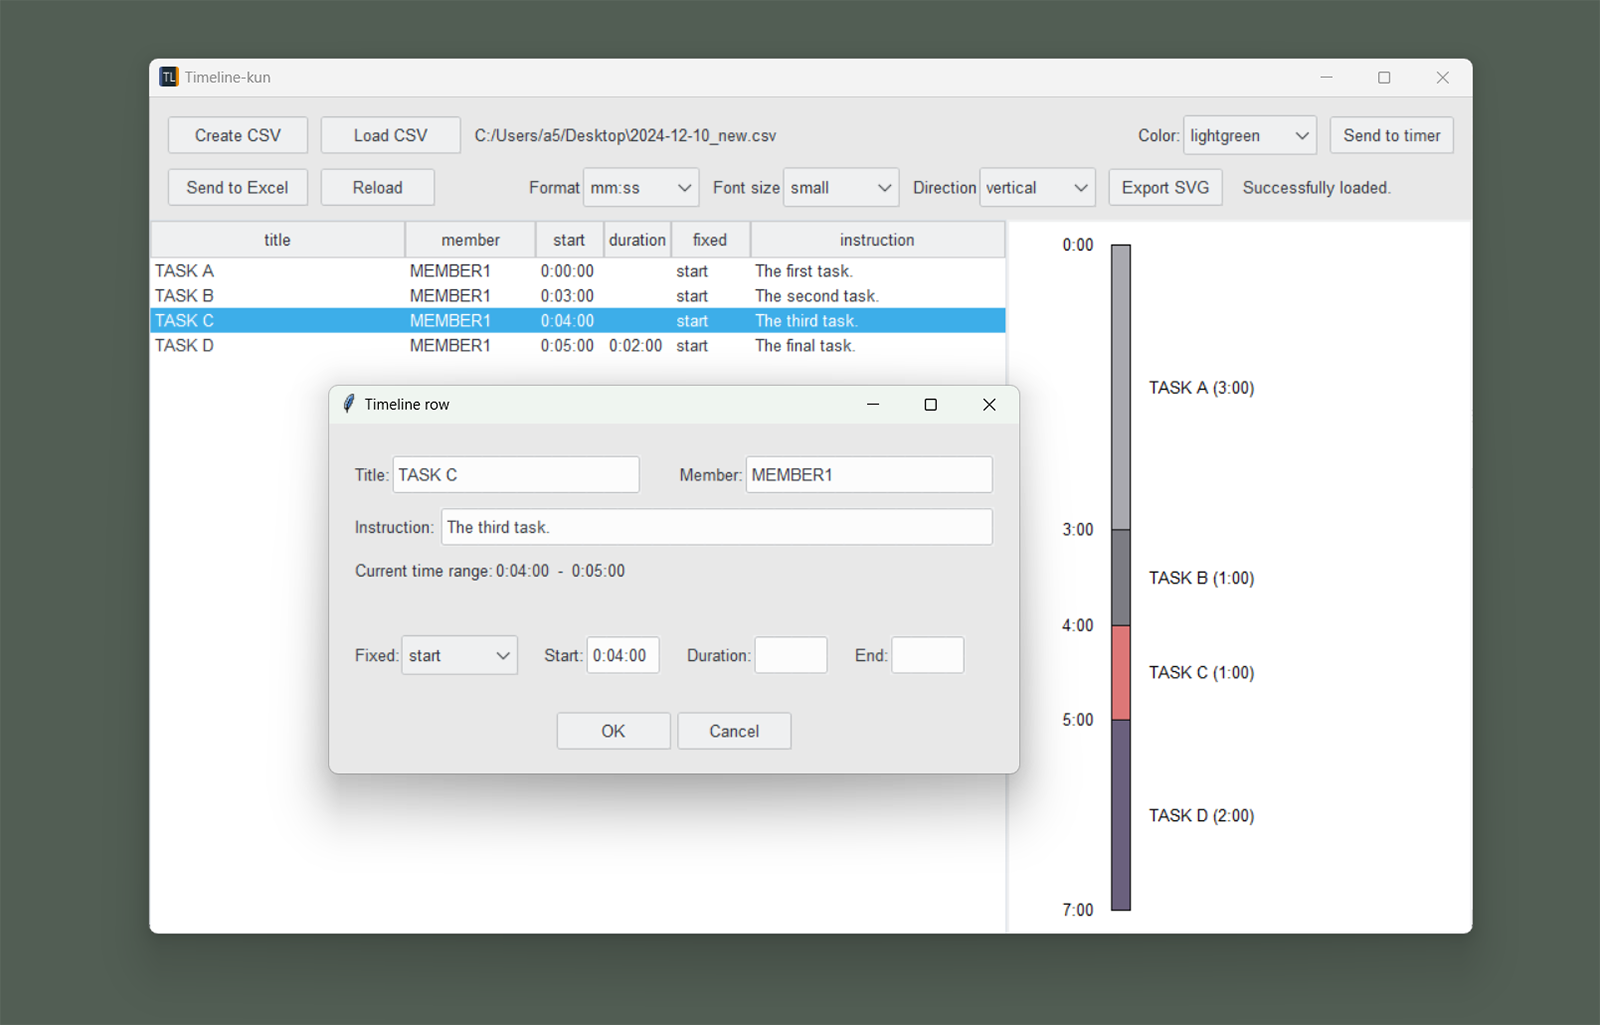
- Previewer: Create/Load/Edit/Validate CSV, visualize timeline, export SVG, launch Timer.
- Timer: Execute the schedule, play alarms, log
events.tsv, optionally control GoPro via BLE.
Timeline-kun reads a simple comma-separated file.
- Required columns:
title,member,start,duration,fixed,instruction - Optional column:
end
If any row usesend, the file should include anendcolumn.
See the full specification and examples in:
timeline_csv_format.md- (LLM generation) If you want to generate a Timeline CSV using an LLM (e.g., ChatGPT), see
timeline_kun_and_llm.md.
Minimal example:
title,member,start,duration,fixed,instruction
TASK A,MEMBER1,0:00:00,0:01:00,start,
TASK B,MEMBER1,,0:05:00,duration,(recording)config.toml is loaded from the application directory:
- Windows standalone: the folder containing the
.exe - Python module: the package directory where
timeline_kunis installed
Current default config:
[ble.orange]
ble_names = []
stop_delay_sec = 2

[ble.cyan]
ble_names = []
stop_delay_sec = 2

[ble.lightgreen]
ble_names = []
stop_delay_sec = 2

[log]
make_events_json = true

[excel]
#read_extra_encoding = "your_encoding"-
ble_names: list of BLE device names to control. Examples:ble_names = ["GoPro 2700", "GoPro 4256"] -
stop_delay_sec: delay (seconds) before stopping recording after leaving a recording-marked stage
If true, writes a JSON sidecar for the generated events.tsv.
Fallback encoding used when UTF-8 decoding fails (and also used for Excel conversion when needed).
Examples: read_extra_encoding = "cp932"
- Press the "Create CSV" button to create timeline data
- Press the "Send to Excel" button to edit the timeline data in Excel
- Press the "Reload" button to visualize the timeline data and check for any input errors
- Press the "Export SVG" button to export the visualized timeline as an SVG file
- you wish to start timing from the middle of the timeline, select the desired event from the table, right-click, and select the "Set start point" menu
- Press the "Send to timer" button to launch the timer
- Press the "Sound test" button to check the speaker volume
- If you use GoPro control, press the "BLE Connect" button to attempt to connect to the GoPro devices listed in
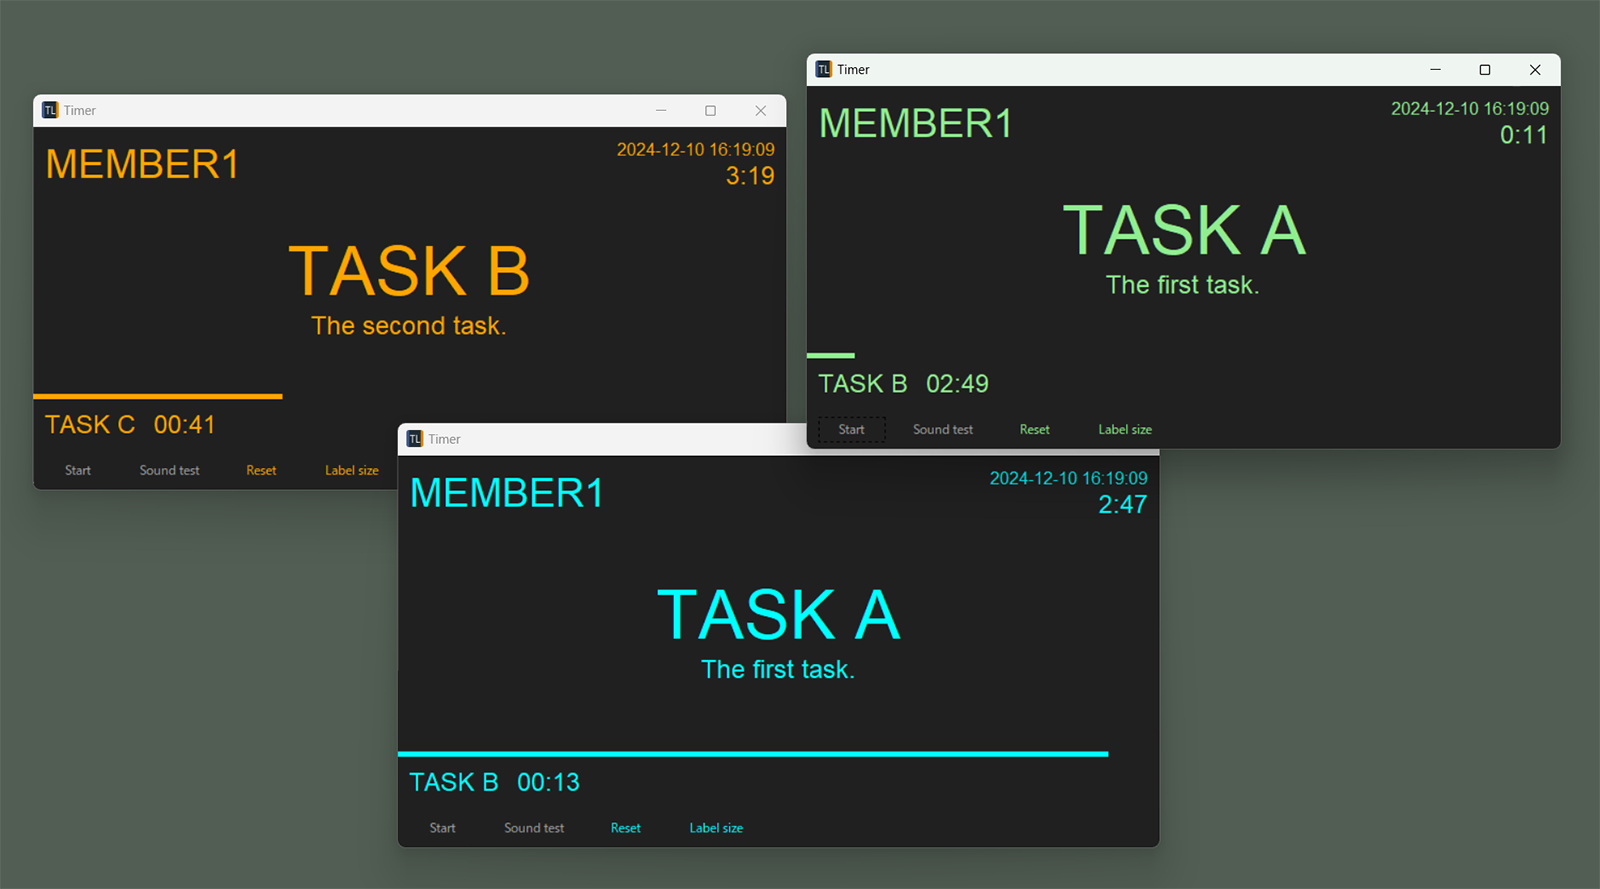
config.toml(ble_names) - Press the "Start" button to begin the timer
- Press the "Skip" button to skip the current event
- To end the timer, simply close the window or press the "Reset" button
- Clone the repository:
git clone https://github.com/nishimura5/timeline_kun.git - Set up the environment using uv (simply run "uv sync" in the directory containing pyproject.toml)
- Run below in the directory containing pyproject.toml to launch
uv run python -m timeline_kun
- Time display format can be selected between "MM:SS" (like 90:00) and "H:MM:SS" (like 1:30:00)
- Custom WAV files can be used by replacing the file in the "sound" folder
- Users can select timer text colors from orange, cyan, and light green. Up to three timers can be operated simultaneously on a single PC
- SVG diagrams are editable using vector graphics tools such as Affinity Designer or Adobe Illustrator
To mark a stage for recording, include "(recording)" in the instruction field.
- Recording starts when the timer is close to a recording-marked stage (and for the first stage, at stage start).
- Recording stops (after
stop_delay_sec) when the timer enters a stage without"(recording)".
To enable BLE UI in the timer:
- Put GoPro names into
ble_namesfor the corresponding timer color inconfig.toml. - Launch the timer in that color.
- Click BLE Connect before starting the timer.
For GoPro models starting from HERO11 that support BLE communication, recording can be automatically started shortly before a specified event begins (3-4 seconds before the next event starts). For the first event, recording starts at the beginning of the event. It is possible to send commands to start and stop recording on multiple GoPro devices.
- Test evidence:
docs/test_evidence_gopro.md
Timer logs conform to the BIDS (Brain Imaging Data Structure) events.tsv format.
Files are created under the same directory as the Timeline CSV:
log/<timeline_csv_name>_00_events.tsvlog/<timeline_csv_name>_scans.tsv
Each time the timer is started, the number (00) increments.
If [log].make_events_json = true, an events JSON sidecar is also generated in log/.
A sample log is shown below:
onset	duration	trial_type
0.0	60.0	TASK A
66.2	0.0	video_record_start
60.0	10.1	Intermission
70.0	89.9	TASK B
179.6	0.0	task_skip
160.0	22.7	TASK C
182.6	60.0	TASK D
242.6	20.0	Intermission
262.7	60.0	TASK E
322.7	0.0	session_end
The timer loads a 3-second WAV file from the sound/ folder.
File names:
countdown3_orange.wavcountdown3_cyan.wavcountdown3_lightgreen.wav
Replace these files to use custom alarm sounds (keep duration ~3 seconds).
MMCV: ずんだもん
Please acknowledge and cite the use of this software and its authors when results are used in publications or published elsewhere.
Nishimura, E. (2026). Timeline-kun (Version 1.0.1) [Computer software]. Kyushu University, https://doi.org/10.48708/7325764
@misc{timeline-kun-software,
  title = {Timeline-kun},
  author = {Nishimura, Eigo},
  year = {2026},
  publisher = {Kyushu University},
  doi = {10.48708/7325764},
  note = {Available at: \url{https://hdl.handle.net/2324/7325764}},
}