View realtime radar scan of the Xiaomi Roborock Vacuum LDS02RR LIDAR directly in a web page, without any libraries
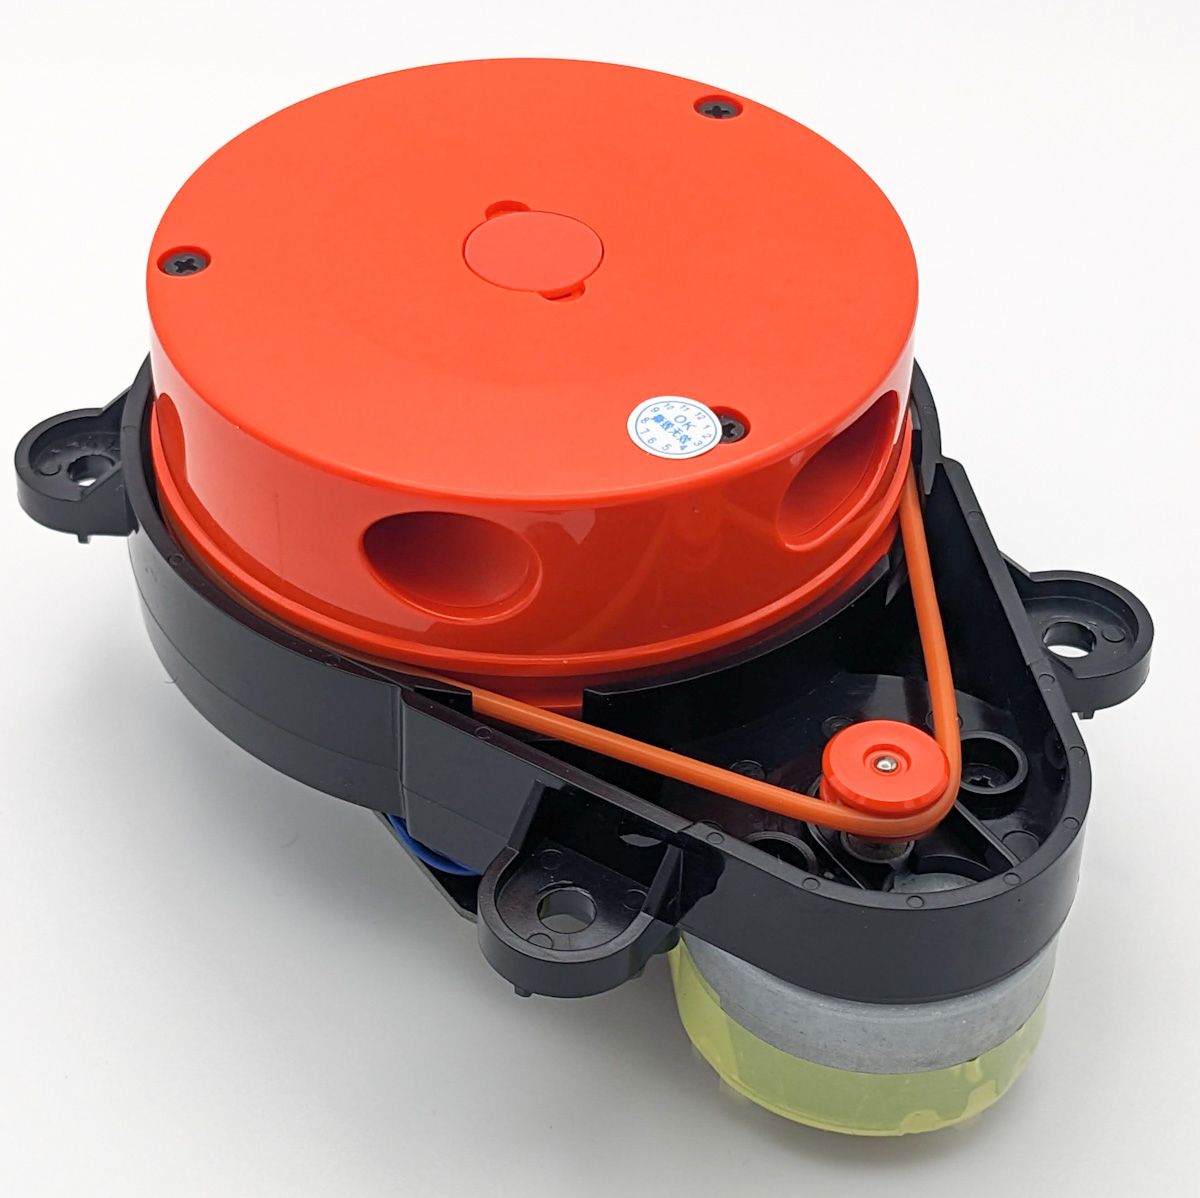 The LDS02RR Xiaomi Roborock Lidar
|
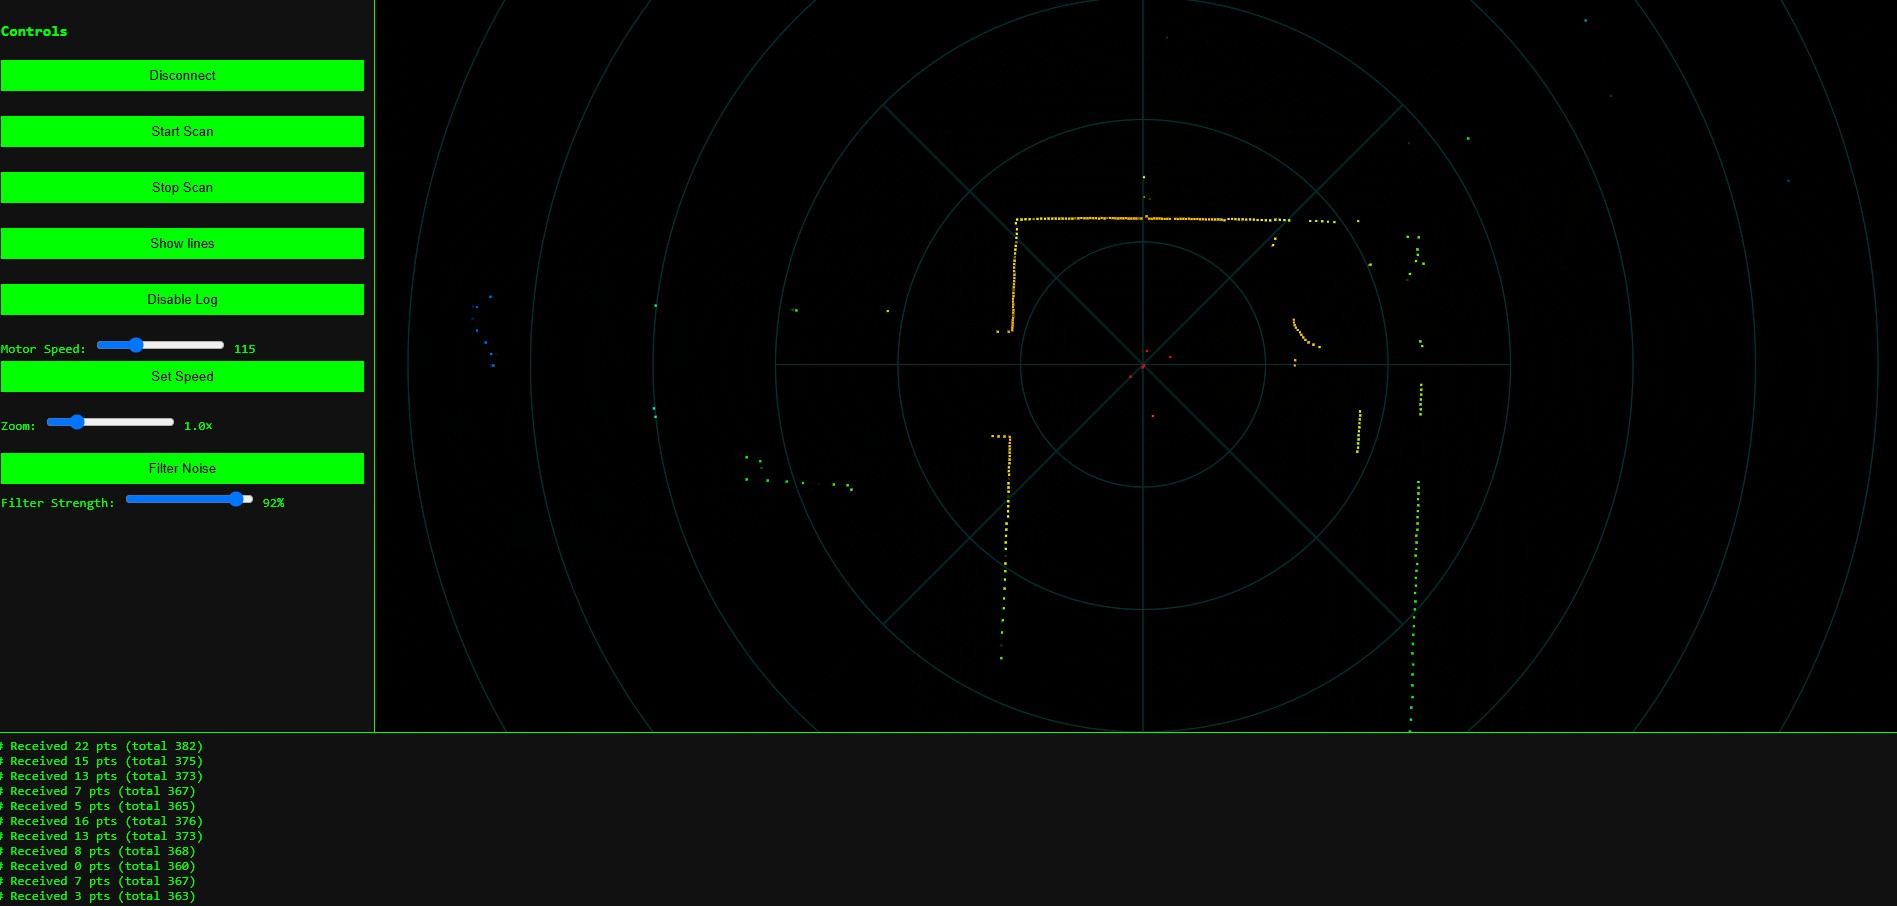 The Web App UI
|
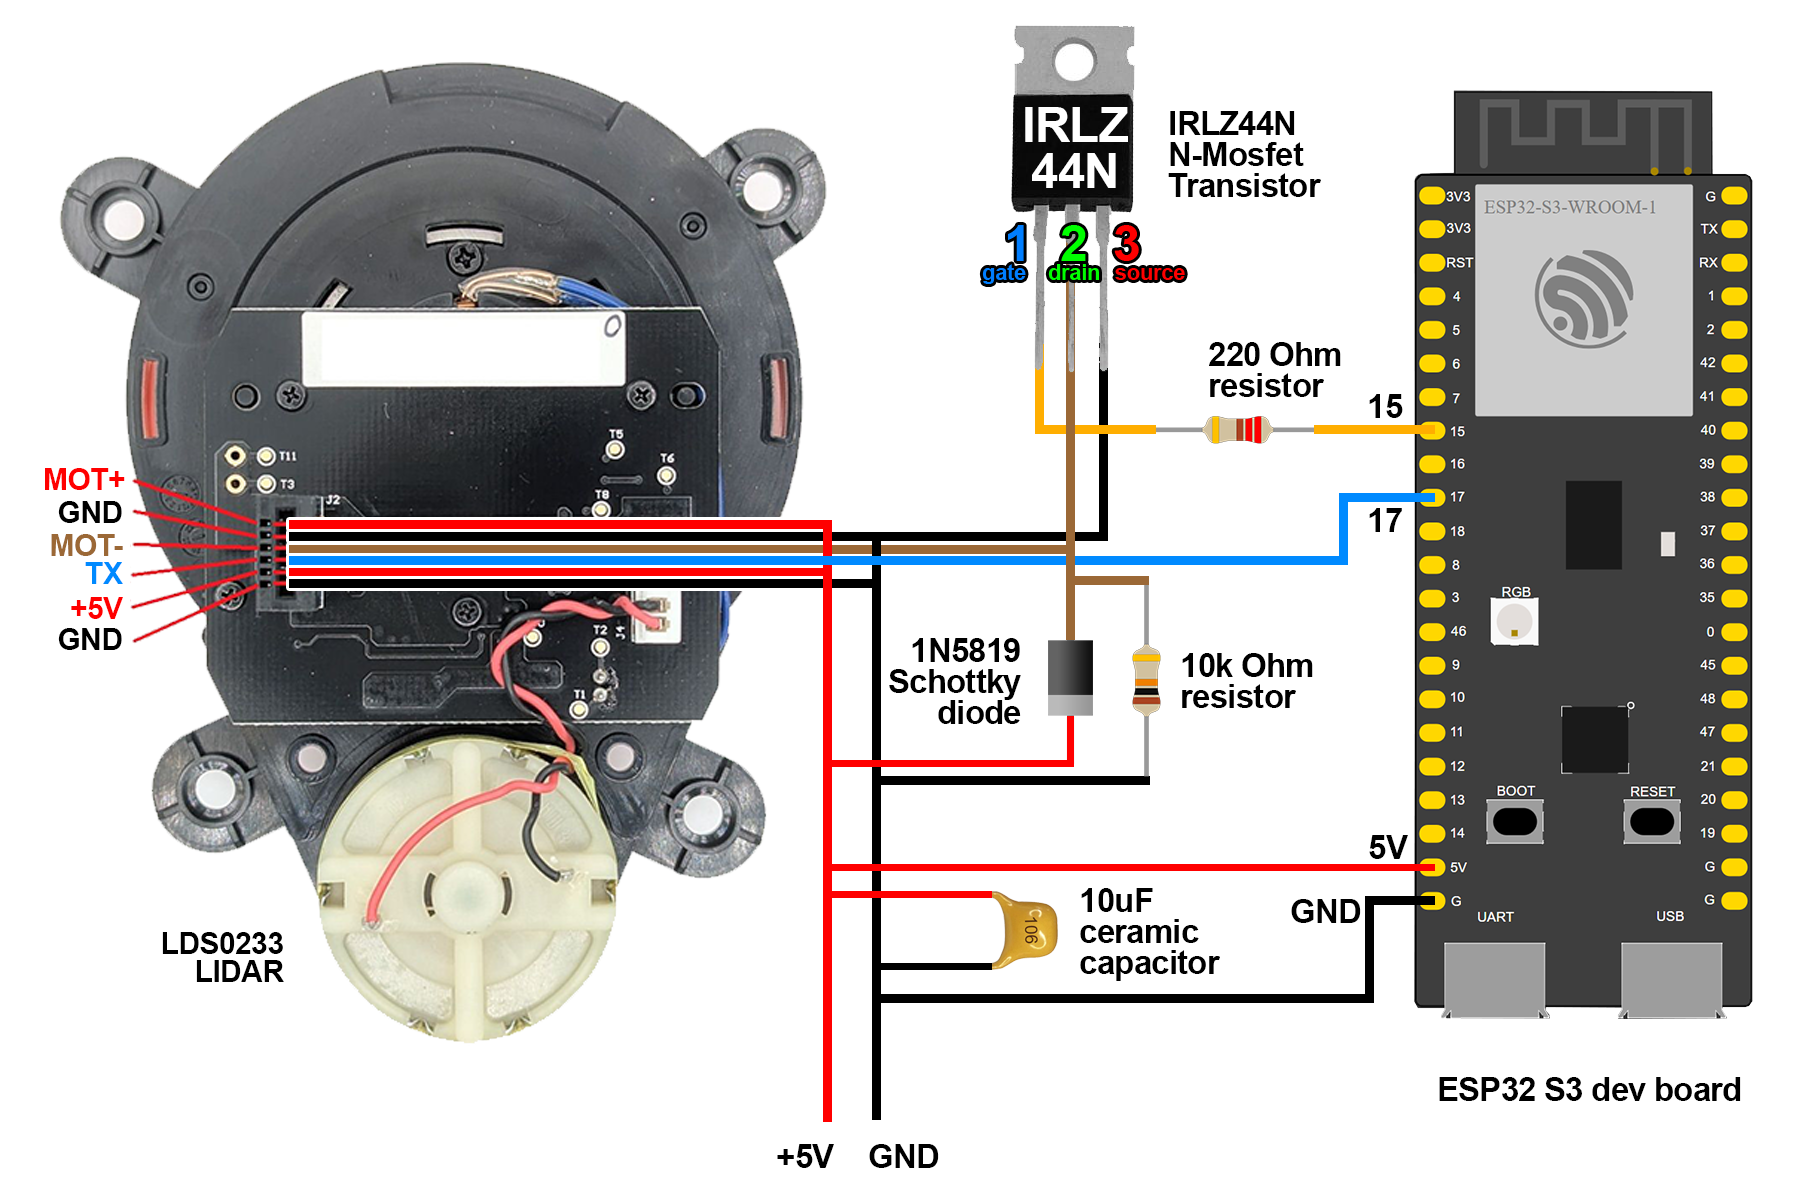
- 1x Xiaomi Roborock Vacuum LDS02RR LIDAR (the sensor)
- 1x ESP32 (I used an S3 dev board) (can be any esp32 board)
- 1x N-Mosfet IRLZ44N Transistor (adjusts the motor speed)
- 1x Schottky Diode 1n5819 (schottky preffered)
- 1x 10k Ohm Resistor (stops the motor when the STOP command is sent)
- 1x 220 Ohm Resistor (filters some noise)
- 1x 10uF Ceramic Capacitor (helps with the motor start)
- A small punch-hole breadboard or prototyping soldering board (for the components soldering)
- 2x JST Connectors 4PINs (for the ESP32 and the LIDAR) (if you want to plug and unplug it fast)
- 1x JST Connector 2PINs (for the 5V external Power Supply)
- Thin wire (to connect the components)
- Solder Iron (do not overheat the components with it)
- Solder wire (for soldering)
Flash the esp32-xiaomi-lidar-lds02rr.ino file on your esp32, follow the diagram for wiring and set up the files from the webapp folder on your web server. Connect trough a serial port and view the scaning in real time.
Open the web app page in your browser (not directly, but served by a webserver - local or online). The buttons and controlls you get are:
- Connect Serial (will open the connected devices popup to select your ESP32)
- Start Scan (will start spinning the motor and get the scan data on the radar map)
- Stop Scan (will stop spinning the motor)
- Show Lines (will show lines instead of dots on the radar map)
- Disable log (will stop the log adding new messages)
- Motor Speed (changes the value of the motor speed, but it doesn't change the motor speed yet)
- Set (changes the speed of the motor to the value set above)
- Zoom (also work with the mouse wheel above the radar map)
- Filter Noise (cleans up the radar map)
- Filter Strength (adjusts the noise filter strength)
Connect an USB-C to USB-A cable (not USB-C to USB-C). Try the other USB-C connector of the ESP32. if it has 2 USB-C ports. Make sure your web app is opened from a local server or an online server, do not open the html directly in the browser.
You have to connect it first. If already connected, try increasing the motor speed slider and click the speed set button. Do not run Arduino IDE and the WebApp page at the same time. Close the Arduino IDE when opening the Web App.
Make sure you connected the TX wire. In the esp32-xiaomi-lidar-lds02rr.ino file, Set the LIDAR baudrate to 230400 and flash it to the esp32. If packets are shown, your LIDAR model uses 230400 baud rate instead of 115200.
Make sure you configured Arduino IDE for ESP32. If not,
Add the following URLs to Additional Boards Manager URLs:
https://dl.espressif.com/dl/package_esp32_index.json
https://raw.githubusercontent.com/espressif/arduino-esp32/gh-pages/package_esp32_dev_index.json
Go to Tools>Board>Boards Manager, search for esp32 and install esp32 by Espressif Systems (VERSION 2.0.10)
NOTE: If you're using windows
Install the CP210X Drivers
Install the CH340X Drivers
Connect the ESP32, make sure it shows up in device manager (Windows) or lsusb (linux). If not, try the other USB-C port if your ESP32 board has 2 USB-C ports. Do not use an USB-C to USB-C cable. Always use USB-C to USB-A, or USB-C to USB-C with USB-C to USB-A adapter.