由于大模型自己具备较强的理解和推理能力,常规的指令大模型都是了解的,因此利用大模型做文本分类更关注下面几个内容:
- 分类任务的具体目标需要在prompt中体现;
- 尽可能每个类目的概念都有相对详细的解释,尤其尤其强调类目之间的差别。
而配合in-context learning的思想,比较简洁地使用大模型进行文本分类的prompt应该包含如下成分:
- 分类任务的介绍及其需求细节;
- 每个类目的概念解释;
- 每个类目最好还有些例子(用学术的方法说,就是few-shot吧);
- 需要分类的文本。
但在实际应用过程中,可能会出现类目较多、样本较多的问题,2/3是非常容易让prompt膨胀过长的,然而很长的prompt往往容易让大模型的推理效果下降,里面某些内容要求容易被忽略,因此如果有经过筛选再进入大模型就会变得更方便。因此,前面借助向量检索来缩小范围,然后交给大模型来进行最终的决策。
此时方案就形成了,思路如下。
离线,提前配置好每个类目的概念及其对应的样本。(某种程度上,其实算是一种训练,整个思路其实就跟KNN里的训练是类似的) 在线,先对给定query进行向量召回,然后把召回结果信息交给大模型做最终决策。 这么说比较抽象,这里我给出例子,方便大家理解处理吧。
强调,本方法不对任何模型进行参数更新,都是直接下载开源模型参数直接使用的,这也算是本方案的一大优势吧。 项目地址:[email protected]:sunyongdi/llm_classification.git
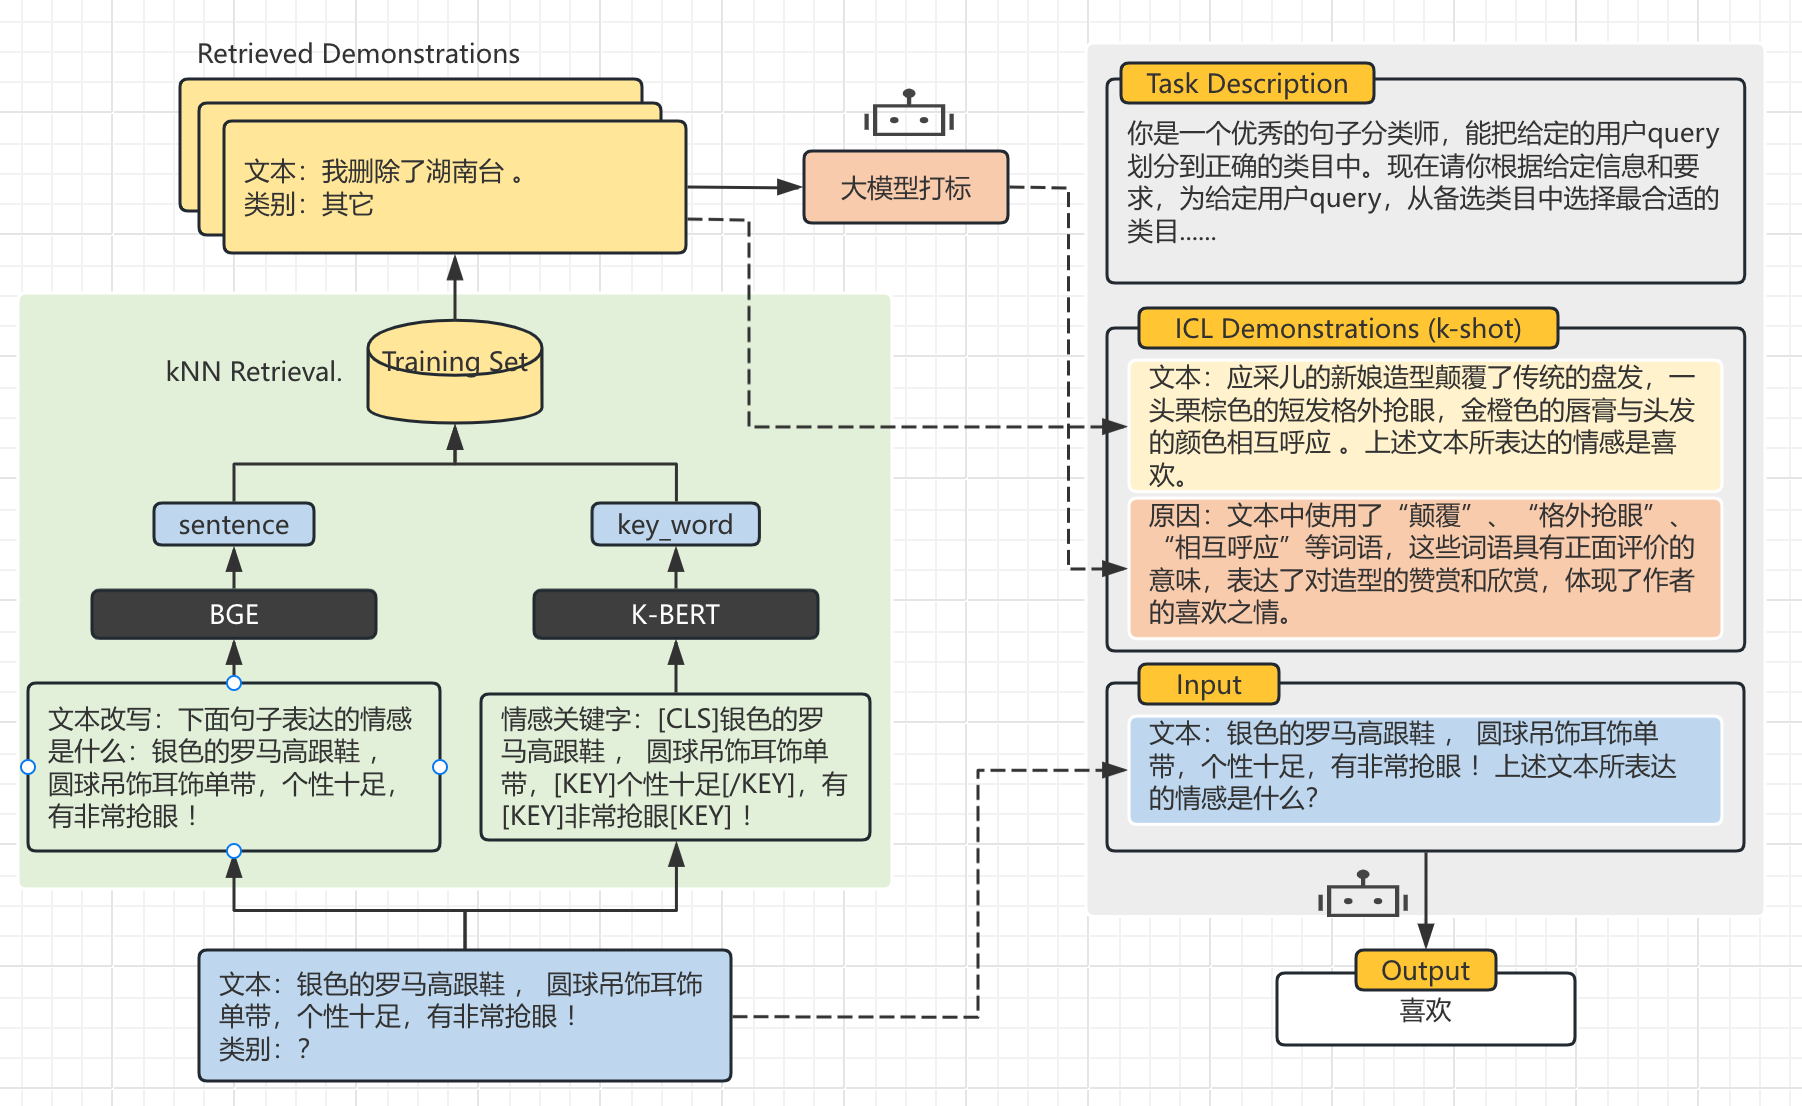
上图是参考GPT-RE 结合叉烧大佬的通用大模型文本分类实践改写的基于的大模型的文本分类模型,其实简单来说就是使用大模型进行文本分类,再添加上下文学习,提高模型的准确度。在GPT-RE中提到,提供的上下文的文本和类别贴近原文,效果会有所提升。这里使用当前先进的BGE作向量模型,使用K-BERT提取文本的关键词。最后拼接召回相似例子作为上下文喂给大模型。
- 大模型使用Qwen2-7B-Instruct
class QwenMode(BaseModel):
    def __init__(self, model_path) -> None:
        self.model = AutoModelForCausalLM.from_pretrained(
            model_path,
            torch_dtype="auto",
            device_map="auto"
        )
        self.tokenizer = AutoTokenizer.from_pretrained(model_path)
        self.model = self.model.eval()
        self.device = self.model.device

        logger.info("load LLM Model done")

    def chat(self,
             messages: str,
             max_new_tokens: int = 1024,
             do_sample:bool = False,
             top_k: float = 1,
             temperature: float = 0.8
             )->str:

        text = self.tokenizer.apply_chat_template(
            messages,
            tokenize=False,
            add_generation_prompt=True
        )
        model_inputs = self.tokenizer([text], return_tensors="pt").to(self.device)

        generated_ids = self.model.generate(
            model_inputs.input_ids,
            attention_mask=model_inputs.attention_mask,
            pad_token_id=self.tokenizer.eos_token_id,
            max_new_tokens=max_new_tokens,
            do_sample=do_sample,
            top_k=top_k,
            temperature=temperature
        )
        generated_ids = [
            output_ids[len(input_ids):] for input_ids, output_ids in zip(model_inputs.input_ids, generated_ids)
        ]

        logger.info(f'input_tokens:{len(model_inputs.input_ids.tolist()[0])} \t generated_ids:{len(generated_ids[0].tolist())} \t all_tokens:{len(model_inputs.input_ids.tolist()[0]) + len(generated_ids[0].tolist())}')
        response = self.tokenizer.batch_decode(generated_ids, skip_special_tokens=True)[0]
return response- Embedding 采用 bge-base-zh-v1.5
class BgeEmbedding(BaseEmbeddings):
    """
    class for BGE embeddings
    """

    def __init__(self, path: str = 'BAAI/bge-base-zh-v1.5') -> None:
        self._model, self._tokenizer = self.load_model(path)

    def get_embedding(self, text: str) -> List[float]:
        import torch
        encoded_input = self._tokenizer([text], max_length=512, padding='max_length', truncation=True, return_tensors='pt')
        encoded_input = {k: v.to(self._model.device) for k, v in encoded_input.items()}
        with torch.no_grad():
            model_output = self._model(**encoded_input)
            sentence_embeddings = model_output[0][:, 0]
        sentence_embeddings = torch.nn.functional.normalize(sentence_embeddings, p=2, dim=1)
        return sentence_embeddings[0].tolist()

    def load_model(self, path: str):
        import torch
        from transformers import AutoModel, AutoTokenizer
        if torch.cuda.is_available():
            device = torch.device("cuda")
        else:
            device = torch.device("cpu")
        tokenizer = AutoTokenizer.from_pretrained(path)
        model = AutoModel.from_pretrained(path).to(device)
        model.eval()
return model, tokenizer- 向量库
向量库这里选择的是milvus,本着学习的态度还是比较好部署和使用的,并且官方文档也比较全面,有着RAG的详细案例教程。
class VectorStore:
    def __init__(self, EmbeddingModel: BaseEmbeddings, db_path: str='milvus_demo.db', collection_name: str='my_rag_collection') -> None:
        self.EmbeddingModel = EmbeddingModel
        self.milvus_client = MilvusClient(uri=db_path)
        self.collection_name = collection_name

    def create_collection(self)->None:
        if self.milvus_client.has_collection(self.collection_name):
            self.milvus_client.drop_collection(self.collection_name)

        # # 创建集合的schema
        # fields = [
        #     FieldSchema(name="id", dtype=DataType.INT64, is_primary=True, auto_id=True),
        #     FieldSchema(name="vector", dtype=DataType.FLOAT_VECTOR, dim=self.EmbeddingModel._model.config.hidden_size),
        #     FieldSchema(name="text", dtype=DataType.VARCHAR, max_length=512)
        # ]
        # collection_schema = CollectionSchema(fields, self.collection_name)

        self.milvus_client.create_collection(
            collection_name=self.collection_name,
            # schema=collection_schema,
            dimension=self.EmbeddingModel._model.config.hidden_size,
            metric_type="IP",  # Inner product distance
            consistency_level="Strong",  # Strong consistency level
        )

    def insert(self, data: List[dict]):
        self.milvus_client.insert(collection_name=self.collection_name, data=data)

    def query(self, query: str, k: int = 3) -> List[str]:
        search_res = self.milvus_client.search(
            collection_name=self.collection_name,
            data=[
                self.EmbeddingModel.get_embedding(query)
            ],
            limit=k,  # Return top 3 results
            # search_params={"metric_type": "IP", "params": {}},  # Inner product distance
            output_fields=["text"],  # Return the text field
        )

return [(res["entity"]["text"], res["distance"]) for res in search_res[0]]- 分类主函数
这个没什么好解释的,就是在向量库中召回相似的案例,拼接prompt,给大模型进行输出。
class VecLlmClassifier:
    def __init__(self) -> None:
        self.emb_model = BgeEmbedding(EMBEDDING_PATH)
        self.retrieval = VectorStore(self.emb_model, DB_PATH)
        self.llm = QwenMode(LLM_PATH)


    def predict(self, query: str, icl=True) -> str:
        task_description = PROMPT_TEMPLATE['CLASSIFY_PROMPT_TEMPLATE']
        demonstrations = ''
        # ICL
        if icl:
            demonstrations = self.retrieval.query(query, k=3)
            logger.info('大模型生成解释........')
            demonstrations = ['文本:' + demonstration[0] + '\n' + '原因:' + \
                            self.llm.chat([{'role': 'user', 'content': PROMPT_TEMPLATE['REASON_PROMPT_TEMPLATE'].format(content=demonstration[0])}]) \
                                for demonstration in demonstrations]


        # LLM
        logger.info('大模型进行推理........')
        output = self.llm.chat([{
            'role': 'user',
            'content': task_description.format(examples=demonstrations, options='财经、彩票、房产、股票、家居、教育、科技、社会、时尚、时政、体育、星座、游戏、娱乐', options_detail = '', query=query)}])
return output- prompt
这里偷个小懒,直接采用叉烧大佬的,没有进行修改。
你是一个优秀的句子分类师,能把给定的用户query划分到正确的类目中。现在请你根据给定信息和要求,为给定用户query,从备选类目中选择最合适的类目。

下面是“参考案例”即被标注的正确结果,可供参考:
<examples>

备选类目:
<options>

类目概念:
<options_detail>

用户query:
<query>

请注意:
1. 用户query所选类目,仅能在【备选类目】中进行选择,用户query仅属于一个类目。
2. “参考案例”中的内容可供推理分析,可以仿照案例来分析用户query的所选类目。
3. 请仔细比对【备选类目】的概念和用户query的差异。
4. 如果用户quer也不属于【备选类目】中给定的类目,或者比较模糊,请选择“拒识”。
5. 请在“所选类目:”后回复结果,不需要说明理由。

所选类目:下面是使用ICL的结果,效果还算是不错的accuracy, 达到了0.94,较bert文本分类的0.98差了0.4。其中大模型生成错误类别6个,在代码中可以看到,我对类别预测错误的处理就是,append 一个"家居"的类别,看起来对结果的影响不大。
              precision    recall  f1-score   support

          家居       0.98      0.99      0.99       200
          体育       0.97      0.98      0.98       200
          教育       0.95      0.87      0.91       200
          房产       0.94      0.84      0.89       200
          科技       0.98      0.79      0.87       200
          娱乐       0.93      0.97      0.95       200
          游戏       0.95      0.94      0.95       200
          财经       1.00      0.99      0.99       200
          时尚       0.98      0.99      0.99       200
          时政       0.76      0.99      0.86       200

    accuracy                           0.94      2000
   macro avg       0.94      0.94      0.94      2000
weighted avg 0.94 0.94 0.94 2000在不使用ICL的条件下,accuracy到达0.88, 其中ERROR 58项,对于这个结果,是有点超出我的预料的,主要原因也许是没有改prompt的缘故,对于examples,只是传了一个空的字符串。后续可以考虑构建一个新的prompt试试。
              precision    recall  f1-score   support

          家居       0.97      0.99      0.98       200
          体育       0.90      0.98      0.94       200
          教育       0.70      0.71      0.71       200
          房产       0.94      0.51      0.66       200
          科技       0.94      0.66      0.77       200
          娱乐       0.96      0.92      0.94       200
          游戏       0.89      0.84      0.87       200
          财经       1.00      0.95      0.98       200
          时尚       0.97      0.85      0.91       200
          时政       0.52      0.98      0.68       200

    accuracy                           0.84      2000
   macro avg       0.88      0.84      0.84      2000
weighted avg 0.88 0.84 0.84 2000先说一下优缺点,优点就是无需训练也可以有一个较为不错的结果,如果能提供比较好的例子和类别的界限比较清晰,效果会更好。比较适合围绕一个通用大模型的api打造一系列工具的场景。缺点是也大模型的通病:就是上限不会太过,如果仅针对一个分类任务部署一个大模型得不偿失,同时推理速度较慢,icl 的token使用的比较多,在使用收费api的时候也是一笔花销。
再说一下后续的优化点,可以看到目前的方法中是没有使用到key-bert 的关键词,下图可以看到,一些核心的词语比语意更加重要。

https://mp.weixin.qq.com/s/H9oY4OaFWGJuwAoboLpcLw
https://github.com/KMnO4-zx/TinyRAG/tree/master
https://arxiv.org/abs/2305.02105