-
Notifications
You must be signed in to change notification settings - Fork 34
Added two new FAQs #895
New issue
Have a question about this project? Sign up for a free GitHub account to open an issue and contact its maintainers and the community.
By clicking “Sign up for GitHub”, you agree to our terms of service and privacy statement. We’ll occasionally send you account related emails.
Already on GitHub? Sign in to your account
Merged
Merged
Added two new FAQs #895
Changes from all commits
Commits
Show all changes
2 commits
Select commit
Hold shift + click to select a range
File filter
Filter by extension
Conversations
Failed to load comments.
Loading
Jump to
Jump to file
Failed to load files.
Loading
Diff view
Diff view
There are no files selected for viewing
64 changes: 64 additions & 0 deletions
64
...cs/FAQs/general/how-do-i-retrieve-the-otp-when-its-embedded-within-html-tags.md
This file contains hidden or bidirectional Unicode text that may be interpreted or compiled differently than what appears below. To review, open the file in an editor that reveals hidden Unicode characters.
Learn more about bidirectional Unicode characters
| Original file line number | Diff line number | Diff line change |
|---|---|---|
| @@ -0,0 +1,64 @@ | ||
| --- | ||
| title: "How Do I Retrieve the OTP When it’s Embedded within HTML Tags?" | ||
| metadesc: "Extract OTPs embedded in HTML emails by removing HTML tags using an addon, ensuring only the numeric OTP is captured for test execution." | ||
| order: 24.43 | ||
| page_id: "how-do-i-retrieve-the-otp-when-its-embedded-within-html-tags" | ||
| warning: false | ||
| contextual_links: | ||
| - type: section | ||
| name: "Contents" | ||
| - type: link | ||
| name: "Prerequisites" | ||
| url: "#prerequisites" | ||
| - type: link | ||
| name: "Steps to Install the Addon" | ||
| url: "#steps-to-install-the-addon" | ||
| - type: link | ||
| name: "Steps to Remove the HTML tag symbols from the OTP" | ||
| url: "#steps-to-remove-the-html-tag-symbols-from-the-otp" | ||
| --- | ||
|
|
||
| --- | ||
|
|
||
| When an OTP is embedded within HTML tags in an email, extracting it using a regex pattern also captures the surrounding HTML symbols. To use the OTP in test execution, an addon is used to remove these extra characters and extract only the numeric value. | ||
|
|
||
| This article discusses how to remove the HTML tag symbols from the OTP. | ||
|
|
||
| --- | ||
|
|
||
| > ## **Prerequisites** | ||
| > | ||
| > Before you begin, ensure that you have referred to the [documentation on MailboxFunctions Function Type](https://testsigma.com/docs/test-data/data-generators/mailboxfunctions-function-type/). | ||
|
|
||
| --- | ||
|
|
||
| ## **Steps to Install the Addon** | ||
|
|
||
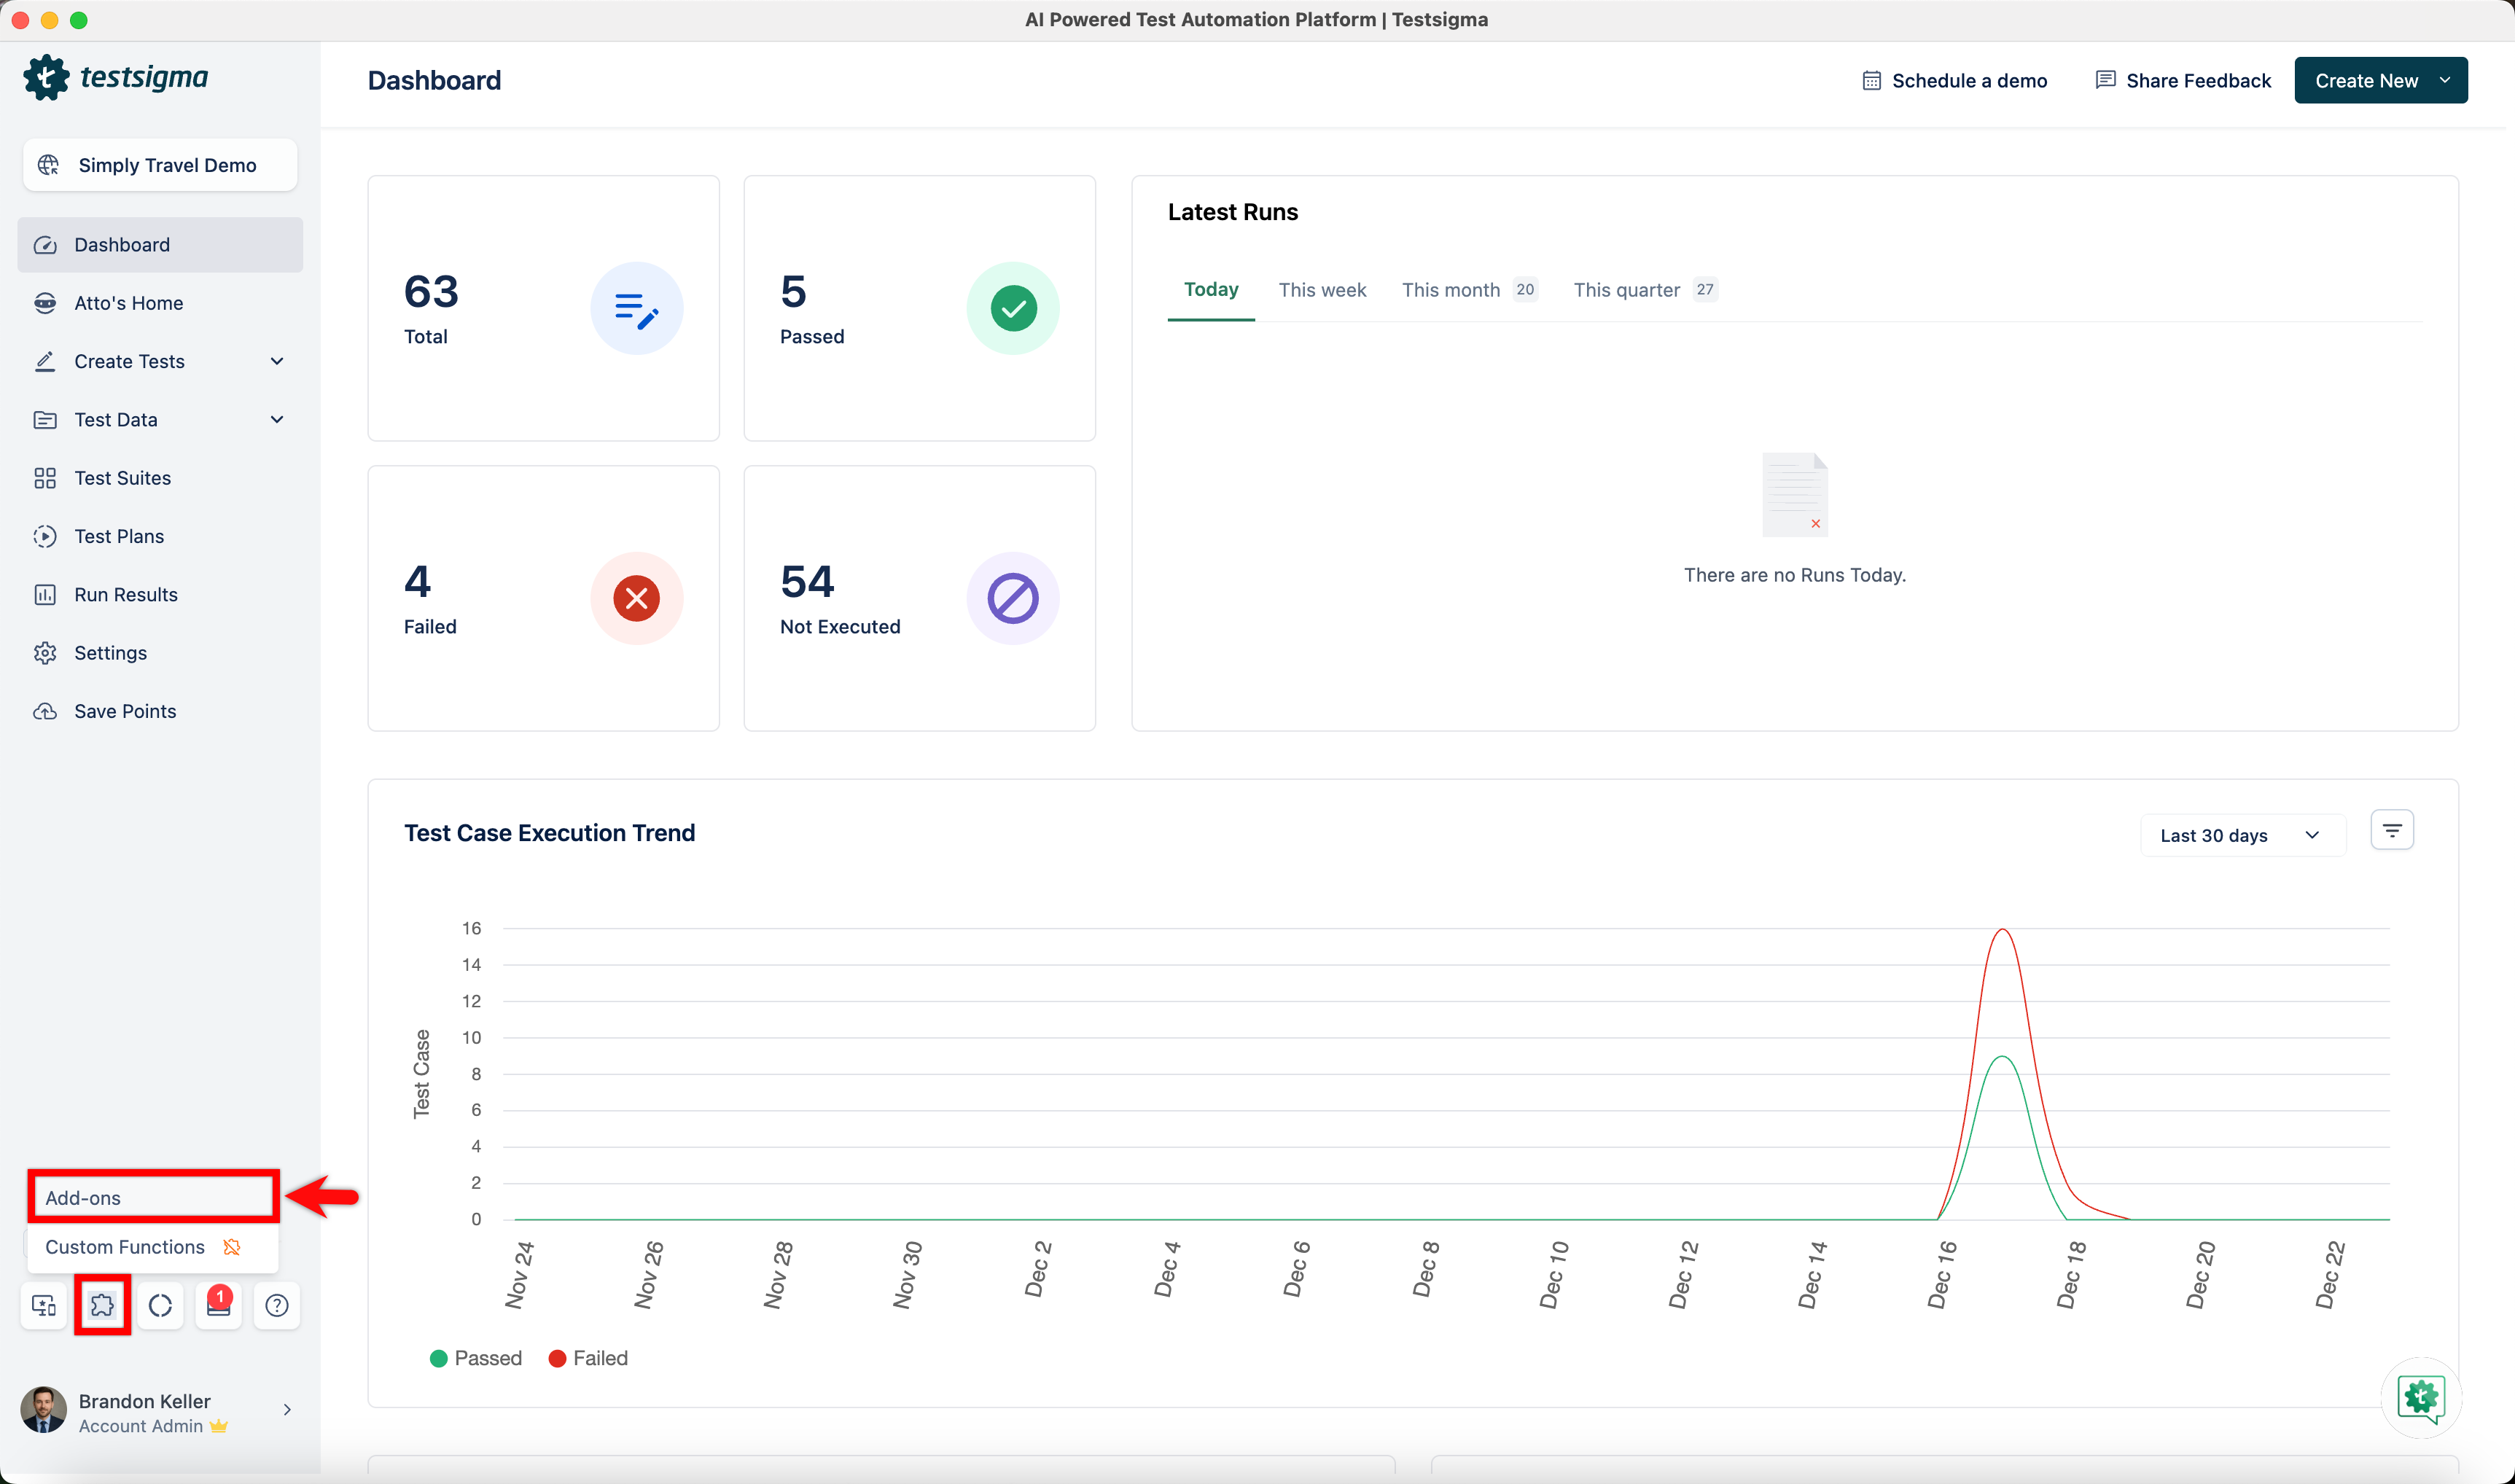
| 1. From the left navigation bar, go to **Addons** and click **Add-ons**. | ||
|  | ||
|
|
||
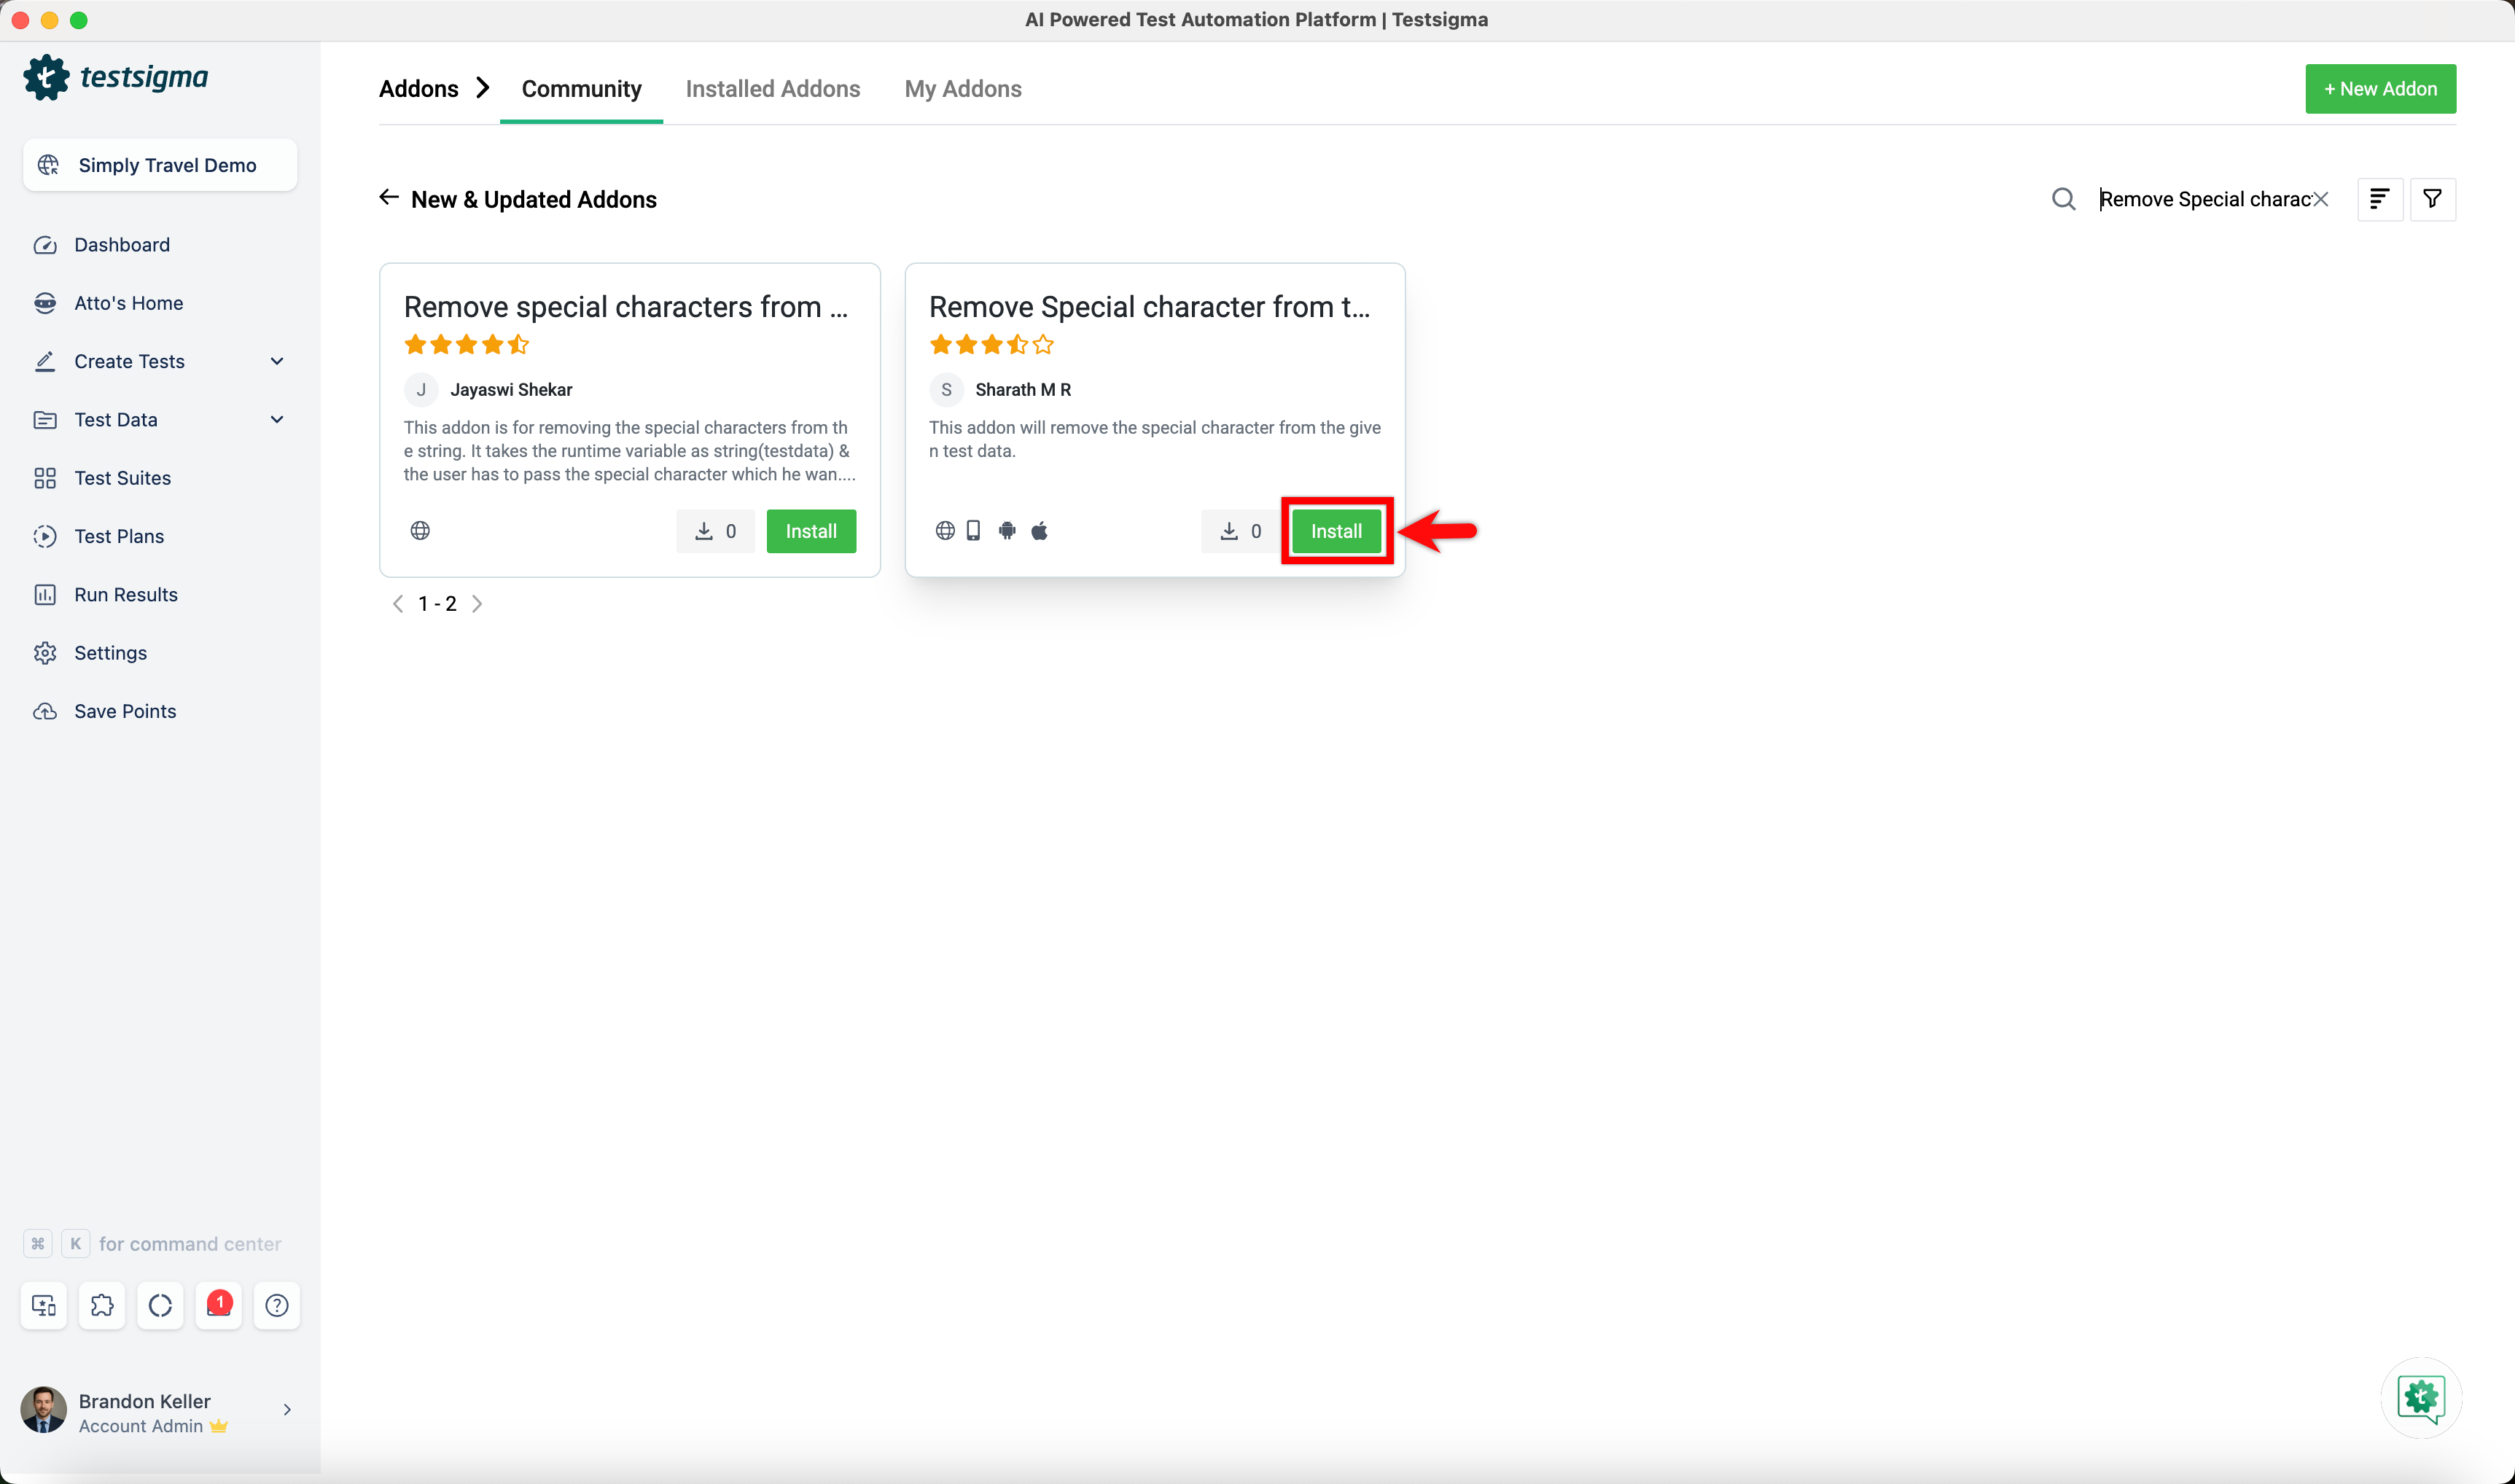
| 2. Under the **New & Updated Addons** section, search for the **Remove Special character from testdata** addon and click **Install**. | ||
|  | ||
|
|
||
| --- | ||
|
|
||
| ## **Steps to Remove the HTML tag symbols from the OTP** | ||
|
|
||
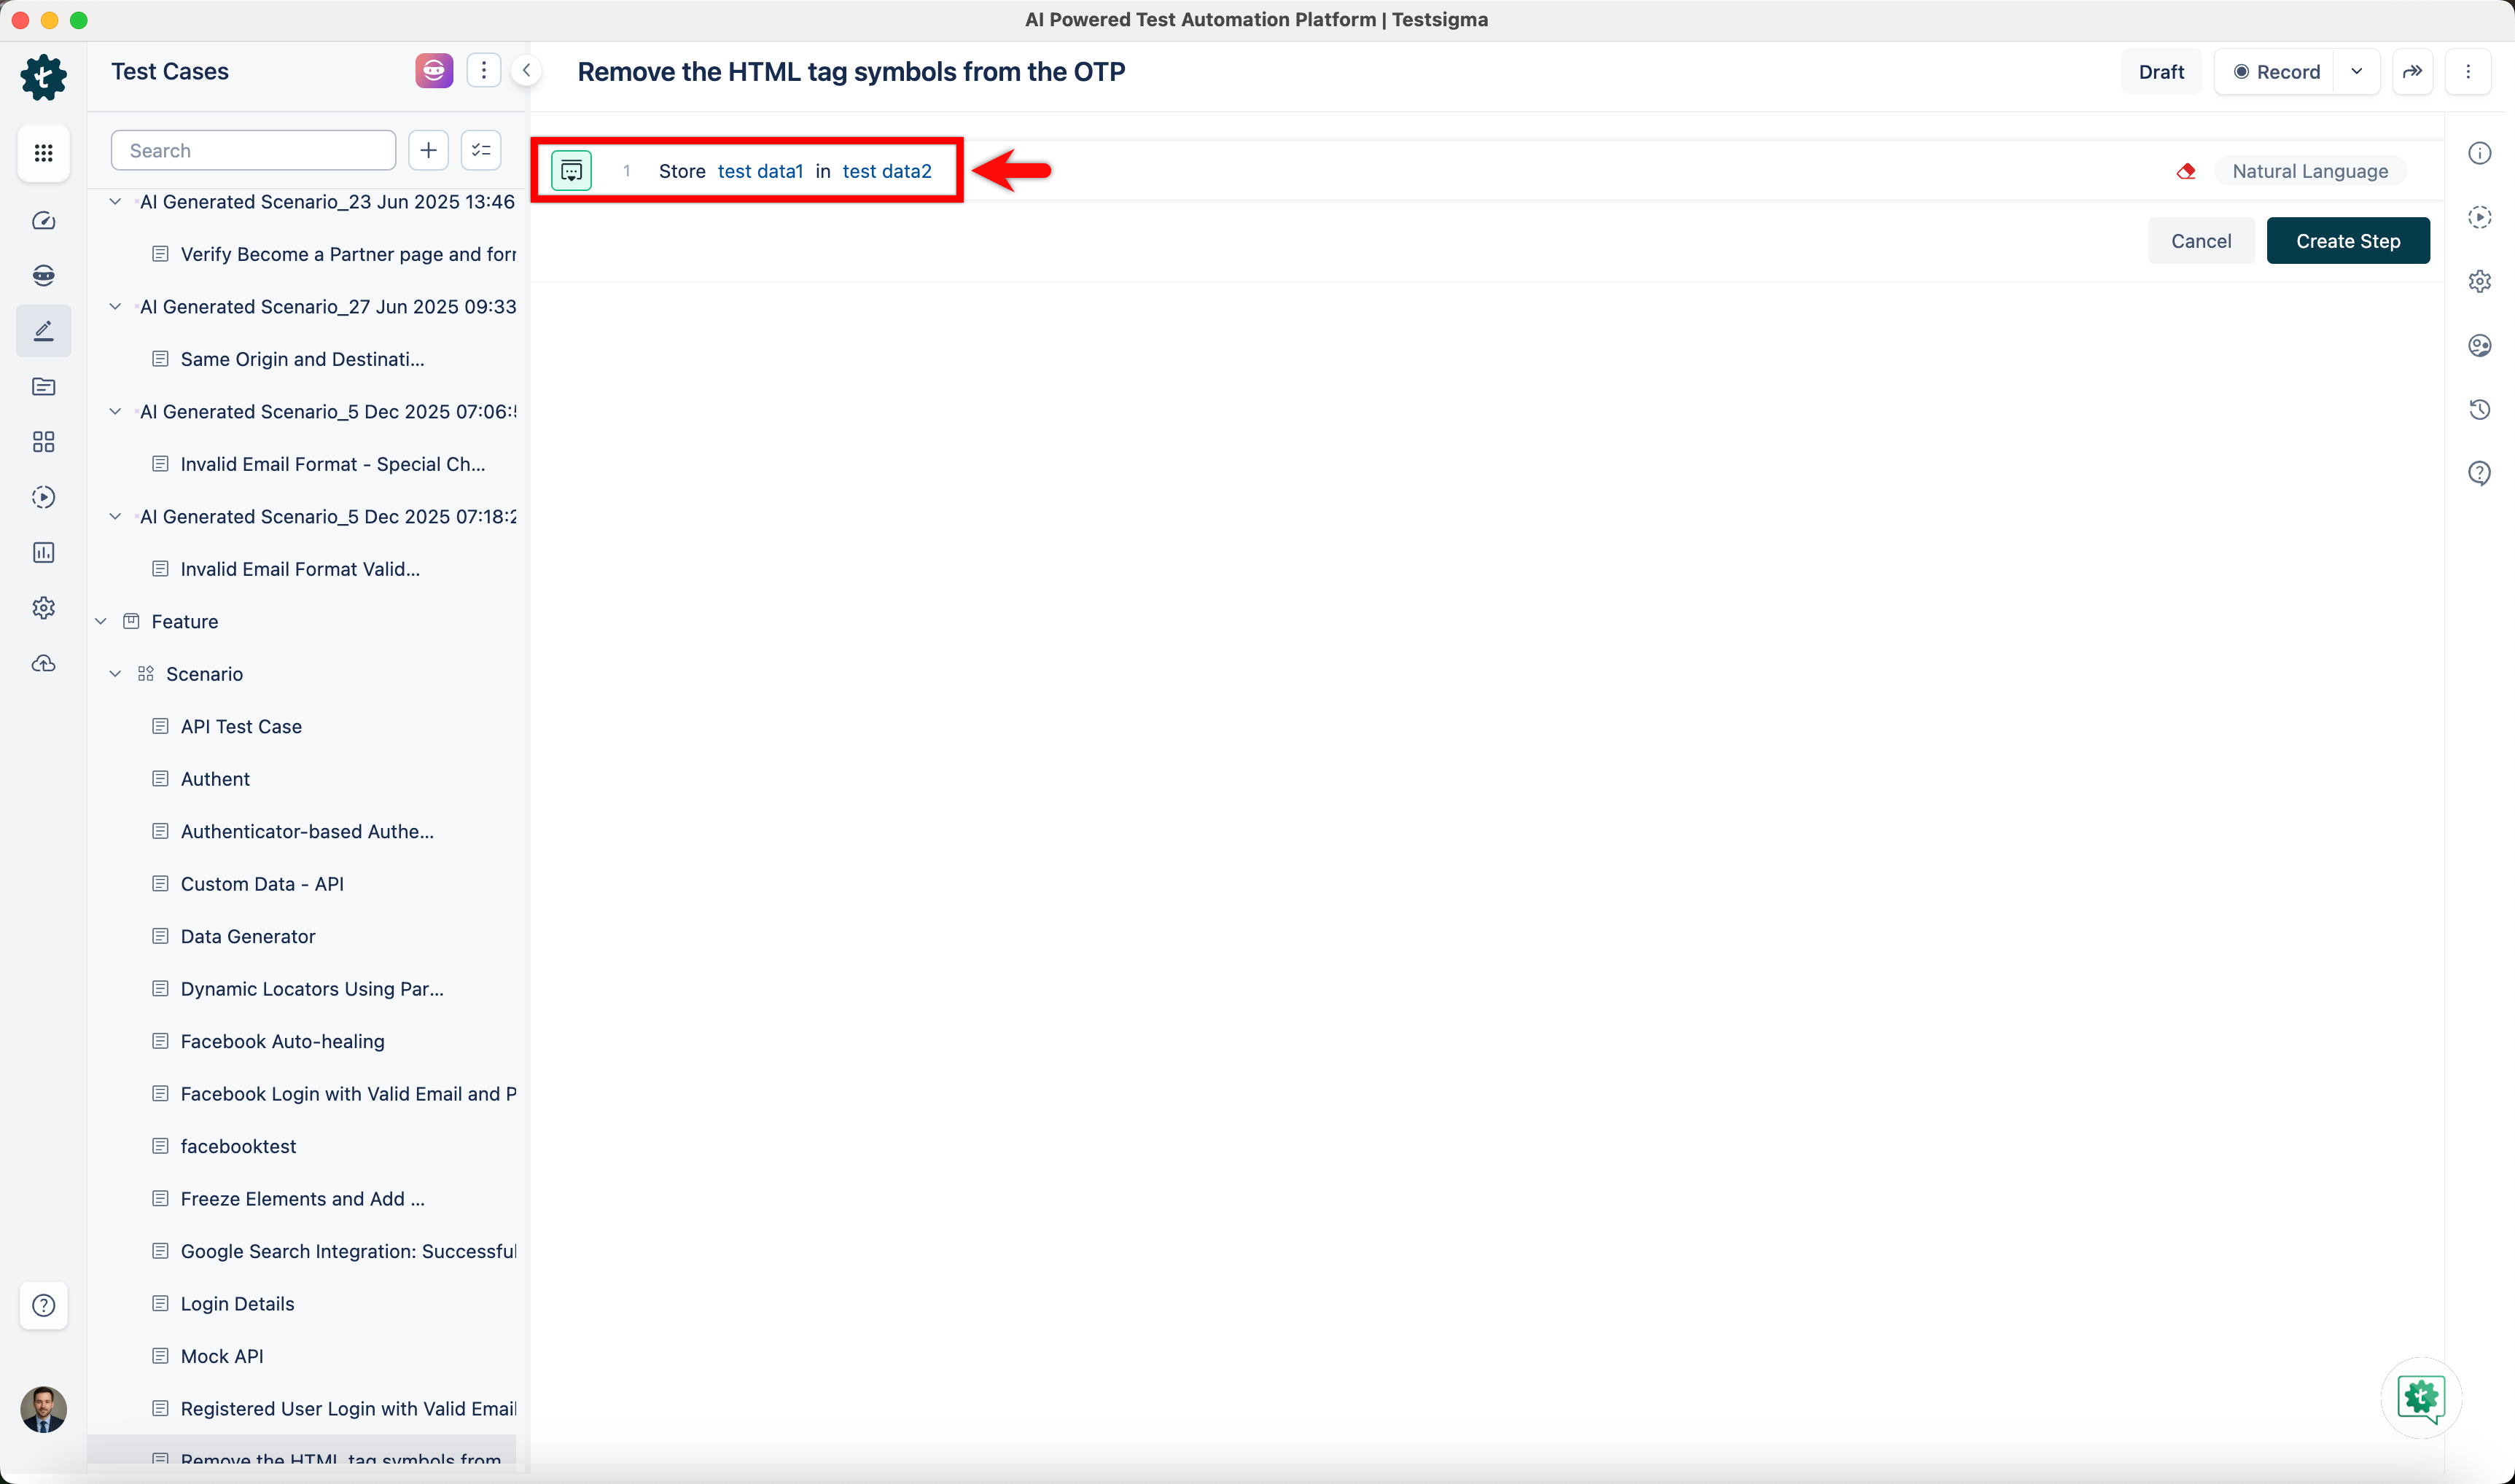
| 1. In your test case, first, use the **Store test data1 in test data2** NLP to store the extracted OTP in a runtime variable. | ||
|  | ||
|
|
||
| - Click the **test data1** placeholder and replace it by selecting **Data Generator** from the **Test Data Types** dropdown. 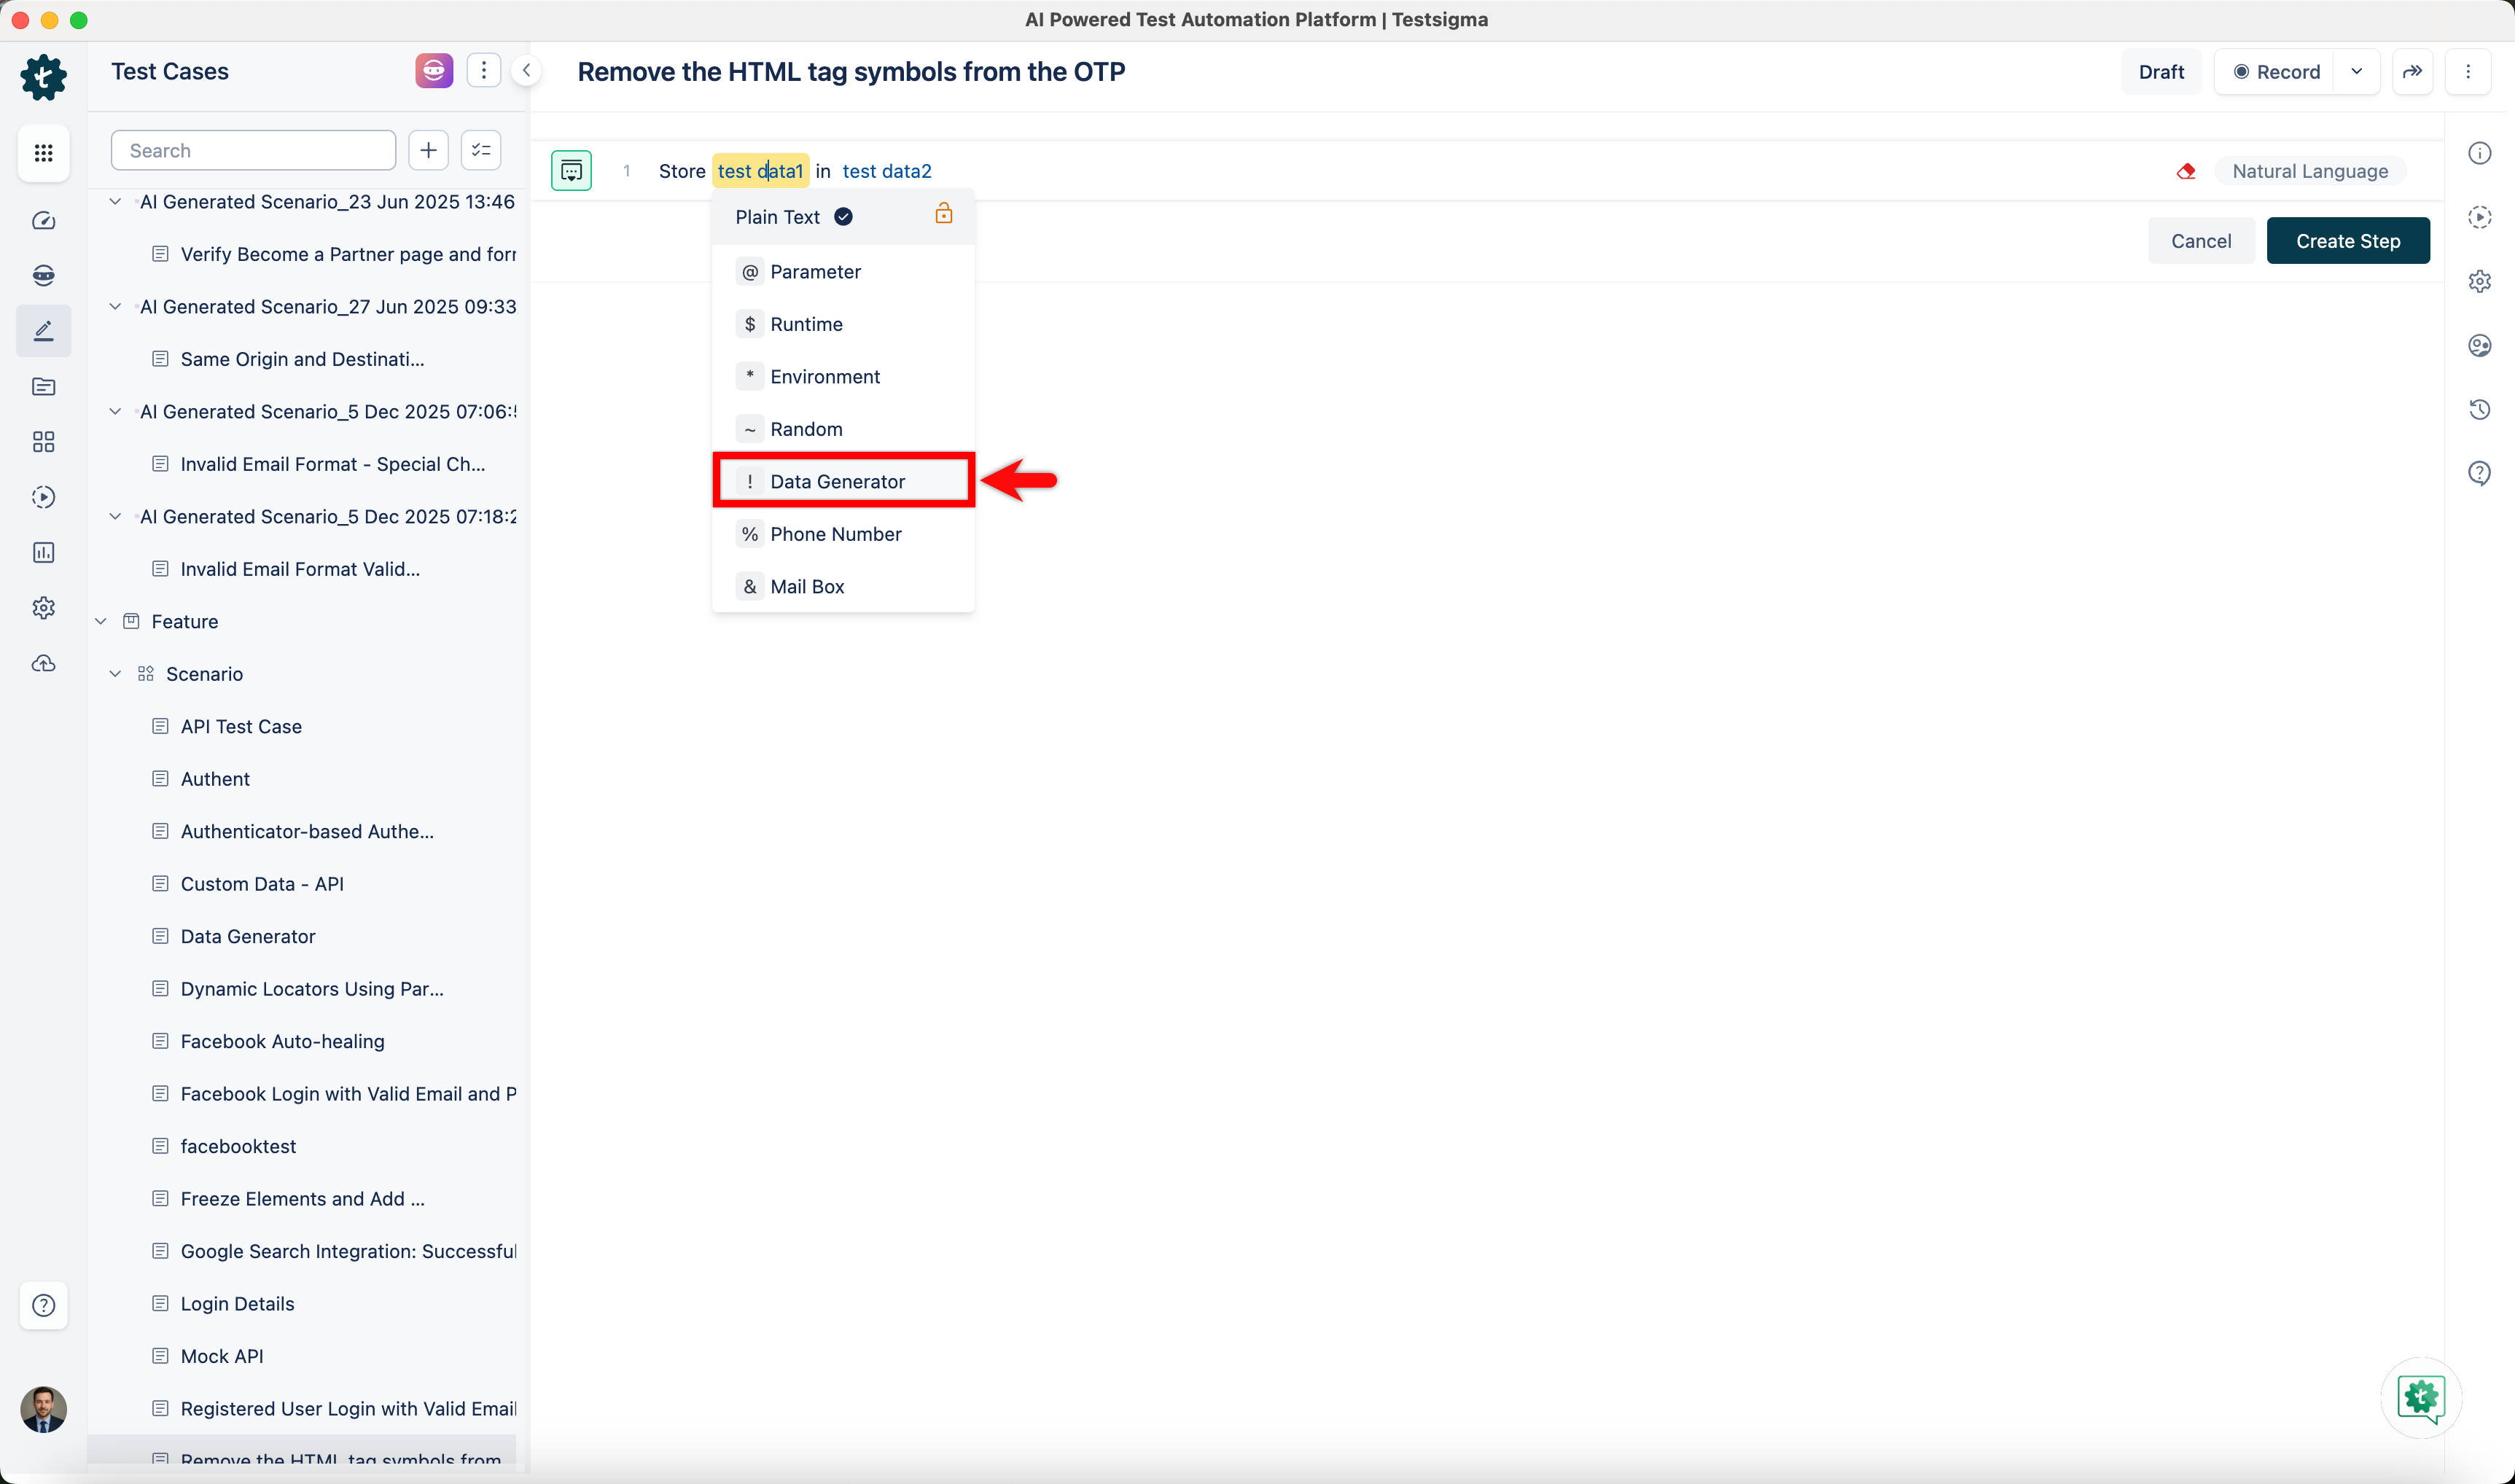 | ||
| - In the **Data Generator** overlay, configure the **Get Email OTP** function by selecting **Default** as the type, **MailBoxFunctions** as the function type, entering the regex pattern (for example, **>\d{6}<**), choosing the mailbox, setting the timeout, and clicking **Save**.  | ||
| - Enter a variable name in the **test data2** placeholder. 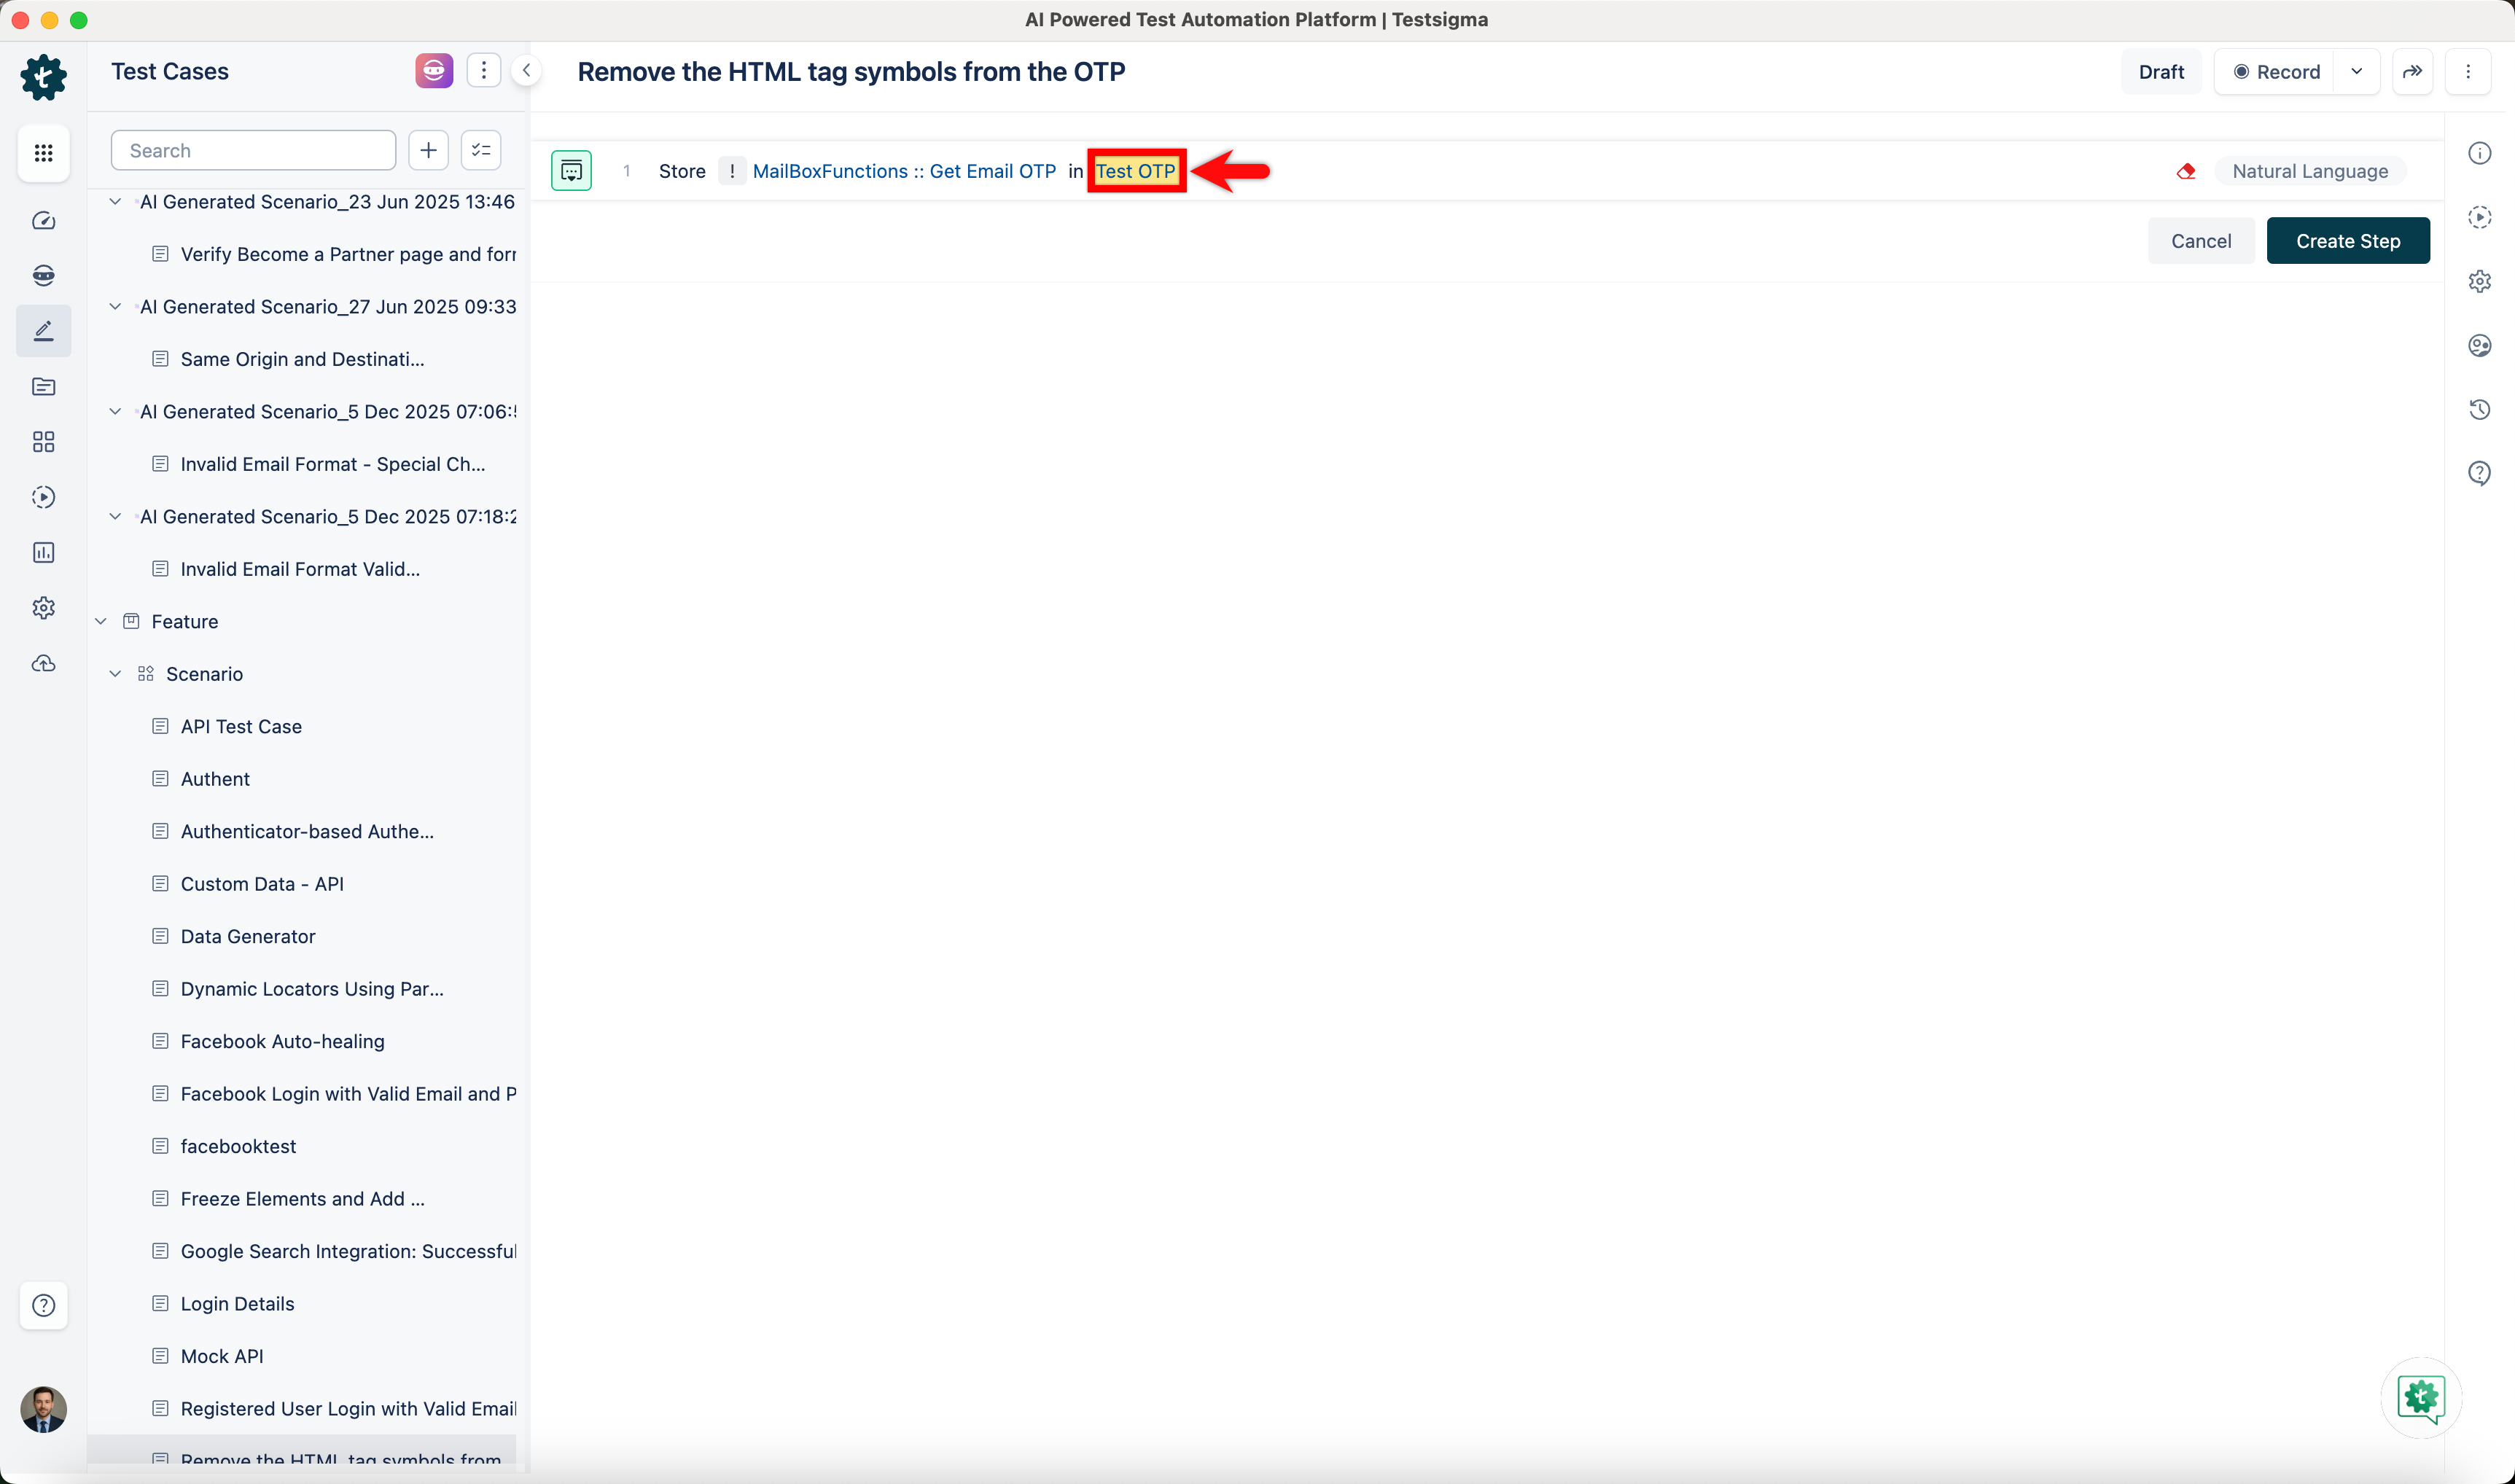 | ||
| - Click **Create Step**. 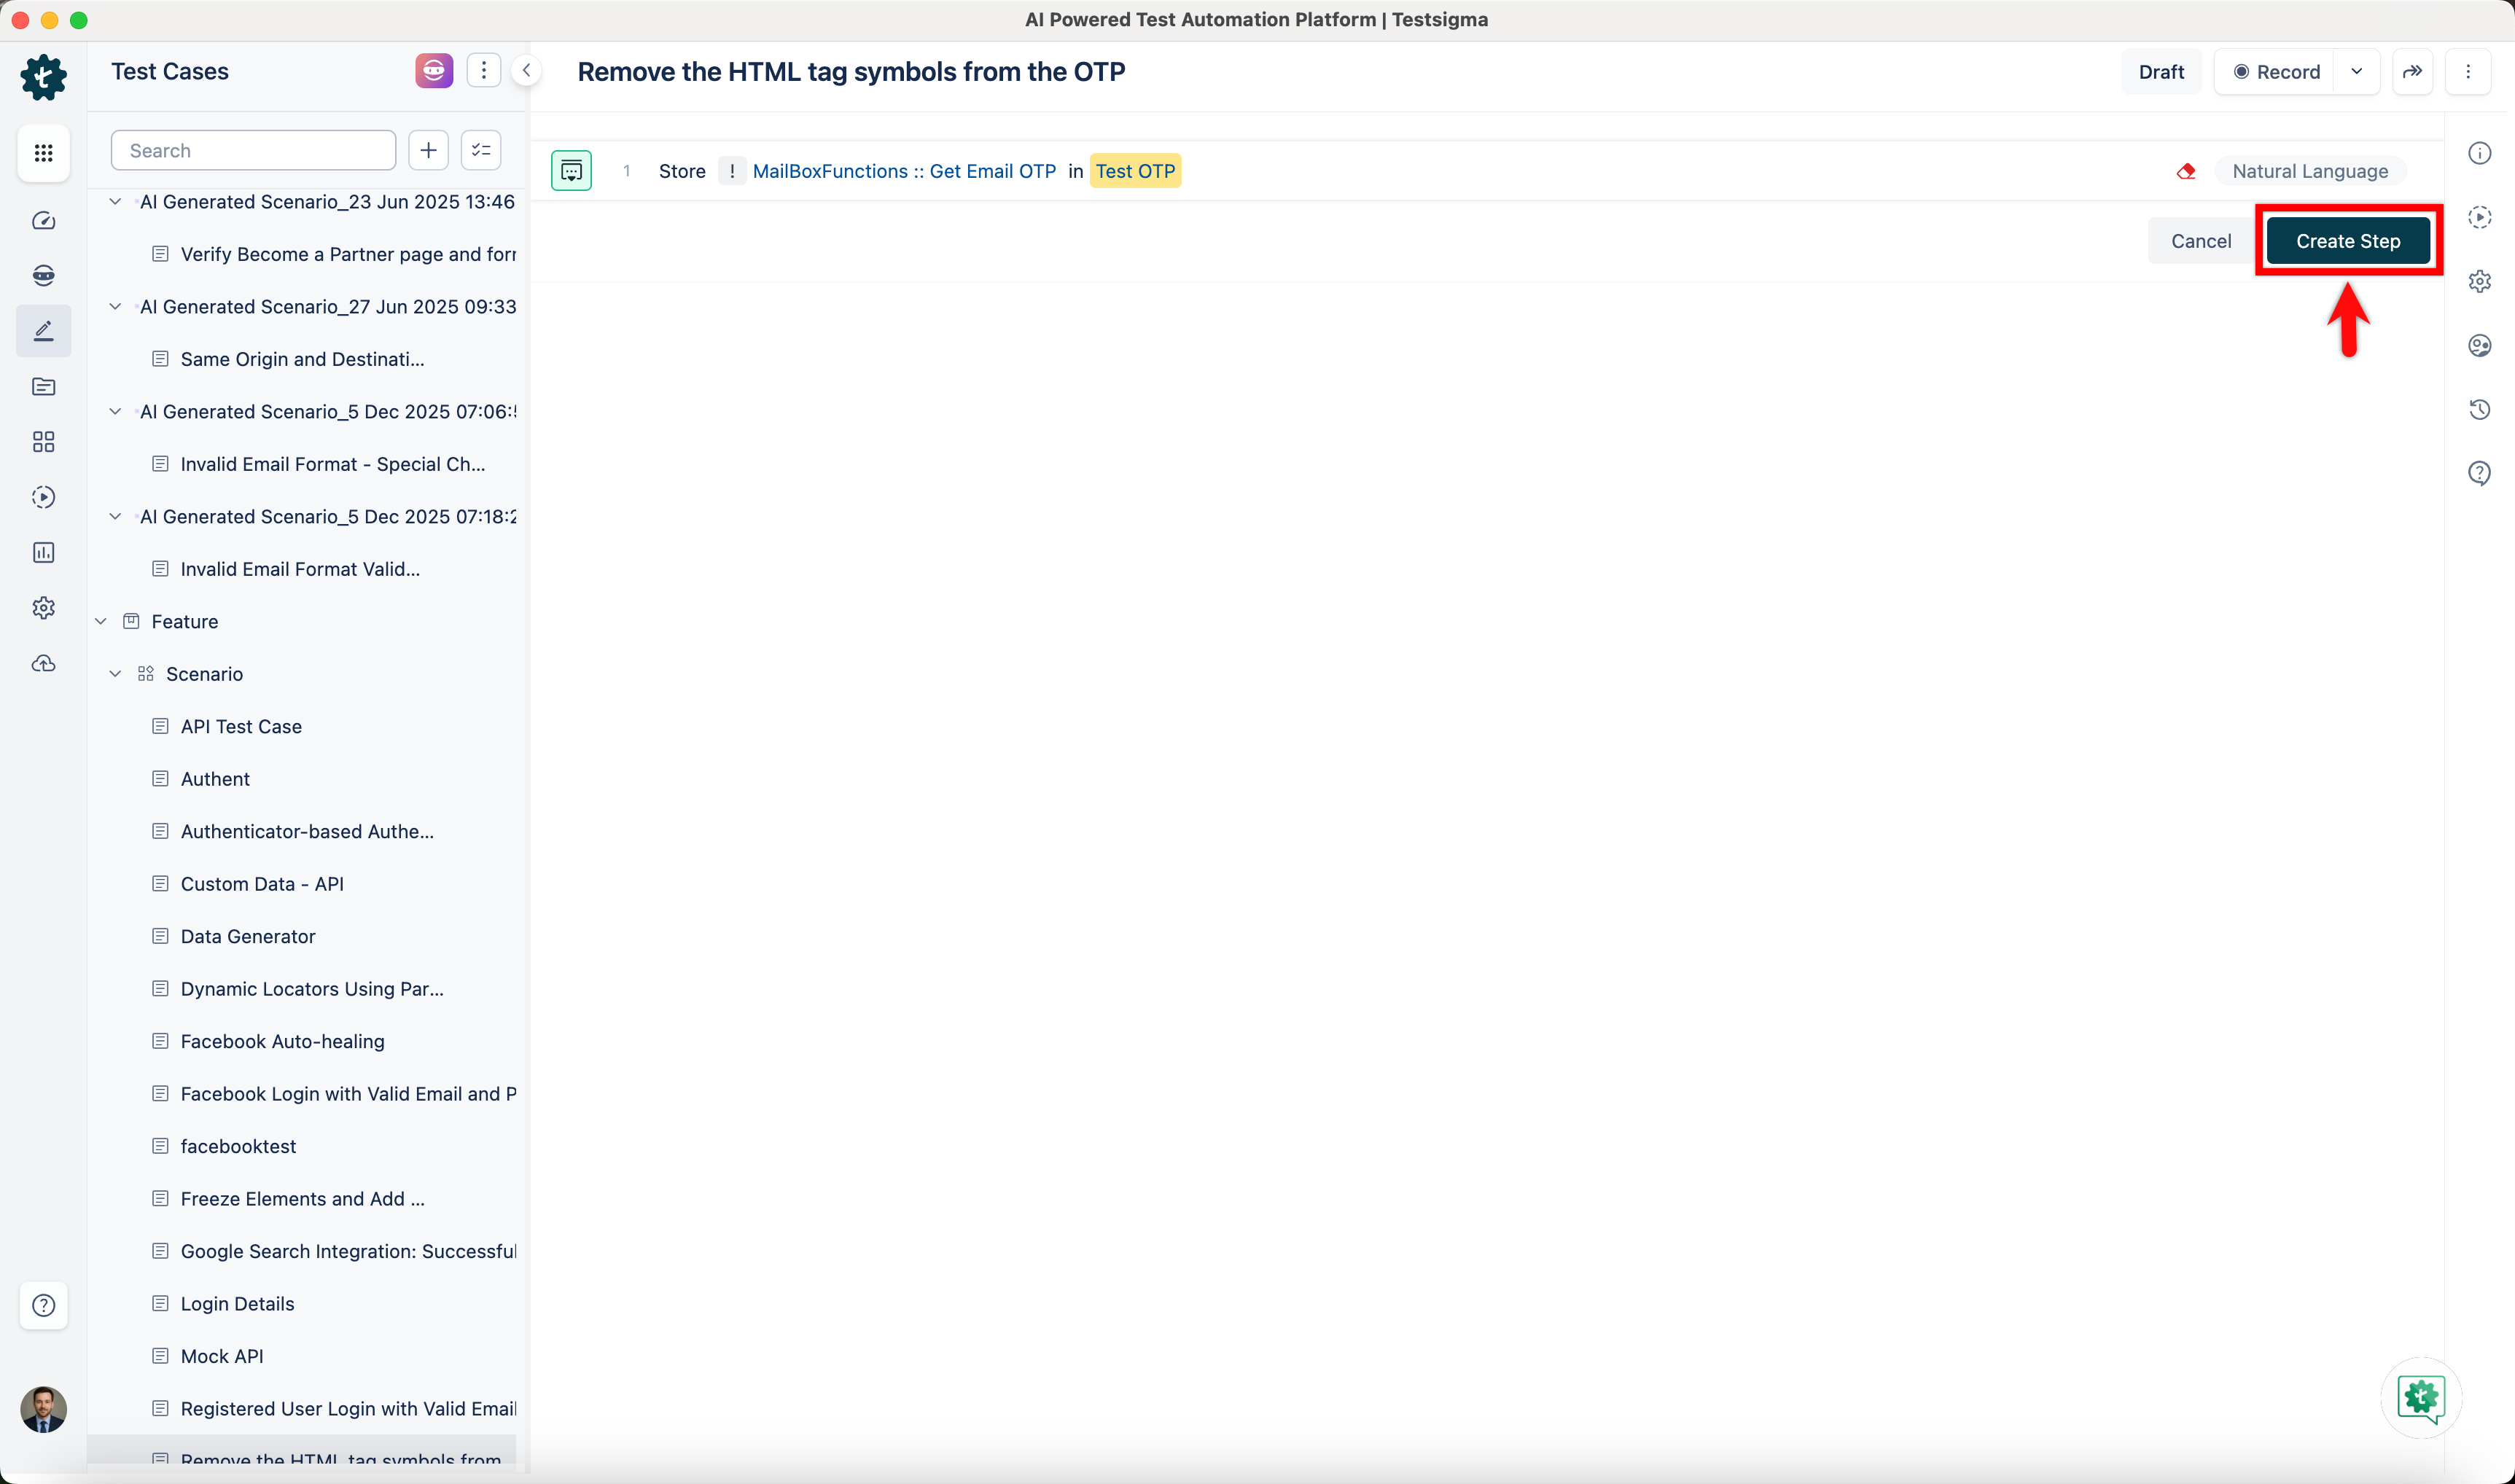 | ||
|
|
||
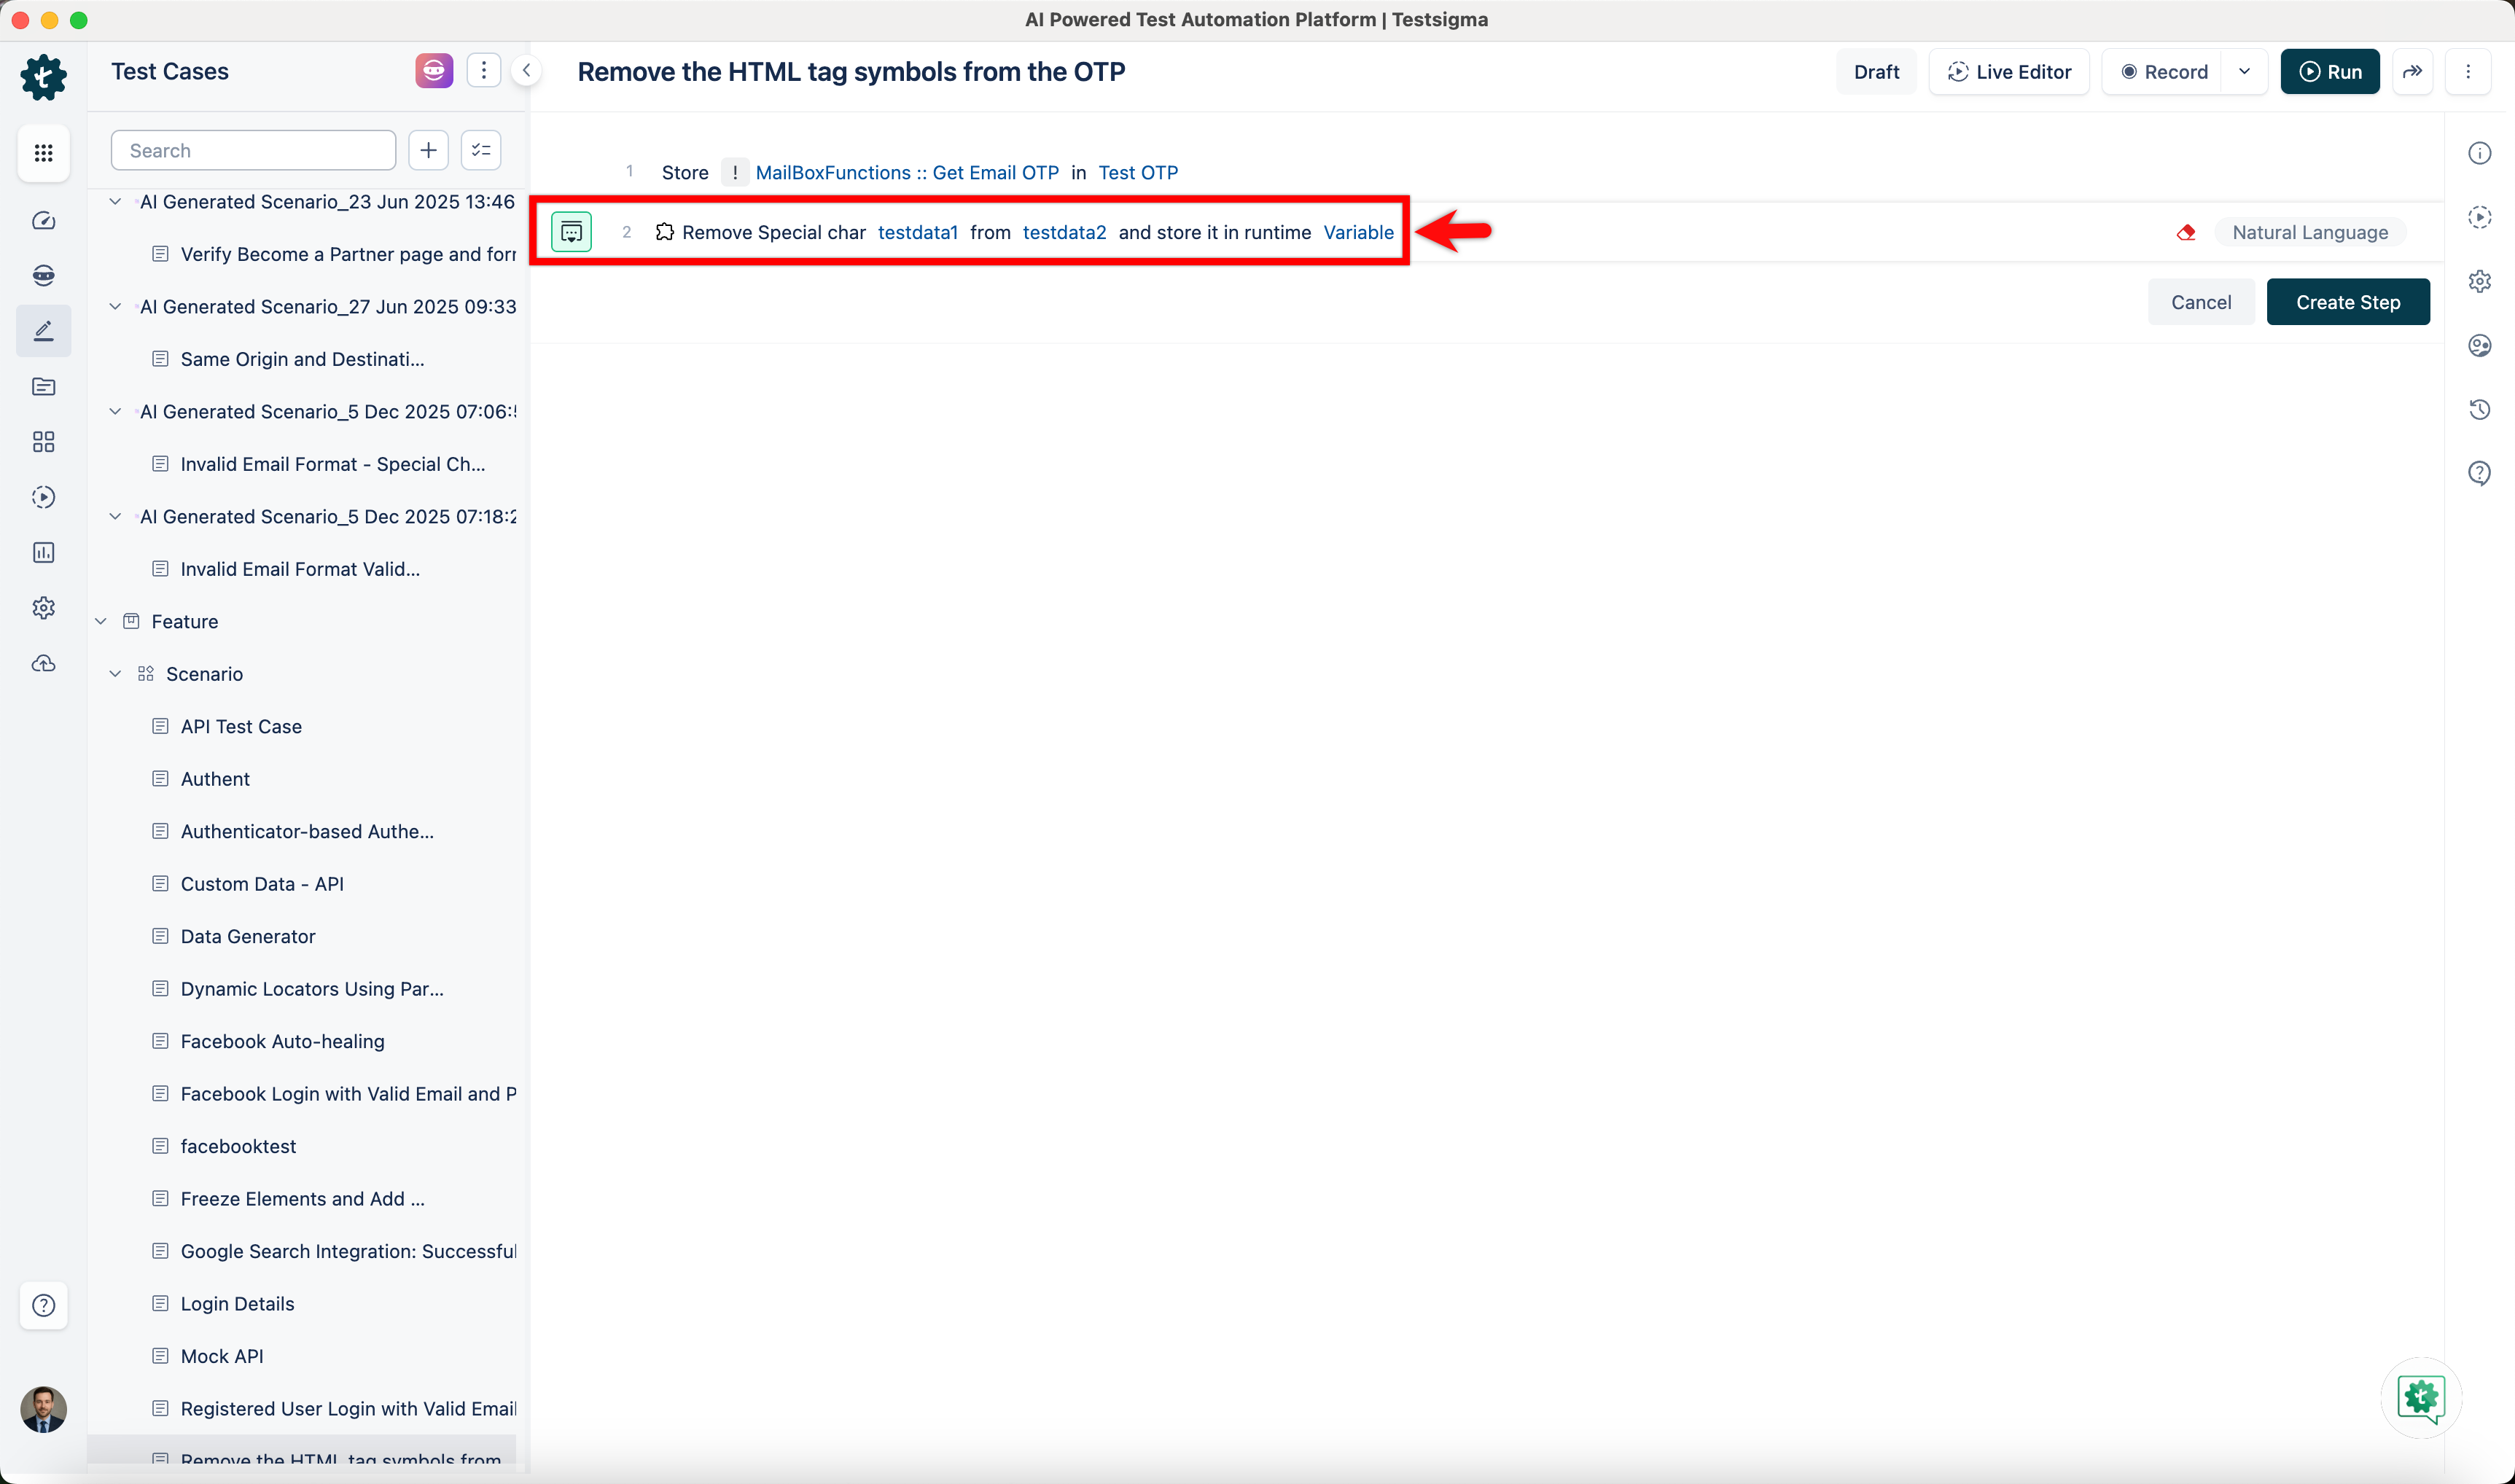
| 2. Secondly, use the **Remove Special char testdata1 from testdata2 and store it in runtime variable** NLP to remove the special character from the OTP. | ||
|  | ||
|
|
||
| - Click the **testdata1** placeholder and enter ><. 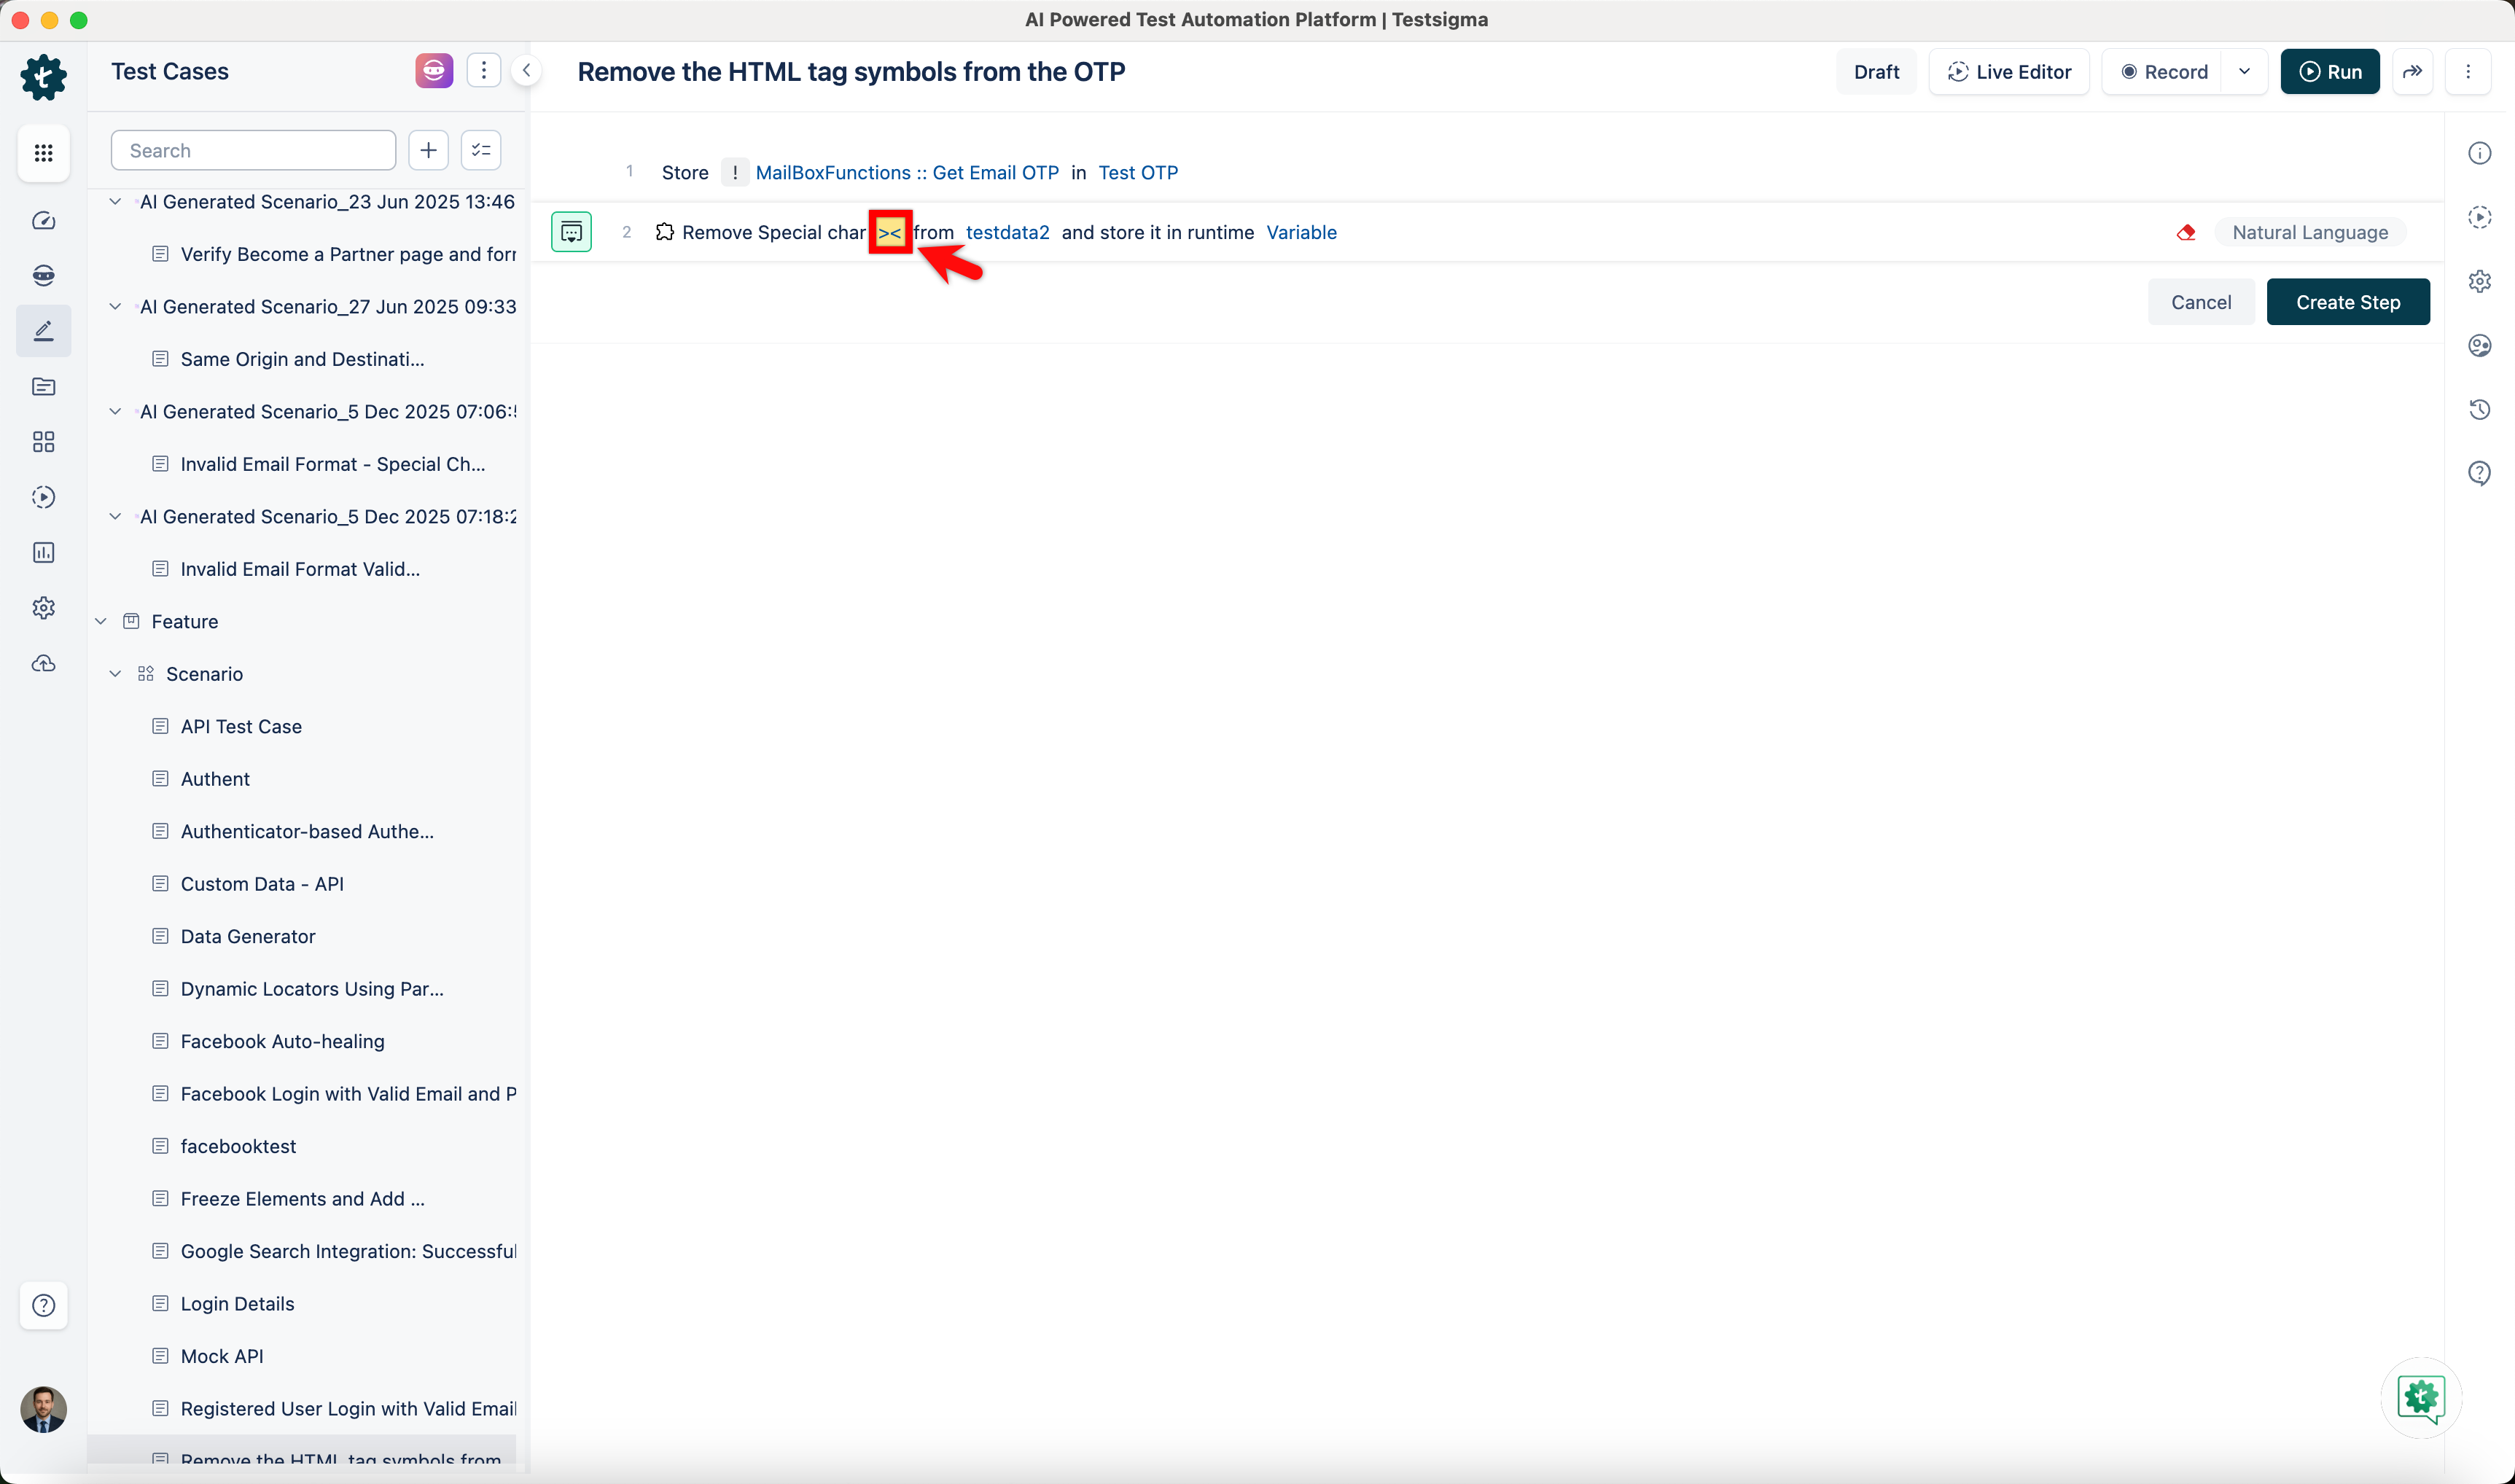 | ||
| - Click the **testdata2** placeholder and replace it by selecting **Runtime** from the **Test Data Types** dropdown. 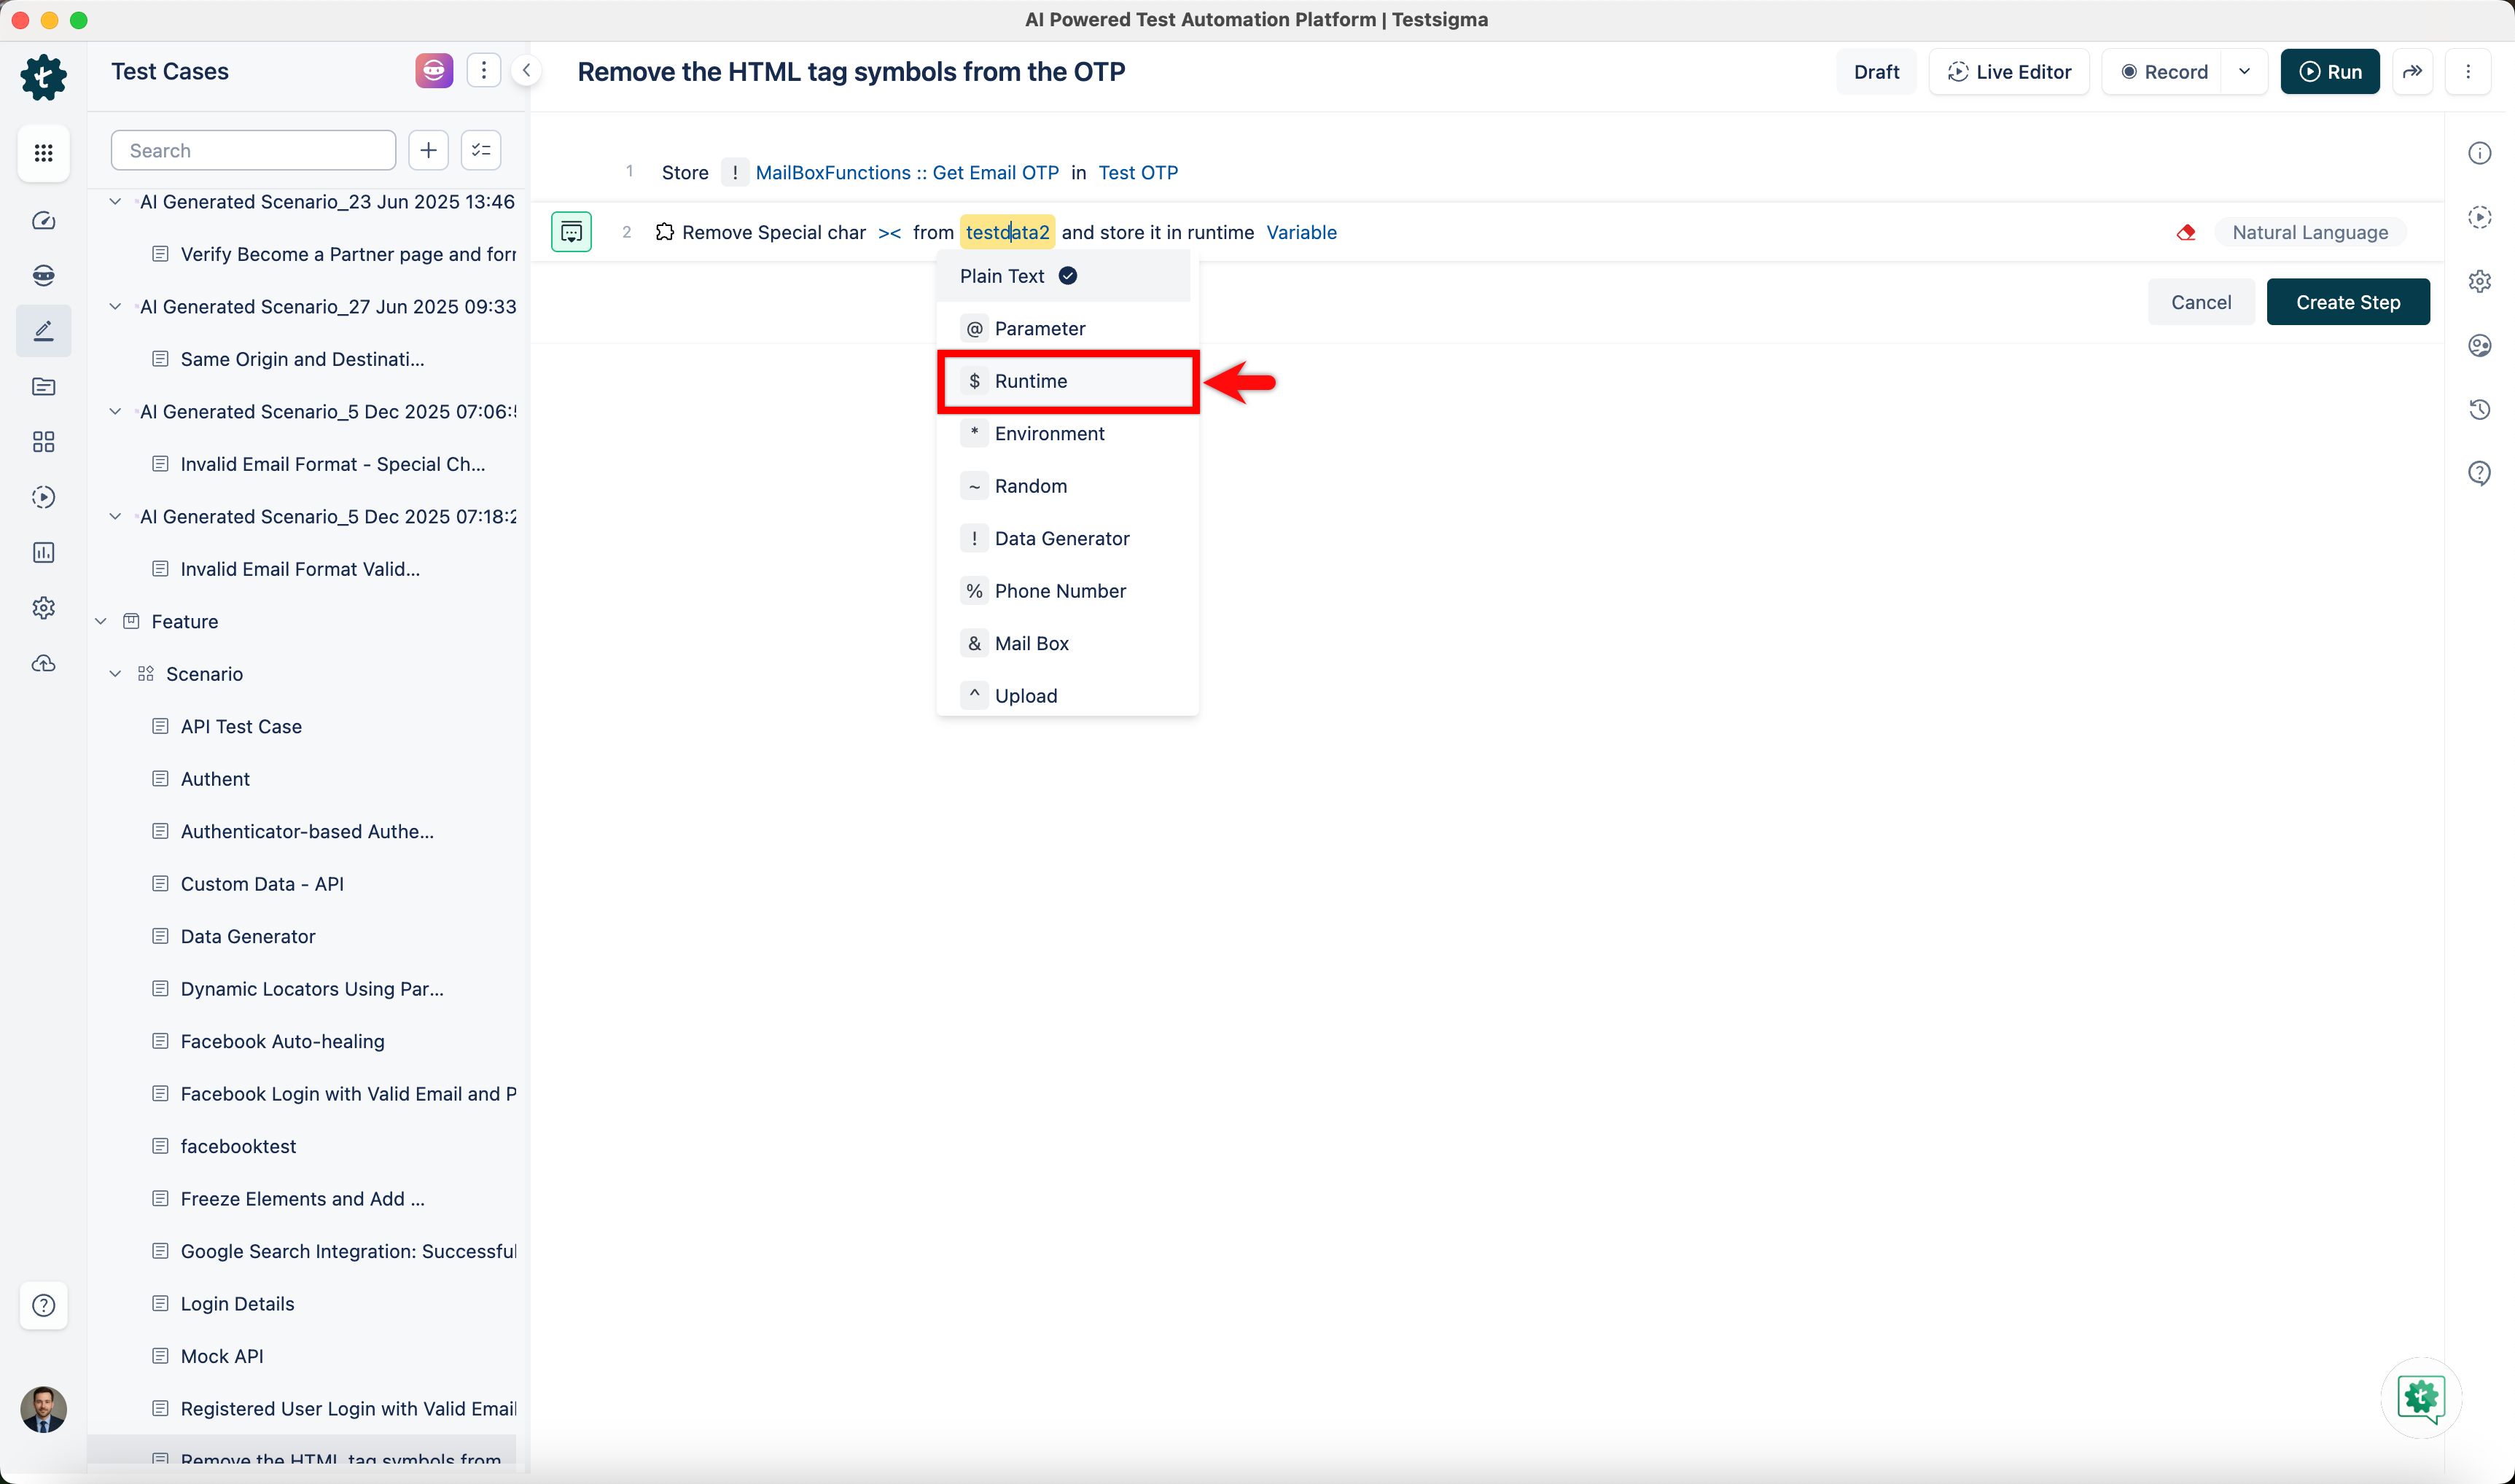 | ||
| - In the **Runtime Variable** overlay, select the runtime variable you created in the previous step. 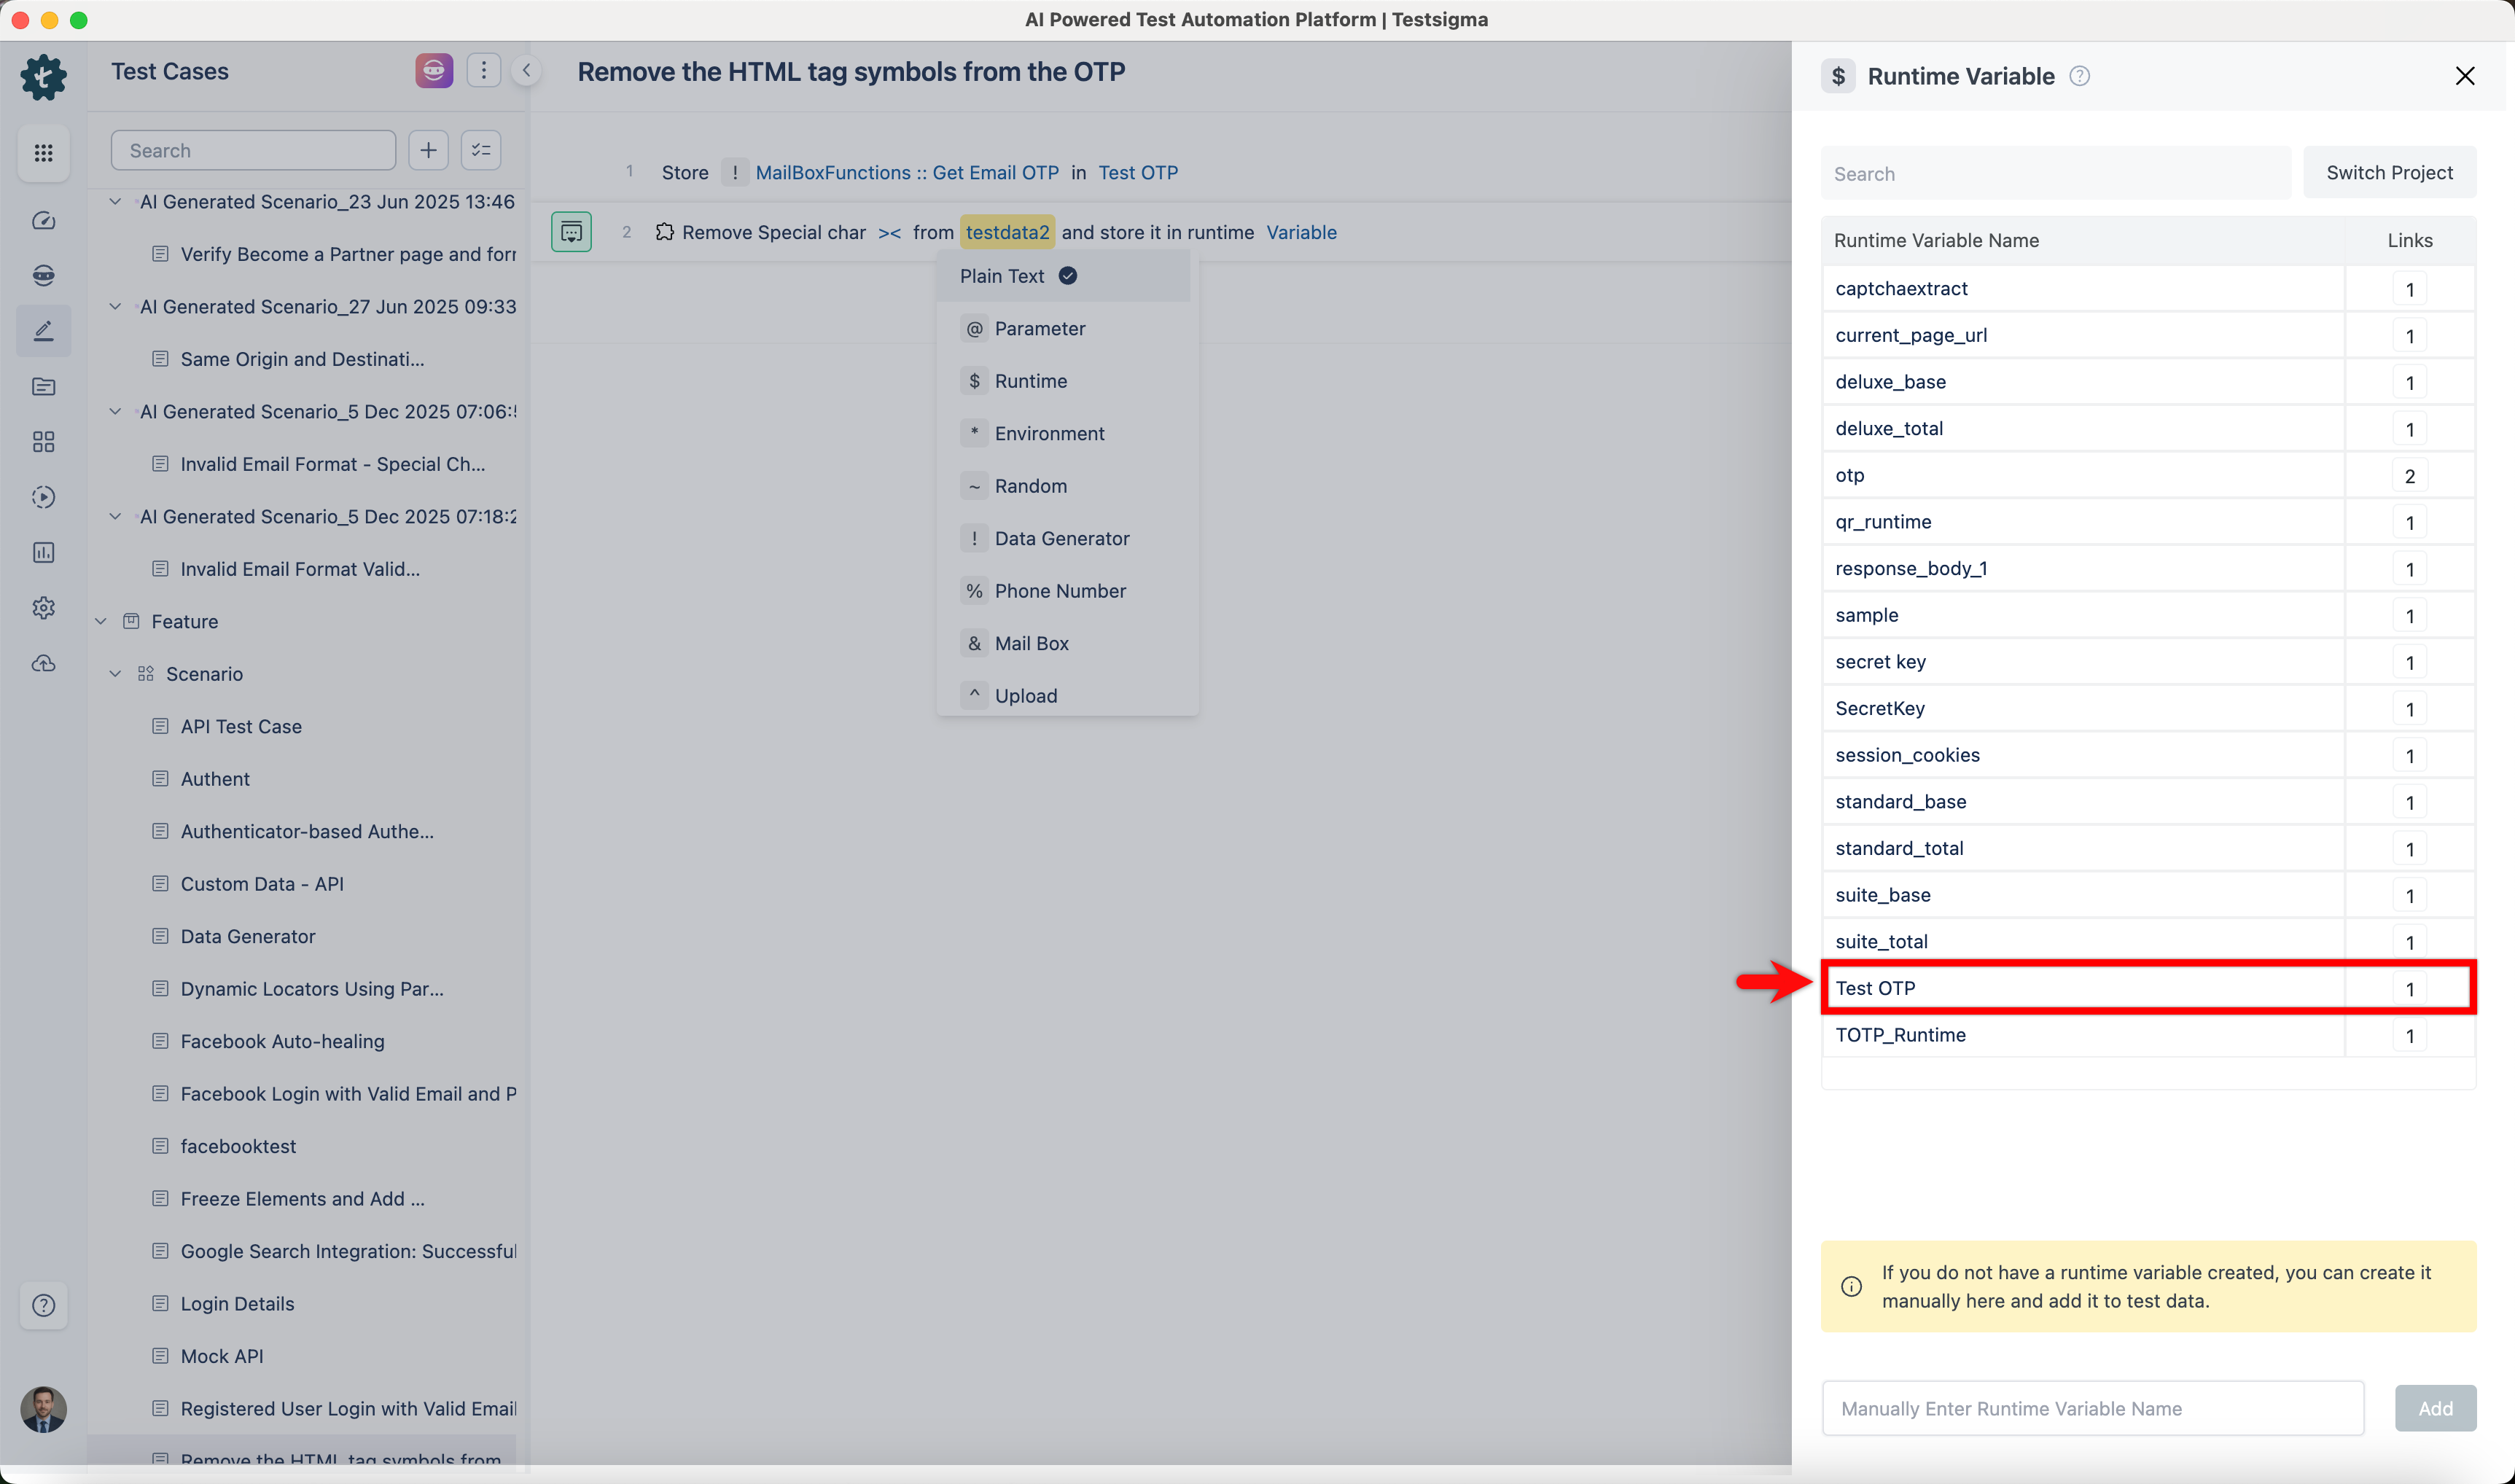 | ||
| - Enter a variable name in the **variable** placeholder. 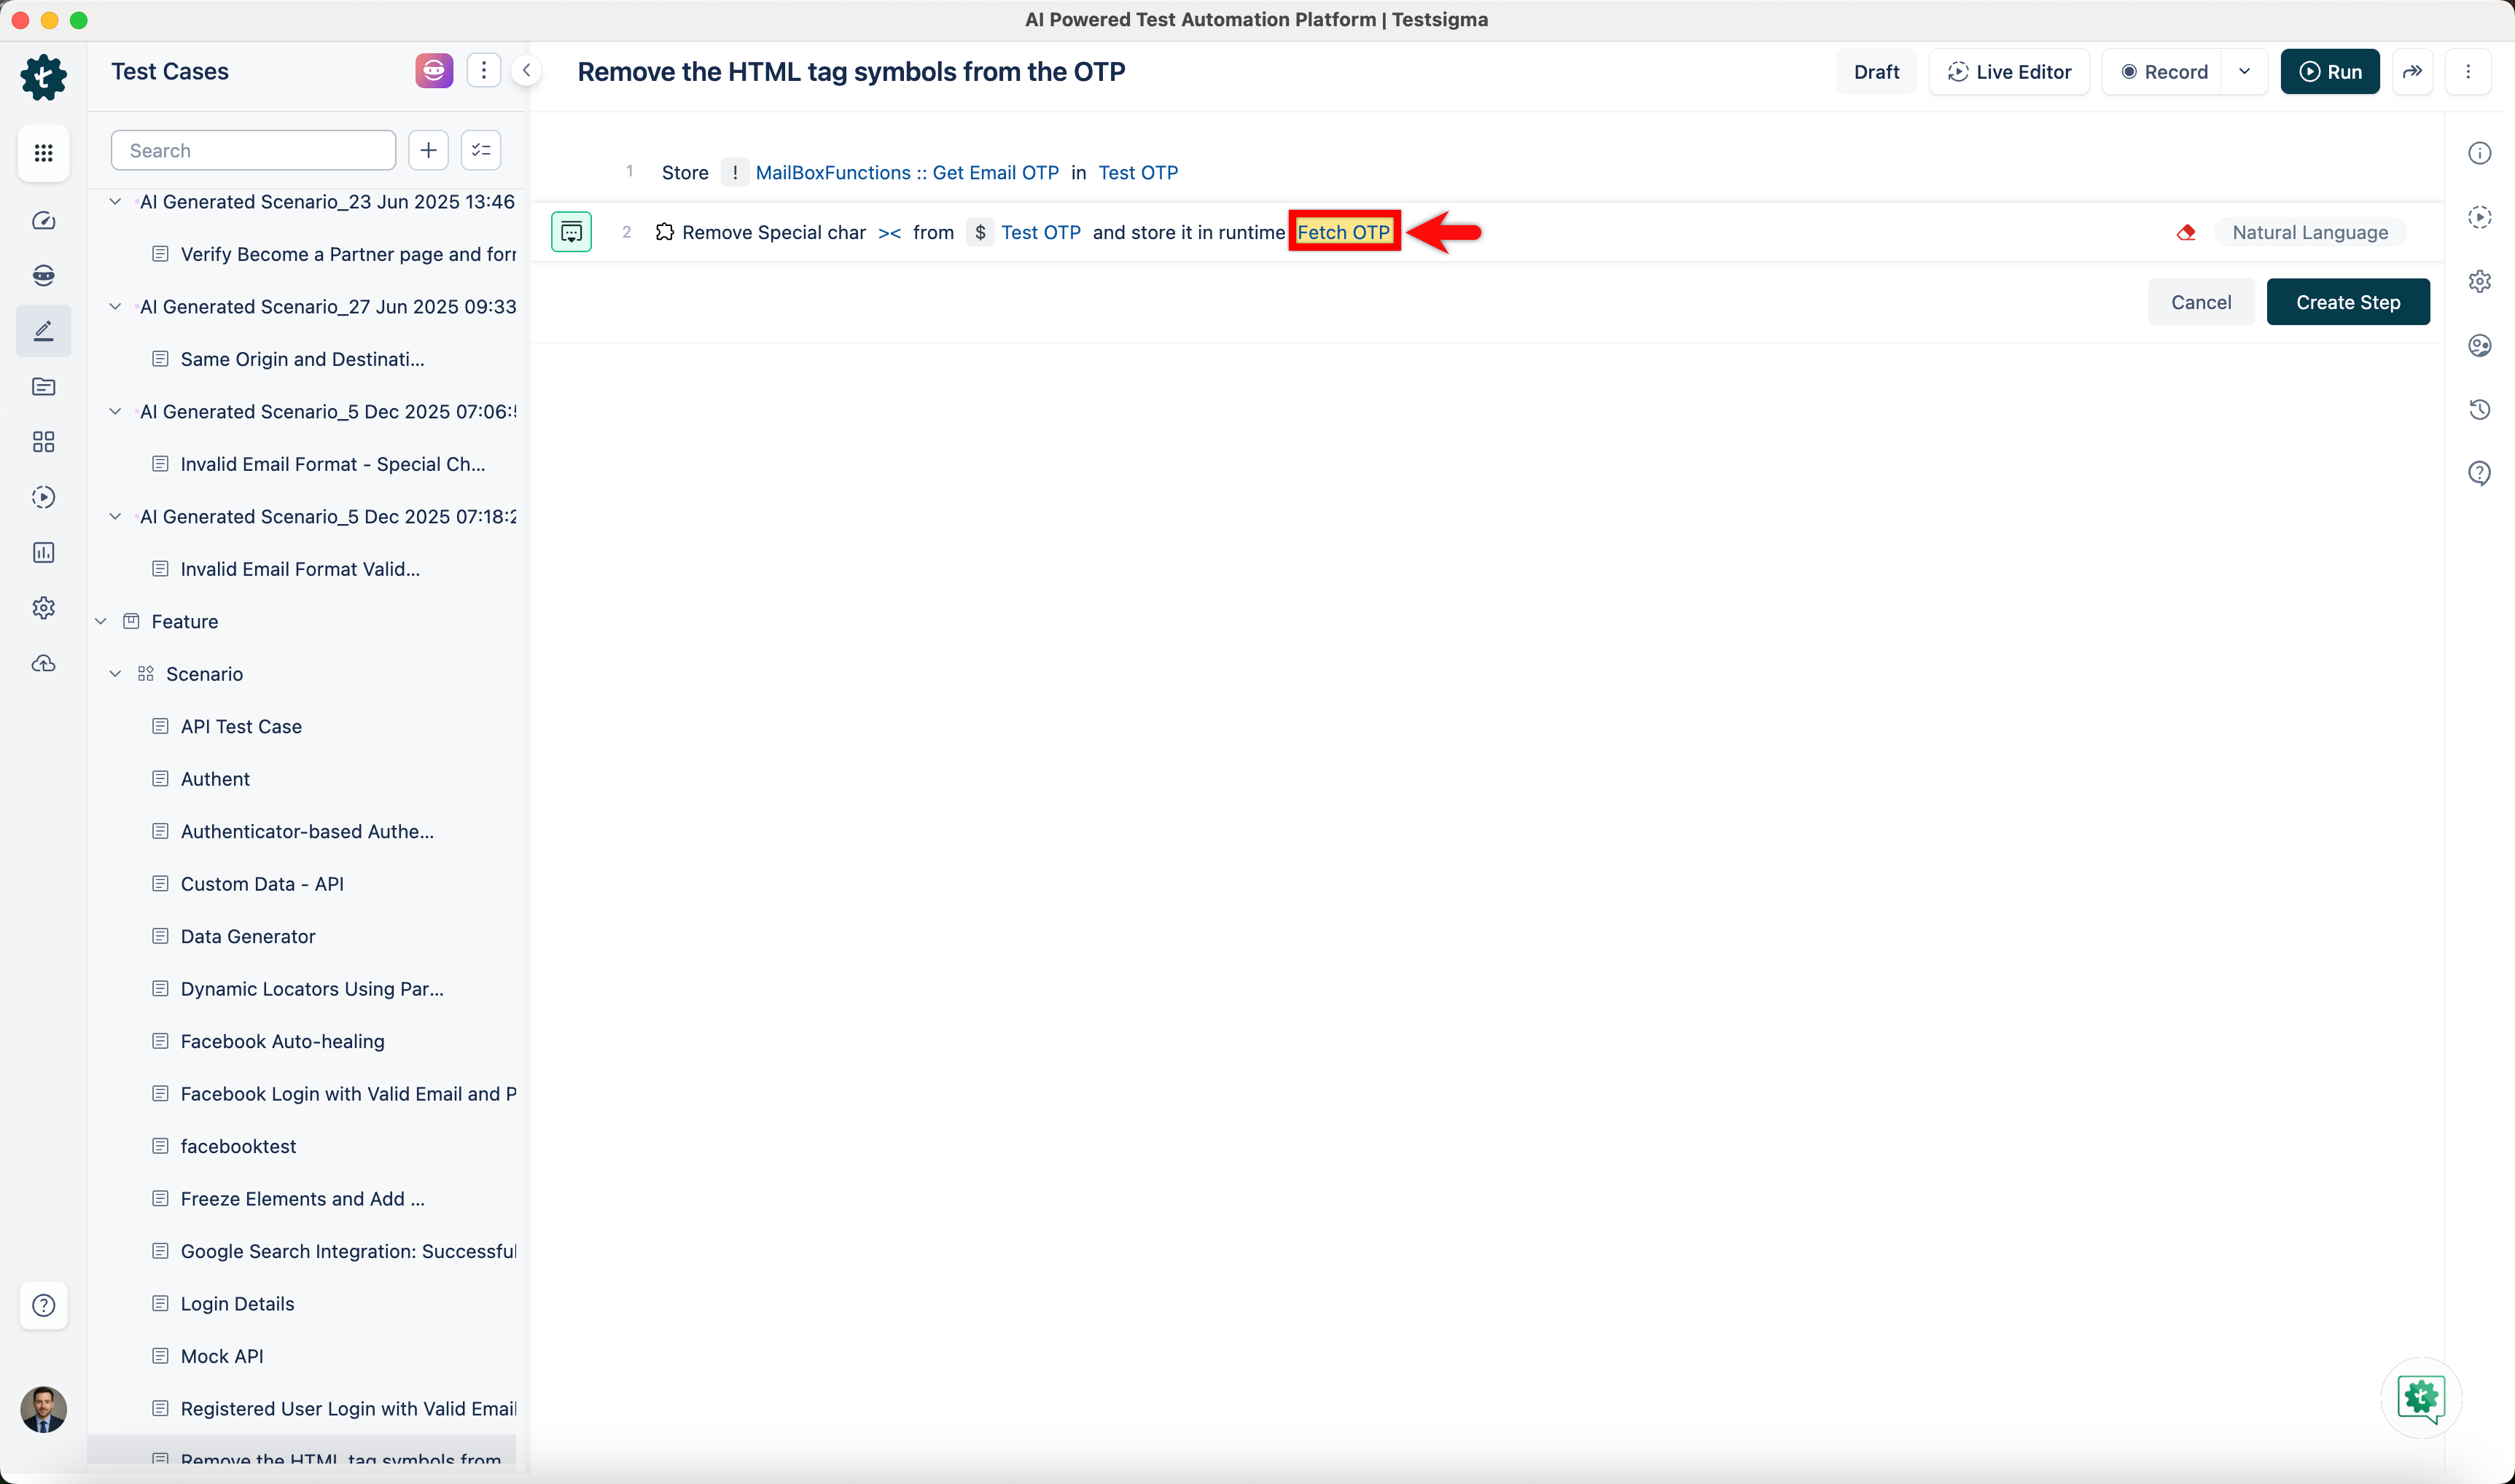 | ||
| - Click **Create Step**. 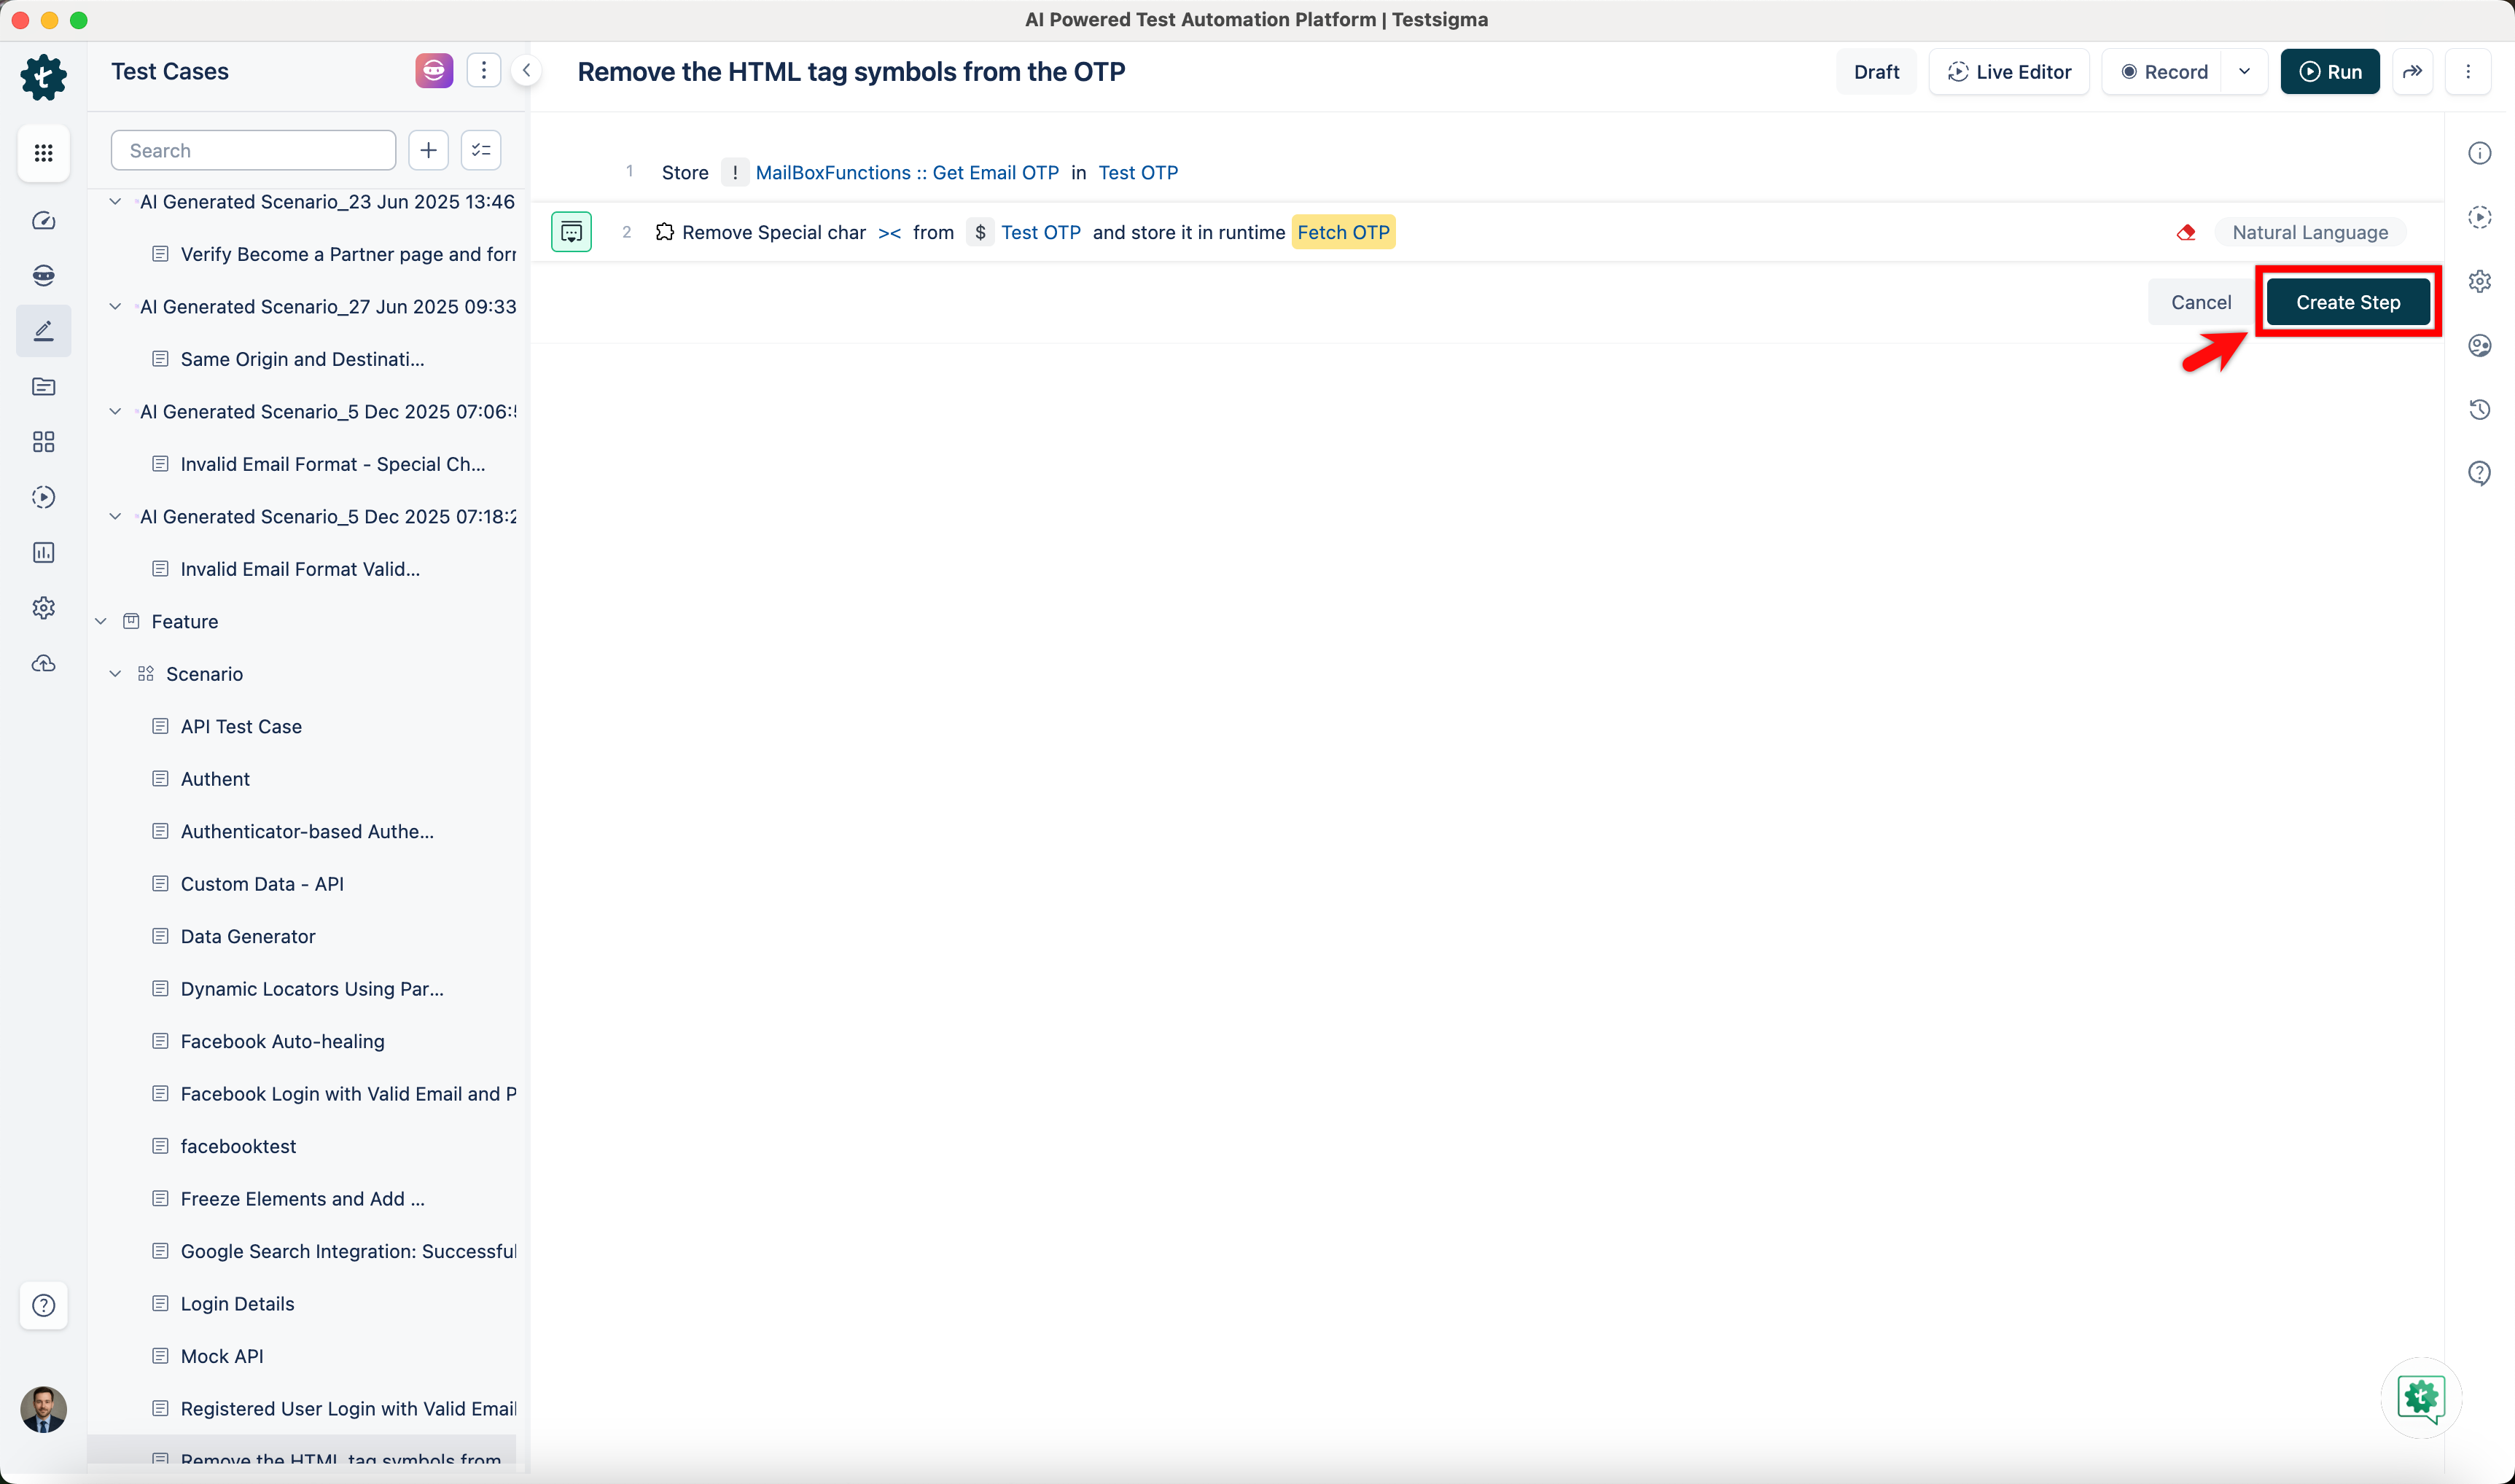 | ||
|
|
||
| --- |
73 changes: 73 additions & 0 deletions
73
src/pages/docs/FAQs/general/how-to-configure-the-oracledb-add-on-in-testsigma.md
This file contains hidden or bidirectional Unicode text that may be interpreted or compiled differently than what appears below. To review, open the file in an editor that reveals hidden Unicode characters.
Learn more about bidirectional Unicode characters
| Original file line number | Diff line number | Diff line change |
|---|---|---|
| @@ -0,0 +1,73 @@ | ||
| --- | ||
| title: "How to Configure the OracleDB Add-on in Testsigma?" | ||
| metadesc: "Learn how to configure the Oracle Database add-on in Testsigma with the required connection details for successful database integration." | ||
| order: 24.44 | ||
| page_id: "how-to-configure-the-oracledb-add-on-in-testsigma" | ||
| warning: false | ||
| contextual_links: | ||
| - type: section | ||
| name: "Contents" | ||
| - type: link | ||
| name: "Steps to Install the Addon" | ||
| url: "#steps-to-install-the-addon" | ||
| - type: link | ||
| name: "Steps to Set Up the Database Connection" | ||
| url: "#steps-to-set-up-the-database-connection" | ||
| --- | ||
|
|
||
| --- | ||
|
|
||
| In Testsigma, the configuration of the Oracle Database add-on requires specific database connection details to ensure successful communication between the application and the Oracle database. This article discusses how to install the add-on and set up the database connection. | ||
|
|
||
| --- | ||
|
|
||
| ## **Steps to Install the Addon** | ||
|
|
||
| 1. From the left navigation bar, go to **Addons** and click **Add-ons**. | ||
|  | ||
|
|
||
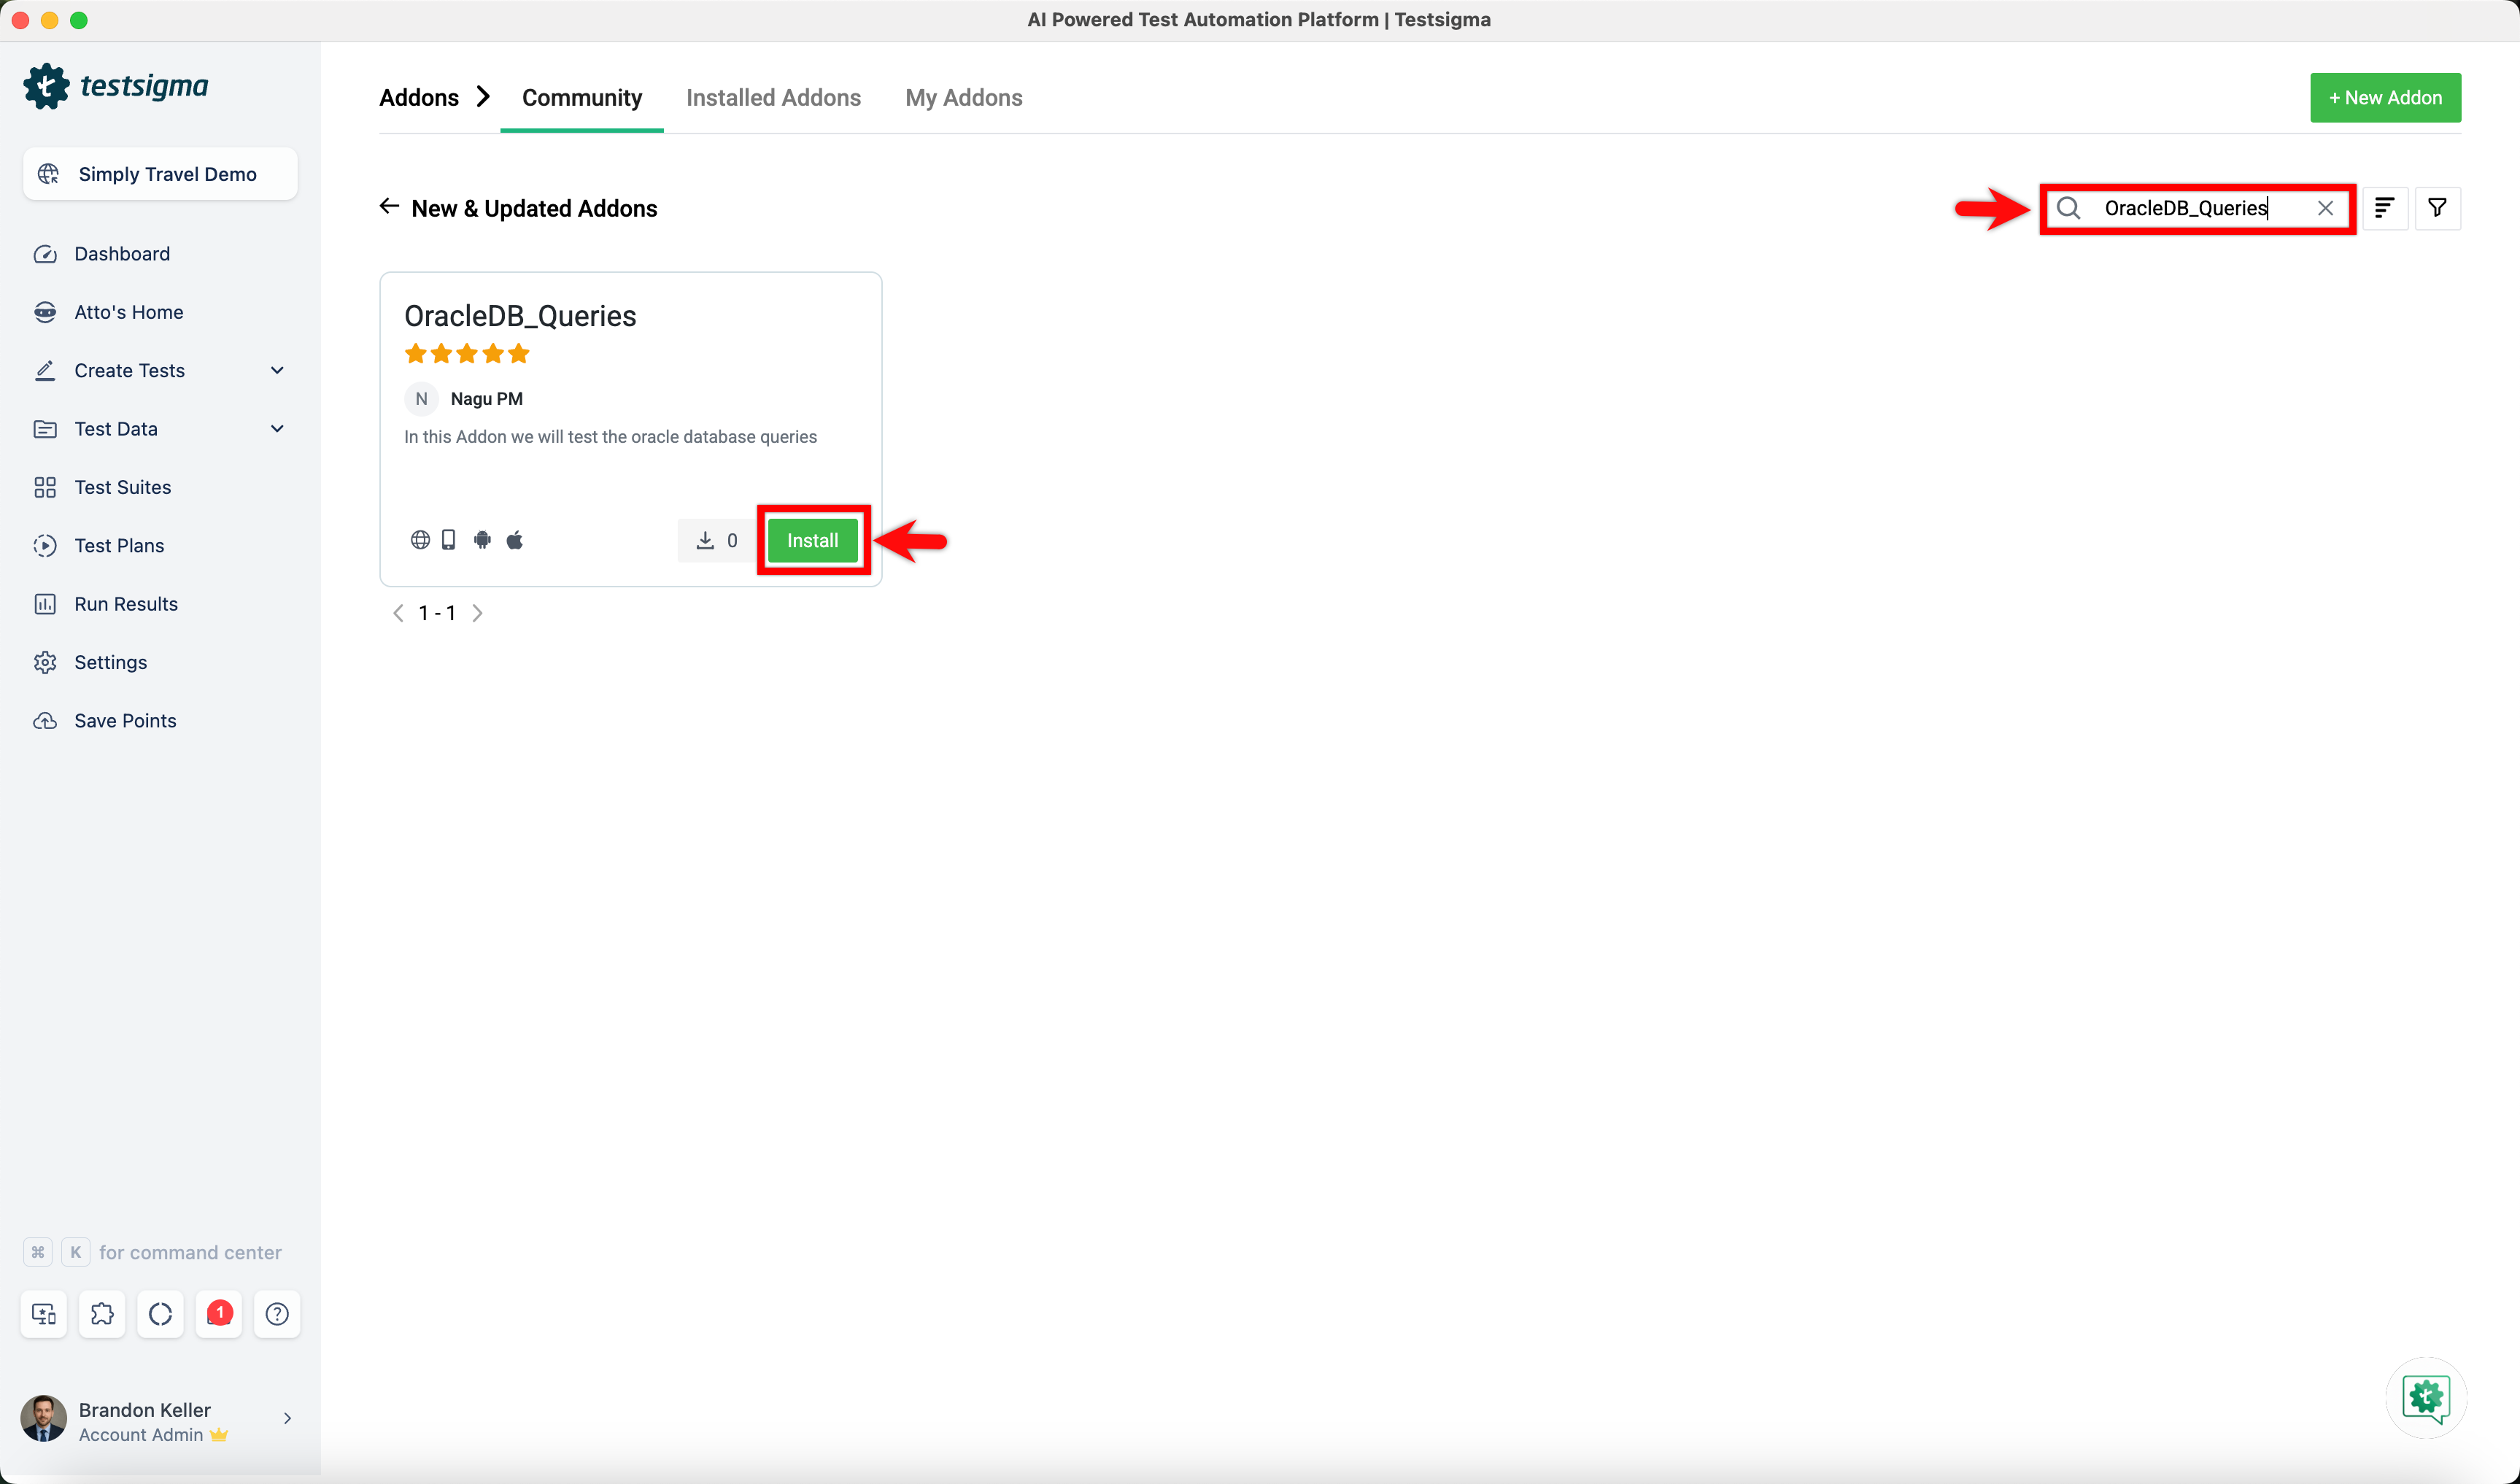
| 2. Under the **New & Updated Addons** section, search for the **OracleDB_Queries** addon and click **Install**. | ||
|  | ||
|
|
||
| --- | ||
|
|
||
| ## **Steps to Set Up the Database Connection** | ||
|
|
||
| 1. In your test case, use the **Execute OracleDB Query on the Connection DB_Connection_URL and verify affected rows count is Row-Count** NLP to execute the query and fetch the required database details. | ||
|
|
||
| 2. Click the **Query** placeholder and enter the SQL query to be executed on the Oracle database. | ||
|
|
||
| **Example query:** | ||
|
|
||
| SELECT * FROM employees WHERE employee_id = 103; | ||
|
|
||
| This query fetches all details of the employee whose ID is 103 from the employees table. Use this example as a reference and replace it with the required query based on your test scenario. | ||
|
|
||
| 3. Click the **DB_Connection_URL** placeholder and use the following syntax to enter the URL: | ||
|
|
||
| **jdbc:oracle:thin:@//<host>:<port>/<service_name>?user=<username>&password=<password>&internal_logon=<role>** | ||
|
|
||
| Now, replace the placeholders with your Oracle database details: | ||
| - **Host Name** – The hostname of your database server (e.g., localhost). | ||
| - **Port** – The port on which the database is running (e.g., 1521). | ||
| - **Service Name** – The service name of the database (or select SID if service name is unavailable). | ||
| - **Username** – Your database username (e.g., SYS). | ||
| - **Password** – Your database password. | ||
| - **Role** – Database role (e.g., SYSDBA). | ||
|
|
||
| 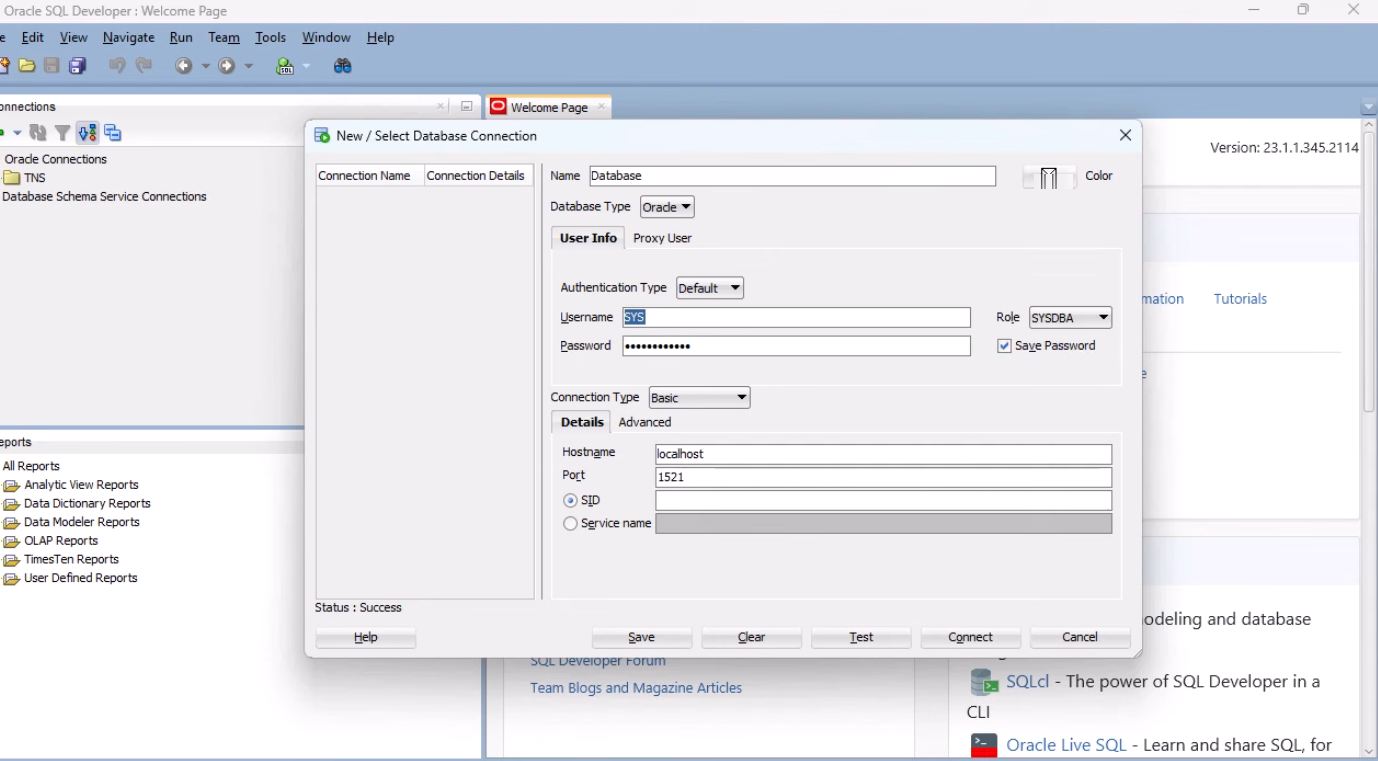 | ||
|
|
||
| Example URL using the screenshot details: | ||
|
|
||
| **jdbc:oracle:thin:@localhost:1521:ORCL?user=SYS&password=<123456789012>&internal_logon=SYSDBA** | ||
|
|
||
| [[info | **NOTE**:]] | ||
| | In the **Service Name** field: | ||
| | - If you select **SID**, enter FREE (the default service). | ||
| | - If you select **Service Name**, enter your actual service name. | ||
|
|
||
| 4. Click the **Row-Count** placeholder and specify the expected number of affected rows for validation. | ||
|
|
||
| 5. Click **Create Step**. | ||
|
|
||
| --- | ||
Add this suggestion to a batch that can be applied as a single commit.
This suggestion is invalid because no changes were made to the code.
Suggestions cannot be applied while the pull request is closed.
Suggestions cannot be applied while viewing a subset of changes.
Only one suggestion per line can be applied in a batch.
Add this suggestion to a batch that can be applied as a single commit.
Applying suggestions on deleted lines is not supported.
You must change the existing code in this line in order to create a valid suggestion.
Outdated suggestions cannot be applied.
This suggestion has been applied or marked resolved.
Suggestions cannot be applied from pending reviews.
Suggestions cannot be applied on multi-line comments.
Suggestions cannot be applied while the pull request is queued to merge.
Suggestion cannot be applied right now. Please check back later.
There was a problem hiding this comment.
Choose a reason for hiding this comment
The reason will be displayed to describe this comment to others. Learn more.
Remove angle brackets from password in example JDBC URL.
The example JDBC URL shows the password as
<123456789012>, but angle brackets should only wrap placeholders, not actual values. Passwords should be provided without angle brackets.🔧 Proposed fix
📝 Committable suggestion
🤖 Prompt for AI Agents