System Setup
WARNING: The bot's codebase and system setup are still in alpha stages and will change considerably before reaching the first stable release.
Before setting up, you're expected to have some knowledge on how to use AWS and it's services (I.e. DyanmoDB and S3) the basics of Python, as well as basic knowledge on Linux server admin.
IT IS NOT RECOMENDED YOU RUN YOUR OWN INSTANCE OF Turinip Bot FOR DAY TO DAY USE!
First, to run the bot you'll need a computer/server will the following installed
- AWS CLI: Also needs to be configured with you account settings
- Python 3.8 & pip for Python 3.8
You'll need the following things as well
- AWS DynamoDB: This is AWS's NoSQL offering and is free on the free forever tier. You'll need more write units than read units. (For testing you'll only need 1 of each).
You'll need either of these's (Or any other S3 compatible Object Storage service)
This acts as a staging point for Turnip Summaries images for Discord Embeds, Discord will cache the image on their end after you send off the embed to the guild. You may want to set up automatic deletion of files to keep what you store under control, This can be set up as a part of AWS S3.
It's also highly recommended in a production environment to have some sort of CDN or caching for your object storage. Turnip Bot itself uses Cloudflare in front of the AWS S3 bucket. This should absorb about 80% of image requests being made for files.
Then there are the APIs needed.
- Nookipedia Private API: Used for lookup endpoints.
-
Create an AWS account and go and navigate to DynamoDB in the region of your choice.
-
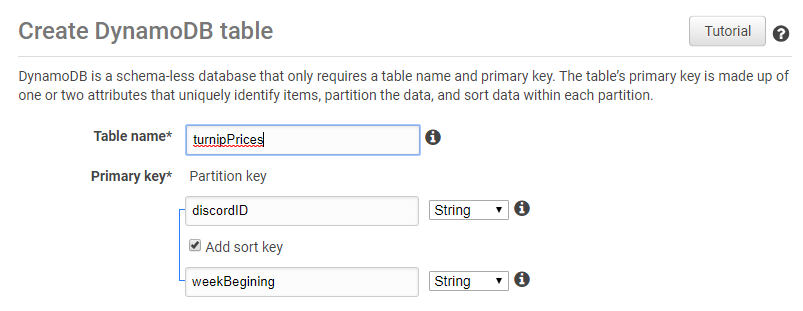
Create a new table by clicking on
Create DynamoDB table -
Enter the following
- Table Name:
turnipPrices - Partition key:
discordID(String) - Select
Add sort key - Sort key:
weekBegining(String)
- Table Name:
-
The create
Createif you want to use default settings, if not I'll walk you through how to set up to use free tier now. -
Deselect
Use default settings -
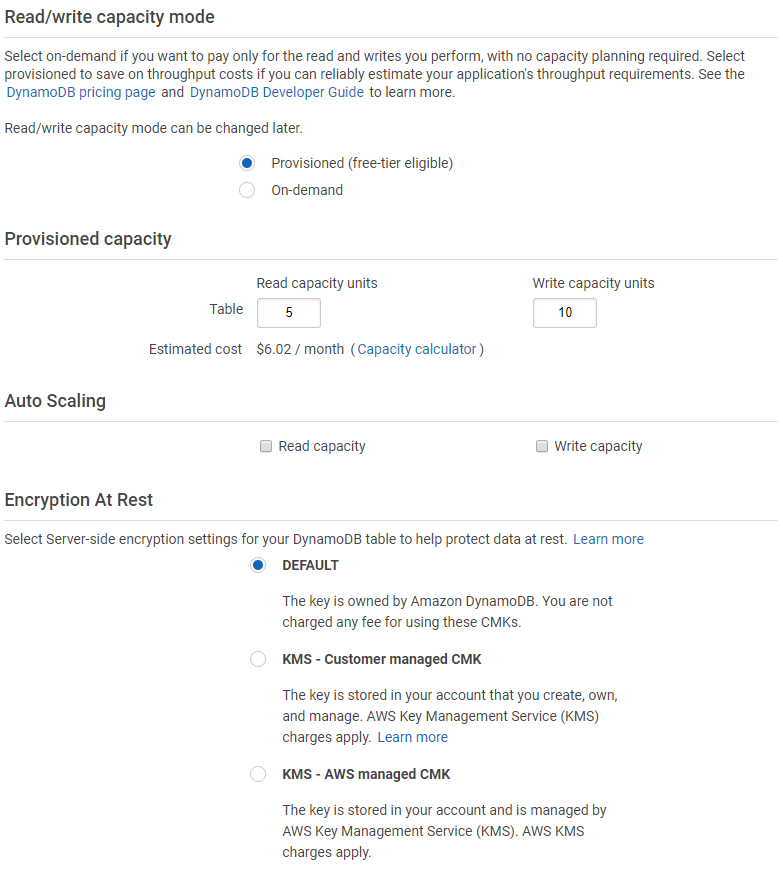
To use free tier select
Provisioned (free-tier eligible)Under Read/write capacity mode -
Under Provisioned capacity Select how many read/write units you want. (You get 25 of each free in one region on the free tier) [As an idea Turnip bot used 5:10 in production, never actually going above 1 unit of each]
-
Don't select Auto Scaling and Leave Encryption At Rest on default.
-
Click Create.
-
Clone The repository. The Master branch is the working branch with the newest/likely undocumented features. The Release branch is tested and can run somewhat stably.
-
Install requirements using for the system with
pip install -r requirements.txt -
Create a
.envfile with the following
# Following are Discord Authentication
discord_Token =

# AWS DynamoDB configuration
turnipDB_Table = turnipPrices

# DigitalOcean Storage Spaces / AWS S3 bucket configuration
endpoint_url =
aws_access_key_id =
aws_secret_access_key =
aws_region_name =
aws_bucket =
CDNLink =

# Nookipedia Private API
nookipedia_API_key = - you can now start the program with
python3.8 main.py
Somethings to take into consideration
- top.gg integration cog hasn't been enabled by default in the repo.
- Don't accidentally commit your auth.py file (Reason for moving to dotenv)
- If you're not using a Full AWS stack you're going to be charged for data moving out of AWS, the first gig is free, then you're charged after that FYI.