


In EdgeTX 2.5, themes only really comprise of the following:
- themefile.yml (your theme configuration file with name, summary, and color settings)
- themefile.png (a logo/banner for your theme)
No other files are used by the transmsmitter firmware, and the themefile.png is itself not strictly necessary for the theme to function.
However, moving forward to EdgeTX 2.6, it is envisaged that themes will also be able to provide a background, and that the end user will have more control over what is displayed when. Thus, the following draft specification as to how a theme will look, which will be expected as of EdgeTX 2.6, and as it is still in draft form, subject to change as it continues to evolve.
Initial Draft Specification - subject to change!
A theme for EdgeTX consists minimally of 5 files, all sharing the initial part of the filename (themefile in this example):
- themefile.yml (your theme configuration file with name, summary, and color settings)
- themefile.png (a logo/banner for your theme)

- themefile1.png (first screenshot, of the main screen with some common widgets selected)

- themefile2.png (second screenshot, of model selection screen with at least two models present)

- themefile3.png (third screenshot, of the channel monitor)


Optional:
- themefile_bg_480x272.png (a background image for your theme in 480 x 272 pixel resolution, e.g. for TX16S, T16, X10, X12S)
- themefile_bg_320x480.png (a background image for your theme in 320 x 480 pixel resolution, e.g. for NV14)
- themefile_readme.txt (any notes or information you wish to share with your theme)
Images should all be in PNG format, and 480x272 pixels in size, except the optional 320x480 background image.
Please refer to the example folder for an example of the expected layout.
Please refer to TODO documentation for more information on the theme file format.
Please note that themes are currently still in development phase in EdgeTX and the specification can change. Thus please be prepared that at some point in (near) future you might be asked to update your submission, as we change the specification, e.g. about the image size or YAML style required.
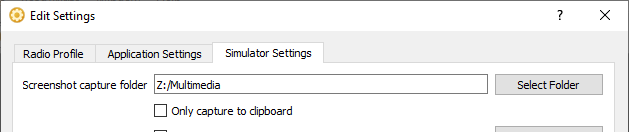
In order to take screenshots using the EdgeTX simulator, first start EdgeTX Companion, pick from menu Settings the menu item with similar name Settings...
Navigate to Simulator Settings tab and provide a folder where you would like the simulator to save the images (here in example Z:\Multimedia):
When using EdgeTX Simulator, click on the Screenshot icon to take a screenshot:

If you want to contribute at current early stage in spite of the warning above, here are the steps:
- If you do not yet have a GitHub account, create it (it is free)
- Fork this repo by clicking
Forkin upper right - Make a branch (by clicking down arrow at "main" and typing an arbitrary name without spaces, e.g. "mytesttheme" and clicking "Create branch")
- Commit your changes to your newly created branch.
You can work via GitHub Web interface or optionally you can do this also locally. Instructions for local command line would be:git clone -b mytesttheme https://github.com/your_user_name_in_GitHub/themes.git ~/edgetx/themes
Then add the files withgit add, followed by a commit withgit commit -m "commitmessagehere"and then push withgit push
If you are a Windows user and looking for a graphical tool for Git, have a look at e.g. TortoiseGit - Make a pull request by clicking the big green "Compare & Pull Request" button in GitHub in your fork's branch.