日本語 / 中文 / हिन्दी / العربية / Español / Français / Português / Deutsch / Türkçe / Bahasa Indonesia / 한국어
The desktop clock application for multiple time zones🕒🌍🕕

Clock-related features:
- 🕐 Text clock for multiple time zones
- ⏱️ Timer
- ⏳ Countdown timer
- 🔄 Epoch time and date-time convertor
Time waits for no one:
- 📝 Sticky note
A developer is never without a clock:
- 🔀 Simple text convertor
- such as easily creating SQL
INclauses
- such as easily creating SQL
- 🌐 Web server
- serves static files
- dump request and response server
- slow endpoints for debugging
- open files in your editor from GitHub URLs
🔔 NOTE: mclocks doesn't need an internet connection — everything runs 100% locally.
From https://github.com/bayashi/mclocks/releases
For Windows, you can get the installer .msi file, or .exe the executable file.
For macOS, you can get .dmg file to install.
(The shortcut keys in this document are for Windows OS. If you are using macOS, please interpret them accordingly, replacing keys such as Ctrl with Command and Alt with Option where appropriate.)
The config.json file allows you to configure the clocks according to your preferences.
The config.json file should be located in the following directories:
- Windows:
C:\Users\{USER}\AppData\Roaming\com.bayashi.mclocks\ - Mac:
/Users/{USER}/Library/Application Support/com.bayashi.mclocks/
When you start mclocks, then press Ctrl + o to edit your config.json file.
The config.json file should be formatted as JSON, as shown like below.
{
  "clocks": [
    { "name": "UTC", "timezone": "UTC" }
  ],
  "format": "MM-DD ddd HH:mm",
  "locale": "en",
  "color": "#fff",
  "font": "Courier, monospace",
  "size": 14,
  "margin": "1.65em",
  "forefront": false
}
The clocks field is an array of objects, each containing name and timezone properties. Both should be String. By default, both are UTC.
nameis a label that will be displayed for the clock.- For selecting time zones, please refer to this list of time zones.
Here is an example of a clocks array for three time zones.
{
  "clocks": [
    { "name": "Tokyo", "timezone": "Asia/Tokyo" },
    { "name": "UTC", "timezone": "UTC" },
    { "name": "SF", "timezone": "America/Los_Angeles" }
  ],
  "format": "MM-DD ddd HH:mm",
  ...snip...
}
string: MM-DD ddd HH:mm
The format field is a date-time format string used to display the clock. To create a custom date-time format, please refer to this formatting guide.
string: ""
The format2 field is same as format. These are switched each other by Ctrl + f key. The format2 is optional field.
string: en
The locale field determines the language settings for displaying the date-time. You can find a list of supported locales here.
string: #fff
The color field defines the color of the date-time text. You can use named colors, RGB hex values, RGB values (e.g., RGB(255, 0, 0)), or any valid CSS color value.
string: Courier, monospace
The font is a font name to display date-time. It should be monospaced font. If you would set non-fixed-width font, then your mclocks may have an undesirable wobbling effect.
number | string: 14
The size is a size of charactor for date-time, in pixel. It can also be specified as a string that includes a unit (e.g., "125%", "1.5em").
string: 1.65em
The margin field determines the space between clocks
bool: false
If the forefront field is set to true, the mclocks application will always be displayed on top of other application windows.
By setting up the config as shown below for the clock, it will be displayed as a countdown clock to a given target date-time.
"clocks": [
	{
		"countdown": "WAC Tokyo D-%D %h:%m:%s",
		"target": "2025-09-13",
		"timezone": "Asia/Tokyo"
	}
],
Above countdown clock will be displayed like below:
WAC Tokyo D-159 12:34:56
Indicating 159 days, 12 hours, 34 minutes, and 56 seconds left until September 13, 2025.
The countdown fieled text accepts below template verbs:
%TG: Target date-time string%D: Remaining day count to target date-time%H: Remaining time as hour to target date-time%h: An hour(hh) of remaining time (hh:mm:ss)%M: Remaining time as minute to target date-time%m: A minute(mm) of remaining time (hh:mm:ss)%S: Remaining time as second to target date-time%s: A second(ss) of remaining time (hh:mm:ss)

Click mclocks app window, then push Ctrl + 1 key, then start 1-minute timer. Push Ctrl + Alt + 1 key, start 10-minute timer. Other number keys work as well. Starting timers up to 5.
Ctrl + p to pause / re-start the timers.
Ctrl + 0 to delete the oldest timer. Ctrl + Alt + 0 to delete the newest timer.
🔔 NOTE: Countdown clock and simple timer will send notification by default when the timer is complete. If you don't need notifications, set withoutNotification: true in config.json.

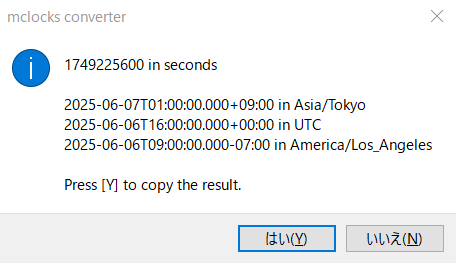
Click mclocks app window, then push Ctrl + e key, then toggle to display Epoch time.
Click mclocks app window, then paste a date-time or Epoch time, then a dialog appears to display conversion results. And it's able to copy the results to the clipboard. If you don't want to copy, then press [No] to just close the dialog.
When pasting with Ctrl + v, the value (Epoch time) is treated as seconds. If you use Ctrl + Alt + v, it's treated as milliseconds, and with Ctrl + Alt + Shift + V, it's treated as microseconds, and with Ctrl + Alt + Shift + N + V, it's treated as nanoseconds and converted accordingly.
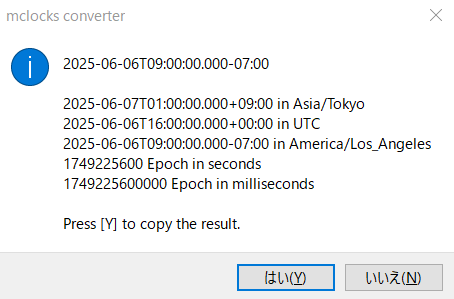
When pasted date-time values do not include timezone information, they are treated as local timezone by default. To handle them as a specific timezone, set the timezone in the convtz option.
"convtz": "UTC"
Click mclocks app window, then use the following keyboard shortcuts to process clipboard text and open it in an editor:
Ctrl + i: Quotes each line of clipboard text with double quotes and appends a comma to the end (except the last line)Ctrl + Shift + i: Appends a comma to the end of each line (no quotes) for INT list IN condition (except the last line)
Empty lines are preserved as-is in all operations.
(This Convert Text Feature has nothing to do with clocks or time, but software developers might find it handy! 😊)
F1 (Windows) or Cmd + Shift + / (macOS) to open help page (this README) in browser
| Shortcut | Description |
|---|---|
Ctrl + o |
Open config.json file in editor |
Ctrl + f |
Switch between format and format2 (if format2 is defined in config.json) |
Ctrl + e or Ctrl + u |
Toggle to display Epoch time |
| Shortcut | Description |
|---|---|
Ctrl + 1 to Ctrl + 9 |
Start timer (1 minute × number key) |
Ctrl + Alt + 1 to Ctrl + Alt + 9 |
Start timer (10 minutes × number key) |
Ctrl + p |
Pause / resume all timers |
Ctrl + 0 |
Delete the oldest timer (leftmost) |
Ctrl + Alt + 0 |
Delete the newest timer (rightmost) |
| Shortcut | Description |
|---|---|
Ctrl + s |
Create a new sticky note from clipboard text |
| Shortcut | Description |
|---|---|
Ctrl + c |
Copy current mclocks text to clipboard |
Ctrl + v |
Convert clipboard content (Epoch time as seconds, or date-time) |
Ctrl + Alt + v |
Convert clipboard content (Epoch time as milliseconds) |
Ctrl + Alt + Shift + V |
Convert clipboard content (Epoch time as microseconds) |
Ctrl + Alt + Shift + N + V |
Convert clipboard content (Epoch time as nanoseconds) |
| Shortcut | Description |
|---|---|
Ctrl + i |
Quote each line of clipboard text with double quotes, append comma to the end (except the last line), and open in editor |
Ctrl + Shift + i |
Append comma to the end of each line (no quotes) for INT list IN condition (except the last line), and open in editor |
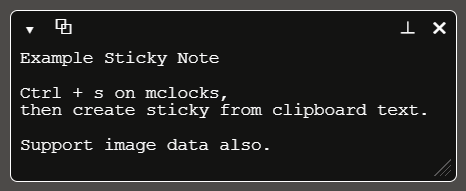
Click mclocks app window, then push Ctrl + s to create a sticky note from clipboard text. A small floating window opens with the clipboard content.
Each sticky note has:
- Toggle button (
▸/▾): Expand or collapse the note. In collapsed mode only a single line is shown. - Copy button (
⧉): Copy the note text to the clipboard. - Forefront button (
⊤/⊥): Toggle whether the note stays on top of other windows. This setting is saved per sticky note. - Close button (
✖): Delete the sticky note and close its window. - Text area: Freely edit the note content. Changes are auto-saved.
- Resize handle: Drag the bottom-right corner to resize the note when expanded.
Sticky notes inherit font, size, color, and forefront settings from config.json. The forefront setting can be overridden per sticky note using the forefront button; if not overridden, the value from config.json is used. Their position, size, open/close state, and forefront override are persisted, and all notes are automatically restored when mclocks restarts.
🔔 NOTE: On macOS, sticky note window positions are only saved when the application exits. On Windows, positions are saved automatically as you move or resize the windows.
The maximum text size per sticky note is 128 KB.
mclocks can serve static files via a built-in web server. This feature allows you to easily view your code snippets in a browser. Add a web field to your config.json:
{
  "web": {
    "root": "/path/to/your/webroot",
    "dump": true,
    "slow": true,
    "status": true,
    "editor": {
      "reposDir": "/path/to/your/repos"
    }
  }
}
root: Path to the directory containing files to serve (required)port: Port number to listen on (default: 3030)open_browser_at_start: If set totrue, automatically opens the web server URL in the default browser whenmclocksstarts (default:false)dump: If set totrue, enables the/dumpendpoint that returns request details as JSON (default:false)slow: If set totrue, enables the/slowendpoint that delays the response (default:false)status: If set totrue, enables the/status/{code}endpoint that returns arbitrary HTTP status codes (default:false)editor: If set and containsreposDir, enables the/editorendpoint that opens local files in your editor from browser's GitHub URLs (default: not set)
If the web field is configured in your config.json, the web server starts automatically when mclocks launches. Access files at http://127.0.0.1:3030. The web server only listens on 127.0.0.1 (localhost), so it is only accessible from your local machine.
The web server supports the following file types:
- Text:
html,css,js,json,md,txt - Images:
png,jpg,jpeg,gif,svg,ico
When dump: true is set in the web configuration, the web server provides a /dump endpoint that returns request details as JSON.
The endpoint responds with a JSON object containing:
method: HTTP method (e.g., "GET", "POST")path: Request path after/dump/(e.g., "/test" for/dump/test)query: Query parameters as an array of key-value objects (e.g.,[{"key1": "value1"}, {"key2": "value2"}])headers: Request headers as an array of key-value objects (e.g.,[{"Content-Type": "application/json"}])body: Request body as a string (if present)parsed_body: Parsed JSON object if Content-Type indicates JSON, or error message string if parsing fails
Access the dump endpoint at http://127.0.0.1:3030/dump or any path under /dump/ (e.g., /dump/test?key=value).
When slow: true is set in the web configuration, the web server provides a /slow endpoint that delays the response before returning 200 OK.
The endpoint is accessible via any HTTP method (GET, POST, etc.) and supports the following paths:
/slow: Waits 30 seconds (default) and returns 200 OK/slow/120: Waits 120 seconds (or any specified number of seconds) and returns 200 OK
The maximum allowed value is 901 seconds (15 minutes + 1 second). Requests exceeding this limit return a 400 Bad Request error.
This endpoint is useful for testing timeout behavior, connection handling, or simulating slow network conditions.
If an invalid seconds parameter is provided (e.g., /slow/abc), the endpoint returns a 400 Bad Request error.
When status: true is set in the web configuration, the web server provides a /status/{code} endpoint that returns arbitrary HTTP status codes defined in RFC standards (100-599).
The endpoint returns a plain text response with the status code and its corresponding phrase, along with appropriate headers as required by the HTTP specification.
Examples:
http://127.0.0.1:3030/status/200- returns 200 OKhttp://127.0.0.1:3030/status/404- returns 404 Not Foundhttp://127.0.0.1:3030/status/500- returns 500 Internal Server Errorhttp://127.0.0.1:3030/status/418- returns 418 I'm a teapot (with special message)http://127.0.0.1:3030/status/301- returns 301 Moved Permanently (with Location header)
Status-specific headers:
The endpoint automatically adds appropriate headers for specific status codes:
- 3xx Redirection (301, 302, 303, 305, 307, 308): Adds
Locationheader - 401 Unauthorized: Adds
WWW-Authenticateheader - 405 Method Not Allowed: Adds
Allowheader - 407 Proxy Authentication Required: Adds
Proxy-Authenticateheader - 416 Range Not Satisfiable: Adds
Content-Rangeheader - 426 Upgrade Required: Adds
Upgradeheader - 429 Too Many Requests: Adds
Retry-Afterheader (60 seconds) - 503 Service Unavailable: Adds
Retry-Afterheader (60 seconds) - 511 Network Authentication Required: Adds
WWW-Authenticateheader
Response body handling:
- 204 No Content and 304 Not Modified: Returns empty response body (as per HTTP specification)
- 418 I'm a teapot: Returns special message "I'm a teapot" instead of standard status phrase
- All other status codes: Returns plain text in format
{code} {phrase}(e.g., "404 Not Found")
This endpoint is useful for testing how your applications handle different HTTP status codes, error handling, redirects, authentication requirements, and rate limiting scenarios.
When web.editor.reposDir is set in the configuration file, the web server provides a /editor endpoint that allows you to open local files in your editor directly from browser's GitHub URLs.
Configuration:
Add the following to your web configuration:
{
  "web": {
    "root": "/path/to/your/webroot",
    "editor": {
      "reposDir": "~/repos",
      "includeHost": false,
      "command": "code",
      "args": ["-g", "{file}:{line}"]
    }
  }
}
reposDir: Path to your local repositories directory. Supports~for home directory expansion (e.g.,"~/repos"on macOS or"C:/Users/username/repos"on Windows). This directory must exist.includeHost: Iftrue, local path resolution includes the original host as a directory (e.g.{reposDir}/{host}/{owner}/{repo}/...). Iffalse, it resolves to{reposDir}/{owner}/{repo}/...(default:false).command: Command name or path to your editor executable (default:code)args: Arguments template array. Use{file}and{line}placeholders. If#L...is not present in URL,{line}uses 1.
How it works:
- When you access a GitHub file URL through the
/editorendpoint, it converts the GitHub path to a local file path - The local file path is constructed as:
{reposDir}/{owner}/{repository_name}/{file_path} - If the file exists, it opens the file in your editor at the specified line number using the configured command and args (default:
code -g {local_file_path}:{line_number}) - If the file doesn't exist, an error page is displayed with a link to clone the repository
Bookmarklet:
Create a bookmarklet to quickly open GitHub files in your local editor. Replace 3030 with your configured port number:
javascript:(function(){var u=new URL(document.location.href);open('http://127.0.0.1:3030/editor/'+u.host+u.pathname+u.hash,'_blank');})()Line number support:
You can specify a line number using the hash fragment in the URL:
https://github.com/username/repo/blob/main/file.rs#L123→ Opens at line 123
Error handling:
- If the file doesn't exist locally, the tab stays open and displays an error message with a link to clone the repository from GitHub
- If the file is successfully opened, the tab automatically closes
- If
web.editor.reposDiris not configured or doesn't exist, the/editorendpoint is not enabled (and you will get 404)
Example:
- You're viewing a file on GitHub:
https://github.com/bayashi/mclocks/blob/main/src/app.js#L42 - Click the bookmarklet or manually navigate to:
http://127.0.0.1:3030/editor/bayashi/mclocks/blob/main/src/app.js#L42 - If
~/repos/mclocks/src/app.jsexists in your local, VS Code opens it at line 42 - If the file doesn't exist, an error page shows with a link to
https://github.com/bayashi/mclocksfor cloning
mclocks includes an MCP (Model Context Protocol) server that enables AI assistants such as Cursor and Claude Desktop to answer "What time is it now?" across multiple timezones, and to convert between datetime formats and epoch timestamps. The MCP server automatically uses your mclocks config.json, so the timezones you've configured in mclocks are reflected in the AI's responses.
- Node.js (v18 or later)
If you don't have Node.js, install it from the official website.
Add the following JSON to your MCP configuration file:
- Cursor:
.cursor/mcp.jsonin your project root, or global~/.cursor/mcp.json - Claude Desktop (
claude_desktop_config.json):- Windows:
%APPDATA%\Claude\claude_desktop_config.json - macOS:
~/Library/Application Support/Claude/claude_desktop_config.json - Linux:
~/.config/Claude/claude_desktop_config.json
- Windows:
{
  "mcpServers": {
    "mclocks-datetime-util": {
      "command": "npx",
      "args": ["-y", "mclocks-datetime-util"]
    }
  }
}
After saving, restart the application. The MCP server will be automatically downloaded and started. The following tools become available:
current-time- Get the current time in your configured timezoneslocal-time- Get the current local time in the user's timezone (fromconvtzconfig or system default)convert-time- Convert a datetime string or epoch timestamp to multiple timezonesnext-weekday- Find the date of the next occurrence of a given weekdaydate-to-weekday- Get the day of the week for a given datedays-until- Count the number of days from today until a specified datedays-between- Count the number of days between two datesdate-offset- Calculate the date N days before or after a given date
The MCP server automatically reads your mclocks config.json and uses:
clocks- Timezones defined in your clocks are used as default conversion targetsconvtz- Used as the default source timezone when converting datetime strings without timezone infousetz- Enables strict timezone conversion for historically accurate UTC offsets (e.g. JST was +09:18 before 1888). Set totruewhen you need to convert historical datetimes accurately
If no config.json is found, the server falls back to a built-in set of common timezones (UTC, America/New_York, America/Los_Angeles, Europe/London, Europe/Berlin, Asia/Tokyo, Asia/Shanghai, Asia/Kolkata, Australia/Sydney).
If you want to override config.json settings, or if you don't have a config.json at all, you can set environment variables in your MCP configuration. Environment variables take priority over values in config.json.
| Variable | Description | Default |
|---|---|---|
MCLOCKS_CONFIG_PATH |
Path to config.json. Not required in most cases, as the server auto-detects the location. |
auto-detect |
MCLOCKS_LOCALE |
Locale for formatting weekday names, etc. (e.g. ja, pt, de) |
en |
MCLOCKS_CONVTZ |
Default source timezone for interpreting datetime strings without timezone info (e.g. Asia/Tokyo) |
(none) |
MCLOCKS_USETZ |
Set to true to enable strict timezone conversion |
false |
Example:
{
  "mcpServers": {
    "mclocks-datetime-util": {
      "command": "npx",
      "args": ["-y", "mclocks-datetime-util"],
      "env": {
        "MCLOCKS_LOCALE": "ja",
        "MCLOCKS_CONVTZ": "Asia/Tokyo"
      }
    }
  }
}Once configured, you can ask your AI assistant things like:
- "What time is it now?" - Returns the current time in all your mclocks-configured timezones
- "What time is it in Jakarta?" - Returns the current time in a specific timezone
- "Convert 1705312200 epoch to datetime"
- "Convert 2024-01-15T10:30:00Z to Asia/Tokyo"
- "Next Friday is what date?"
- "What day of the week is 2026-12-25?"
- "How many days until Christmas?"
- "How many days between 2026-01-01 and 2026-12-31?"
- "What date is 90 days from 2026-04-01?"
Dai Okabayashi: https://github.com/bayashi