Getting started
Hello and thank you for downloading my scripting mod!
With this guide, I will try to show you how to get started using my scripting mod. I will start with very simple examples with thorough explanation and continue to more advanced machines with only conceptual remarks.
Examples:
The mod looks for scripts in the /Besiege_Data/Scripts/ folder. By default, it will look for a script with the same name as the machine, but you can change that by opening Script options window (Ctrl+U).

If you see the green checkmark near the script file input field, it means that the mod has found your script file and will run it when you start the simulation.
This is how the mod finds the right script to run. Save your machine, create a .py file with a matching name in Scripts folder and you're ready to go.
Alternatively, you can embed the script inside the machine file for sharing on workshop.
Let's make something simple. We want a vehicle that can run at different speeds. We will do this by changing it's wheel's speed sliders at a key press.
If you looked around in Block handlers page, you might have noticed the function called
SetSliderValue(string sliderName, float value). This is what we will be calling.
First we need the block we want to manipulate. We get that by calling Besiege.GetBlock(string blockId) function with the block's ID. To get the blocks identifier, point at a block and press LeftShift. You will see the this.

These are actually two block identifiers for the same block. You can use either of those. The first one (name + number) is the sequential identifier. It's the most simple way to select your block, but you must be careful because it's number might change if you place more wheels.
The second identifier is the block's GUID. This one will not change unless you delete the block. It can also be seen in the .bsg file. If you are modifying your machine a lot, you will probably want to use this one.
Let's say we decide to use GUIDs. At the beginning of the script we can get the block references and save them in a variable to avoid typing them again.
left_wheel = Besiege.GetBlock("9d771b0d-d61c-4f35-a4bb-8f5f8daad308")
right_wheel = Besiege.GetBlock("7b700250-b1fd-4aae-834e-c1db9f8b5d8e")
The first parameter to SetSliderValue function specifies the slider we want to change. Some blocks have multiple sliders, so this is necessary. To select a slider, just look at it's name in the block's mapper window:

Now we can set the wheels to super fast, even beyond what you're allowed to in-game.
left_wheel.SetSliderValue("SPEED", 4)
right_wheel.SetSliderValue("SPEED", 4)
Try running the script. It's not what we want yet. We want the speed to change at the press of a key.
To do this, we need to write a function:
def Update():
    # handle key press
This function will be called on every frame of the simulation. Inside, we can check for key presses and update our slider values.
Let's create a variable called v for speed. Every time we press I, we will increase it, and every time we press K, we will decrease it. Then we update the slider value.
v = 1

def Update():
    if Input.GetKey(KeyCode.I):
        v += 0.2
    if Input.GetKey(KeyCode.K):
        v -= 0.2
    left_wheel.SetSliderValue("SPEED", v)
    right_wheel.SetSliderValue("SPEED", v)
We checked if key I or K are pressed by calling functions from UnityEngine.Input class. You can read more about how to use it here.
There we go. We can now change the speed of the car while driving it!
Want to see how the speed changes? Press Ctrl+I to open the Watchlist, type v into the field and press add.
You can now see the variable value and even change it by clicking on it.
You know how nice it would be sometimes if steering hinges reset their angle when you stopped pressing the key? We can make that!
Let's upgrade our code from the last example. We will need block handlers for the steering hinges.
left_hinge = Besiege.GetBlock("STEERING HINGE 1")
right_hinge = Besiege.GetBlock("STEERING HINGE 2")
The GetBlock() function finds the block by it's identifier and returns the block handler object. Variables left_hinge and right_hinge now contain objects representing our left and right steering hinges. This way, we can use features only steering blocks have, like the left_hinge.SetAngle(angle).
Just like the last time, we will check for key presses inside Update() function body, then set the angle of the hinges. Let's check for LeftArrow and RightArrow key presses.
v = 1

def Update():
    if Input.GetKey(KeyCode.I):
        v += 0.2
    if Input.GetKey(KeyCode.K):
        v -= 0.2

    if Input.GetKey(KeyCode.LeftArrow):
        # steer left
    if Input.GetKey(KeyCode.RightArrow):
        # steer right

    left_wheel.SetSliderValue("SPEED", v)
    right_wheel.SetSliderValue("SPEED", v)
We now have the conditional sentences sentences that check if the arrow keys are pressed. Now we just need to create a variable that will hold our angle.
A really elegant way to do this is initializing it at the start of the Update function, then increase it or decrease it in the if sentence blocks.
angle = 0
if Input.GetKey(KeyCode.LeftArrow):
    angle += 40
if Input.GetKey(KeyCode.RightArrow):
    angle -= 40
This way if no key is pressed, the angle will remain zero. If both keys are pressed simultaneously, the angle will be 0 + 40 - 40 = 0.
Now we just call the SetAngle functions and we're done.
left_wheel.SetAngle(angle)
right_wheel.SetSliderValue(angle)Now let's try do the same thing, but with a spinning block. This way we'll show how to control your machine indirectly. This approach can be used to control almost anything.
Here's our machine:

To control the steering angle through a spinning block, we need to set just the right speed for the spinning block to turn to the desired angle.
But to know what speed to apply to the block, we need to know where we are steering first in order to adjust. Our steering angle is the difference between where the car is pointing and where the wheels are pointing.
We need car heading and steering block heading angles. Good way to get them is by using EulerAngles block property. This property will return a vector of three angles, one for each axis (x, y, z) in range from 0 to 360.
starting_block = Besiege.GetBlock("STARTING BLOCK 1")
spinning_block = Besiege.GetBlock("SPINNING 1")

def Update():
    car_angles = starting_block.EulerAngles
    spinning_angles = spinning_block.EulerAngles
By toying around with the car a bit, we can see that the values we want are in the vector's y component. Now we need to calculate the angle between them. This is tricky, because we need to get the shortest angle and we can't just substract the smaller from the bigger one. For example, the shortest angle between 330° and 30° is 60° and not 300°.
Good thing is we can access methods from UnityEngine Mathf module. Function Mathf.DeltaAngle will get us what we want.
car_heading = starting_block.EulerAngles.y
spinning_heading = spinning_block.EulerAngles.y
steering_angle = Mathf.DeltaAngle(car_heading, spinning_heading)
Mathf.DeltaAngle calculates the shortest angle from car_heading to spinning_heading. That's why if car_heading is bigger, we get negative value, which means negative steering angle is left and positive is right, as you can see on the picture.
We have our steering angle. Now we need to know how we want to steer. We will create a variable called target_angle.
Target angle will be 30 degrees to the left (-30) if we're holding down left arrow and 30 degrees to the right (+30) when we're holding down right arrow. If we let go of the keys, the target_angle will return back to 0.
We will do this the same way as we set the angle in the last example.
starting_block = Besiege.GetBlock("STARTING BLOCK 1")
spinning_block = Besiege.GetBlock("SPINNING 1")

def Update():
    car_heading = starting_block.EulerAngles.y
    spinning_heading = spinning_block.EulerAngles.y
    steering_angle = Mathf.DeltaAngle(car_heading, spinning_heading)

    target_angle = 0
    if Input.GetKey(KeyCode.LeftArrow):
        target_angle += 30
    if Input.GetKey(KeyCode.RightArrow):
        target_angle -= 30
Now we need to use the information about our car to calculate which way and how fast to spin our spinning block to make it point in direction of target_angle. To keep it simple for now, let's just try substracting target angle from the current angle. The maximum difference between the angles is 60, so if we divide it by 120, we will get maximum 0.5 speed slider value, keeping the steering smooth.
speed = (steering_angle - target_angle)/120This way we convert the steering error into spinning block speed. If the angles match, the speed will be zero, meaning the spinning block will hold the angle. If the angles are off, the speed will be right to correct the angle.
Now we only need to set the slider value:
spinning_block.SetSliderValue("SPEED", speed)You should be able to do some real scripting by now. And that's what we're going to do.
Here's our next objective:

Create a drone with four spinning blocks for propellers. Invert two of those to balance it. We will be writing an autopilot stabilisation script for the drone. It's quite stable on it's own, so it won't be that hard to tune it, but it will teach you the concepts behind it. We will also include a reactionary wheel in the center to turn the drone left and right.
First, find out at what speed of the spinning blocks the drone hovers at the same altitude. With my drone, that speed was 0.9. Save it to a global variable HOVER_SPEED. The speeds we will be applying to the spinning blocks will all be deviations of this value.
Similarly to the previous example, we will be matching drones parameters to our target parameters and then adjusting the input with a bit more complex controllers. Let's start by defining target variables and handling input for pitch, roll and altitude.
target_altitude = 0

def Update():
    """
    Functions in Python have their own local scope.
    To make sure we are changing global variables instead of creating
    new local variables with the same name,
    we use the global keyword.
    """
    global target_altitude

    target_pitch = 0
    if Input.GetKey(KeyCode.UpArrow):
        target_pitch = 10
    if Input.GetKey(KeyCode.DownArrow):
        target_pitch = -10

    target_roll = 0
    if Input.GetKey(KeyCode.LeftArrow):
        target_roll = 10
    if Input.GetKey(KeyCode.RightArrow):
        target_roll = -10

    if Input.GetKey(KeyCode.I):
        target_altitude = target_altitude + 5 * Time.deltaTime
    if Input.GetKey(KeyCode.K):
        target_altitude = target_altitude - 5 * Time.deltaTime
As you see, we will be using I and K to move the target altitude. When the key is held, we will be moving it by 5 units per second. We do this by multiplying 5 with Time.deltaTime.
Arrow keys will be controlling pitch and roll. Each will bank the drone for 10 degrees in it's direction.

Same as before, the first step is getting machine's parameters: angles and altitude. We need to convert them so they match our target values. Because we will be using more advanced control loop feedback mechanisms (controllers) than last time, we will also need the rate of change (speed) of the machine's parameters.
position = starting_block.Position
rotation = starting_block.EulerAngles

machine_altitude = position.y
vertical_velocity = (machine_altitude - last_altitude) / Time.deltaTime

machine_pitch = rotation.x
pitch_velocity = Mathf.DeltaAngle(machine_pitch, last_pitch) / Time.deltaTime

machine_roll = rotation.z
roll_velocity = Mathf.DeltaAngle(machine_roll, last_roll) / Time.deltaTime

last_altitude = machine_altitude
last_pitch = machine_pitch
last_roll = machine_roll
Don't forget to initialize last_* variables at the start of the script.
With our machine and target parameters ready, it's time to program our controllers. Real drones do this by implementing PID (proportional-integral-derivative) controller and so do we.
The PID controller accounts for present values, past values and possible future values. It determines the output based on three components:
- proportional error - distance to the target value
- integral error - proportional error accumulated over time
- derivative error - error based on the rate of change (speed)
The proportional error is basically what we used in the previous example - we subtracted the values. For altitude controller, this would be:
altitude_p_error = target_altitude - machine_altitudeThe integral error is accumulated proportional error. A good example of why we need this is if we're lifting heavy loads with the drone. When lifting, greater rotor speeds are required to keep the altitude. The controller would accumulate the error and learn to apply more power to all rotors.
altitude_i_error = altitude_i_error + altitude_p_error * Time.deltaTimeFinally the derivative component which is simply the speed or rate of change. Accounting for this will greatly help us fix on the target, especially when the controlled value carries momentum, in this case our drone falling or rising rapidly.
altitude_d_error = - vertical_velocityThe output value will be normalized sum of these components, multiplied by their gain coefficients:
altitude_p_gain = 1
altitude_i_gain = 1
altitude_d_gain = 1
For now, we can set them to 1. Later, when tuning the controllers, we will change these values to manipulate how the controllers react to change.
The output value for the altitude controller is now:
    altitude_adjustment = ( altitude_p_error * altitude_p_gain +
                            altitude_i_error * altitude_i_gain +
                            altitude_d_error * altitude_d_gain) / 20
The controller returns zero when the machine is on target. By dividing the output value by 20, it's proportional component will now return 1 when 20 units below target or -1 when 20 units above target. With this, we try to normalize the output between -1 (rotors standing still) and +1 (rotors at double hover speed).
We implement similar controllers also for pitch and roll.
Now it's time to apply new values.
Altitude adjustment applies to all rotors equally. Positive pitch adjustment means the pitch angle is too big so the drone needs to be tilted forward. When doing that, the rear rotor speeds will be increased and the front decreased. That is why we put negative sign infront of pitch adjustment for front rotors. We do similarly for roll adjustment.
front_left_speed = HOVER_SPEED + HOVER_SPEED * (altitude_adjustment - pitch_adjustment - roll_adjustment)
front_right_speed = HOVER_SPEED + HOVER_SPEED * (altitude_adjustment - pitch_adjustment + roll_adjustment)
rear_left_speed = HOVER_SPEED + HOVER_SPEED * (altitude_adjustment + pitch_adjustment - roll_adjustment)
rear_right_speed = HOVER_SPEED + HOVER_SPEED * (altitude_adjustment + pitch_adjustment + roll_adjustment)
With all controllers in place, it is time to tune them.
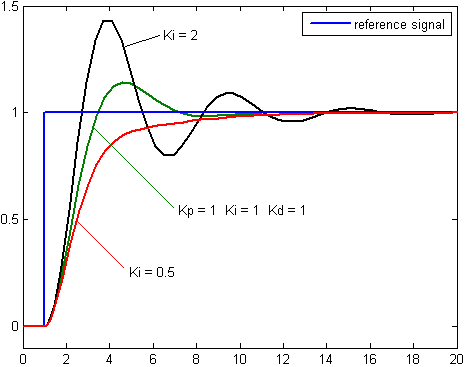
We watch how far the drone overshoots the target. We want the drone to reach the target as fast as possible, but minimise the overshoot and the wobble that comes after it. Overshooting with altitude could prove extremely problematic, especially when trying to land the drone, as it could slam it into the ground. Overshooting with pitch or roll is more acceptable as we want to keep good responsiveness of the controls.
When tuning the pitch and roll controllers, we notice that it the drone sometimes starts shaking violently. It seems that the drone carries too much rotational inertia, so it just swings over the target value and then comes back with the same speed. To fix it, we will lower the d_gain parameter.
If you tuned your controllers right, the drone should be easy and responsive to fly.
Tutorials
Guides to scripting from basic to advanced.
Installation
Required file structure.
Running scripts
Get started; how to run scripts and how to import / export them.
Block identifiers
How to select blocks.
Block handlers
Manipulating blocks.
Functions
All available functions.
Property identifiers
How to select block properties.
Watchlist
How to debug your script.
API
How to integrate with your mod.
Console commands
Mod configuration and Python console commands.
Fueled by coffee
