-
Notifications
You must be signed in to change notification settings - Fork 323
Add the multi language support, and add the german version in the docs #1224
New issue
Have a question about this project? Sign up for a free GitHub account to open an issue and contact its maintainers and the community.
By clicking “Sign up for GitHub”, you agree to our terms of service and privacy statement. We’ll occasionally send you account related emails.
Already on GitHub? Sign in to your account
Open
Esscraye
wants to merge
1
commit into
mylinuxforwork:main
Choose a base branch
from
Esscraye:main
base: main
Could not load branches
Branch not found: {{ refName }}
Loading
Could not load tags
Nothing to show
Loading
Are you sure you want to change the base?
Some commits from the old base branch may be removed from the timeline,
and old review comments may become outdated.
Open
Changes from all commits
Commits
File filter
Filter by extension
Conversations
Failed to load comments.
Loading
Jump to
Jump to file
Failed to load files.
Loading
Diff view
Diff view
There are no files selected for viewing
Large diffs are not rendered by default.
Oops, something went wrong.
This file contains hidden or bidirectional Unicode text that may be interpreted or compiled differently than what appears below. To review, open the file in an editor that reveals hidden Unicode characters.
Learn more about bidirectional Unicode characters
This file contains hidden or bidirectional Unicode text that may be interpreted or compiled differently than what appears below. To review, open the file in an editor that reveals hidden Unicode characters.
Learn more about bidirectional Unicode characters
| Original file line number | Diff line number | Diff line change |
|---|---|---|
| @@ -0,0 +1,23 @@ | ||
| # Hyprland und NVIDIA | ||
|
|
||
| > [!WARNING] | ||
| > Es gibt keine offizielle Hyprland-Unterstützung für NVIDIA-Hardware. Möglicherweise lässt sich Hyprland jedoch zum Laufen bringen. Siehe dazu: | ||
| > https://wiki.hyprland.org/Nvidia/ | ||
|
|
||
| Einige Benutzer berichten, dass Hyprland mit den Dotfiles erfolgreich auf Systemen mit NVIDIA-GPUs unter Verwendung des Open-Source-Treibers "nouveau" installiert werden konnte. | ||
|
|
||
| Alternativ bietet ML4W eine BETA-Option an, um den proprietären NVIDIA-Treiber zu installieren (GRUB-Bootloader erforderlich). | ||
| Installiere die Dotfiles mit: | ||
|
|
||
| ```sh | ||
| ml4w-hyprland-setup -m nvidia | ||
| ``` | ||
|
|
||
| <div class="tip custom-block" style="padding-top: 20px; padding-bottom: 8px;"> | ||
|
|
||
| **Wähle in der ML4W Settings-App unter System → Environment die [folgende Variation](https://github.com/mylinuxforwork/dotfiles/blob/main/share/dotfiles/.config/hypr/conf/environments/nvidia.conf) aus** | ||
|
|
||
| Oder setze die entsprechenden Umgebungsvariablen direkt in `hyprland.conf`. | ||
|
|
||
| </div> | ||
|
|
This file contains hidden or bidirectional Unicode text that may be interpreted or compiled differently than what appears below. To review, open the file in an editor that reveals hidden Unicode characters.
Learn more about bidirectional Unicode characters
| Original file line number | Diff line number | Diff line change |
|---|---|---|
| @@ -0,0 +1,8 @@ | ||
| # Eingabekonfiguration | ||
|
|
||
| Du kannst die Einstellungen für Tastatur, Maus oder Touchpad jederzeit in dieser Datei ändern: | ||
|
|
||
| `./config/hypr/conf/keyboard.conf` | ||
|
|
||
| Deine Eingabekonfiguration kann bei jedem Update der Dotfiles wiederhergestellt werden. | ||
|
|
This file contains hidden or bidirectional Unicode text that may be interpreted or compiled differently than what appears below. To review, open the file in an editor that reveals hidden Unicode characters.
Learn more about bidirectional Unicode characters
| Original file line number | Diff line number | Diff line change |
|---|---|---|
| @@ -0,0 +1,45 @@ | ||
| # Monitor-Einrichtung | ||
|
|
||
| Wenn du die Standard-Monitor-Konfiguration ändern möchtest, kannst du entweder eine persönliche Monitor-Variation anlegen oder `nwg-displays` verwenden. | ||
|
|
||
| ## Persönliche Monitor-Variation | ||
|
|
||
| Öffne die ML4W Dotfiles Settings App und wähle den Reiter "System". Beim Herunterscrollen findest du die mitgelieferten Monitor-Variationen. | ||
|
|
||
|  | ||
|
|
||
| Du kannst auch eine eigene Variation erstellen, wie in der Dokumentation beschrieben: [Configuration-Variations](https://github.com/mylinuxforwork/dotfiles/wiki/Configuration-Variations). | ||
|
|
||
| ## Verwendung von nwg-displays | ||
|
|
||
| Die ML4W Dotfiles unterstützen die Anwendung [nwg-displays](https://github.com/nwg-piotr/nwg-displays) zur Konfiguration deiner Anzeigeeinstellungen. | ||
|
|
||
| Installiere `nwg-displays` für deine Distribution wie folgt: | ||
|
|
||
| ::: code-group | ||
|
|
||
| ```sh [<i class="devicon-archlinux-plain"></i> Arch] | ||
| sudo pacman -S nwg-displays | ||
| ``` | ||
|
|
||
| ```sh [<i class="devicon-fedora-plain"></i> Fedora] | ||
| sudo dnf install python-build python-installer python-wheel python-setuptools | ||
| git clone https://github.com/nwg-piotr/nwg-displays ~/nwg-displays | ||
| cd ~/nwg-displays && chmod +x install.sh | ||
| sudo ./install.sh | ||
| ``` | ||
| ```sh [<i class="devicon-opensuse-plain"></i> openSuse] | ||
| sudo zypper install nwg-displays | ||
| ``` | ||
|
|
||
| ::: | ||
|
|
||
| Öffne die App und wende deine gewünschten Monitoreinstellungen an. | ||
|
|
||
|  | ||
|
|
||
| Anschließend öffne die ML4W Settings App und wähle die Monitor-Variation `nwg-displays`. | ||
|
|
||
|  | ||
|
|
||
| > Ab jetzt kannst du deine Monitoreinstellungen direkt in `nwg-displays` ändern. |
This file contains hidden or bidirectional Unicode text that may be interpreted or compiled differently than what appears below. To review, open the file in an editor that reveals hidden Unicode characters.
Learn more about bidirectional Unicode characters
| Original file line number | Diff line number | Diff line change |
|---|---|---|
| @@ -0,0 +1,10 @@ | ||
| # Bewahre deine Anpassungen | ||
|
|
||
| > [!NOTE] | ||
| > Der Dotfiles Installer installiert die Dotfiles standardmäßig in `.mydotfiles`. Du kannst den Zielordner in den Einstellungen anpassen. | ||
|
|
||
| ## Schütze Ordner in `.config` mit dem Dotfiles Installer | ||
|
|
||
| Wenn du deine aktuellen ML4W-Dotfiles mit dem Dotfiles Installer auf eine neue Version aktualisierst, kannst du Konfigurationsordner oder -dateien im Ordner `.config` mit deinen Anpassungen schützen. Der Dotfiles Installer merkt sich deine Auswahl für zukünftige Updates. | ||
|
|
||
| 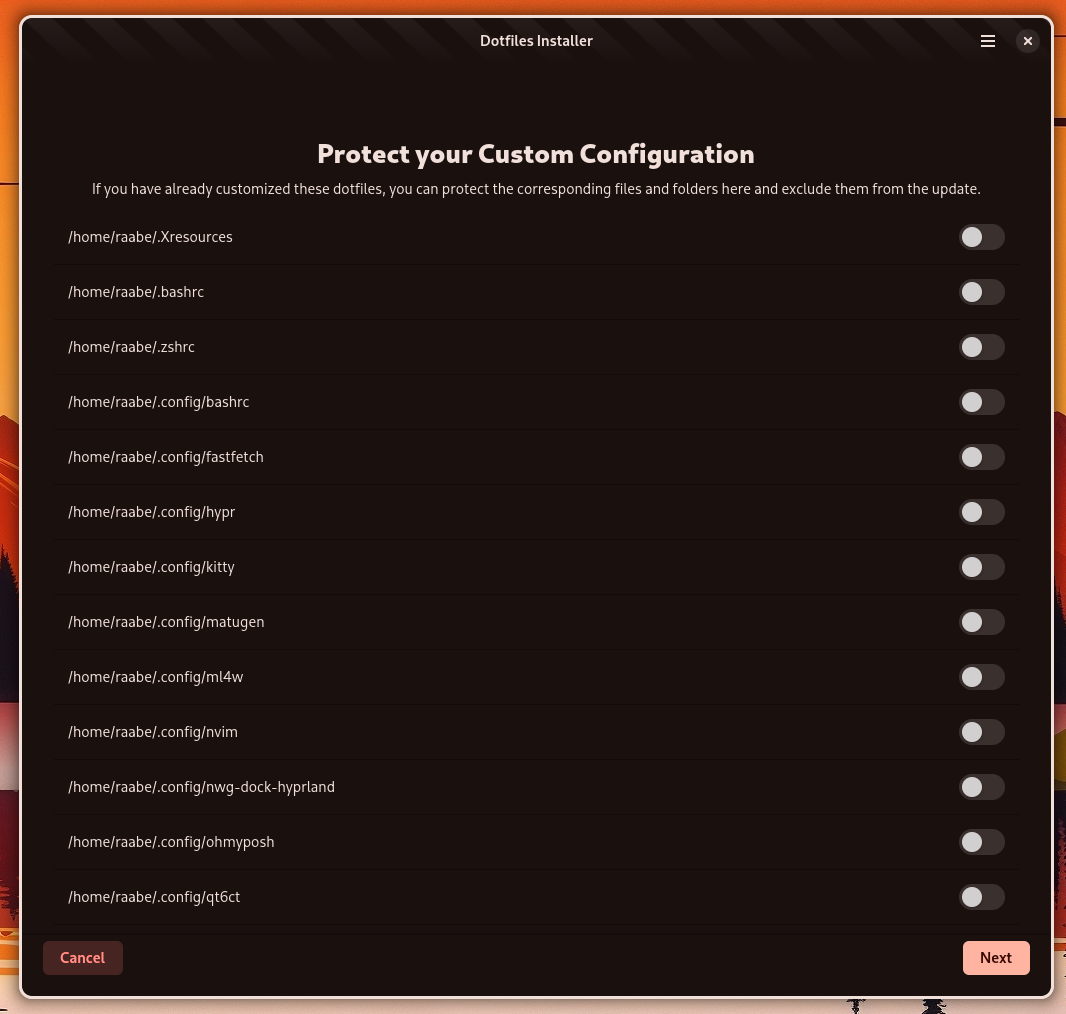 |
This file contains hidden or bidirectional Unicode text that may be interpreted or compiled differently than what appears below. To review, open the file in an editor that reveals hidden Unicode characters.
Learn more about bidirectional Unicode characters
| Original file line number | Diff line number | Diff line change |
|---|---|---|
| @@ -0,0 +1,34 @@ | ||
| # SDL umschalten | ||
|
|
||
| Einige Spiele verwenden veraltete SDL-Versionen, die ohne Wayland-Unterstützung kompiliert wurden. Das bedeutet, dass sie wahrscheinlich nicht starten (oder beim Start abstürzen), wenn `SDL_VIDEODRIVER` auf `wayland` gesetzt ist.** | ||
|
|
||
| Du kannst zwischen Wayland und X11 in der Datei `~/dotfiles/hypr/conf/custom.conf` wechseln: | ||
|
|
||
| ```sh | ||
| # SDL-Version | ||
| env = SDL_VIDEODRIVER,wayland | ||
| # env = SDL_VIDEODRIVER,x11 | ||
| ``` | ||
|
|
||
| > [!NOTE] | ||
| > In Versionen vor 2.9.5RL findest du den Eintrag in `~/dotfiles/hypr/conf/ml4w.conf` | ||
|
|
||
| ## Toolkit-Backend Umgebungsvariablen | ||
|
|
||
| Diese Umgebungsvariablen stellen sicher, dass die richtigen Backends in Hyprland verwendet werden: | ||
|
|
||
| | Variable | Wert | | ||
| |----------|------| | ||
| | `GDK_BACKEND` | `wayland,x11,*` | | ||
| | `SDL_VIDEODRIVER` | `wayland` | | ||
| | `CLUTTER_BACKEND` | `wayland` | | ||
|
|
||
| > [!TIP] | ||
| > Verschiebe die folgende Zeile in deine `custom.conf`, um mehr Kontrolle zu haben: | ||
| > | ||
| > ```ini | ||
| > env = SDL_VIDEODRIVER,wayland | ||
| > ``` | ||
|
|
||
|
|
||
|
|
This file contains hidden or bidirectional Unicode text that may be interpreted or compiled differently than what appears below. To review, open the file in an editor that reveals hidden Unicode characters.
Learn more about bidirectional Unicode characters
| Original file line number | Diff line number | Diff line change |
|---|---|---|
| @@ -0,0 +1,25 @@ | ||
| # Besonderer Dank | ||
|
|
||
| Ich möchte allen Mitwirkenden der ML4W-Dotfiles und allen Entwicklern danken, die großartige Konfigurationen für unseren Lieblings-Tiling-Fenstermanager Hyprland erstellen. Eure Unterstützung, das Testen jeder Version und all eure wertvollen Pull Requests mit Verbesserungen und Fehlerbehebungen haben das Projekt wiederholt verbessert und seine Qualität gesteigert. | ||
|
|
||
| Besonderer Dank geht an: | ||
|
|
||
| https://github.com/harilvfs für die Unterstützung beim Erstellen des neuen Wikis https://mylinuxforwork.github.io/dotfiles/ | ||
|
|
||
| https://github.com/Mat-Armstrong für das neue ML4W-Logo-Design und vieles mehr. | ||
|
|
||
| https://github.com/dwilliam62 für all deine Unterstützung und Tests seit Beginn des Projekts | ||
|
|
||
| und so viele mehr... | ||
|
|
||
| Die folgenden Projekte haben mich inspiriert: | ||
|
|
||
| - https://github.com/JaKooLit/Hyprland-Dots | ||
| - https://github.com/prasanthrangan/hyprdots | ||
| - https://github.com/sudo-harun/dotfiles | ||
| - https://github.com/dianaw353/hyprland-configuration-rootfs | ||
| - https://github.com/basecamp/omarchy | ||
|
|
||
| und viele weitere... | ||
|
|
||
| Und natürlich https://github.com/vaxerski für diese großartige Software. |
This file contains hidden or bidirectional Unicode text that may be interpreted or compiled differently than what appears below. To review, open the file in an editor that reveals hidden Unicode characters.
Learn more about bidirectional Unicode characters
| Original file line number | Diff line number | Diff line change |
|---|---|---|
| @@ -0,0 +1,25 @@ | ||
| # Default Browser | ||
|
|
||
| <div align="center" class="tip custom-block" style="padding-top: 20px; padding-bottom: 20px;"> | ||
|
|
||
| **Der Standardbrowser ist Firefox. Du kannst aber jeden beliebigen Browser als Standard setzen.** | ||
|
|
||
| </div> | ||
|
|
||
| As an example, let's install brave. | ||
|
|
||
| ```sh | ||
| yay -S brave-bin | ||
| ``` | ||
|
|
||
| Öffne anschließend die ML4W Dotfiles Settings App mit `SUPER+CTRL+S`, wähle den Reiter Waybar, scrolle nach unten und ändere den Browser auf `brave`. | ||
|
|
||
|  | ||
|
|
||
| Führe dann folgenden Befehl in einem Terminal aus: | ||
|
|
||
| ```sh | ||
| xdg-settings set default-web-browser brave.desktop | ||
| ``` | ||
|
|
||
| Um den Waybar-Quicklink für den Browser zu ändern, folge den Anweisungen im Abschnitt `Customize Waybar`. | ||
This file contains hidden or bidirectional Unicode text that may be interpreted or compiled differently than what appears below. To review, open the file in an editor that reveals hidden Unicode characters.
Learn more about bidirectional Unicode characters
| Original file line number | Diff line number | Diff line change |
|---|---|---|
| @@ -0,0 +1,182 @@ | ||
|
|
||
| # Display Manager | ||
|
|
||
| Dieses Tutorial führt dich durch die Installation eines Display Managers wie SDDM und das Wechseln zwischen verschiedenen Display Managern (z. B. SDDM und GDM) auf einem Linux-System. Display Manager bieten eine grafische Anmeldemaske und verwalten Benutzersitzungen. | ||
|
|
||
| > [!NOTE] | ||
| > Die ML4W Dotfiles enthalten keine Display-Manager-Konfiguration, um nicht direkt sensible Systemkomponenten wie Display Manager zu manipulieren. | ||
|
|
||
| Aktualisiere zuerst deine Paketliste, bevor du einen Display Manager installierst. | ||
|
|
||
| ::: code-group | ||
|
|
||
| ```sh [Arch] | ||
| sudo pacman -Syu | ||
| ``` | ||
|
|
||
| ```sh [Fedora] | ||
| sudo dnf update | ||
| ``` | ||
|
|
||
| ```sh [openSuze] | ||
| sudo zypper update | ||
| ``` | ||
| ::: | ||
|
|
||
| ## SDDM | ||
|
|
||
| ### SDDM für deine Distribution installieren: | ||
|
|
||
| ::: code-group | ||
|
|
||
| ```sh [Arch] | ||
| sudo pacman -S sddm | ||
| ``` | ||
|
|
||
| ```sh [Fedora] | ||
| sudo dnf install sddm | ||
| ``` | ||
|
|
||
| ```sh [openSuze] | ||
| sudo zypper install sddm | ||
| ``` | ||
| ::: | ||
|
|
||
|
|
||
| ### SDDM aktivieren (falls nicht automatisch aktiviert) | ||
|
|
||
| Während der Installation kann es sein, dass einige Distributionen dich auffordern, den Standard-Display-Manager auszuwählen. Falls nicht, oder wenn du ihn explizit aktivieren möchtest, kannst du dies tun. | ||
|
|
||
| Für Systeme mit systemd (die meisten modernen Distributionen): | ||
|
|
||
| ```sh | ||
| sudo systemctl enable sddm | ||
| ``` | ||
|
|
||
| Wenn zuvor ein anderer Display Manager (z. B. GDM) aktiviert war, deaktiviert das Aktivieren von SDDM diesen in der Regel automatisch. Wenn du sicher gehen möchtest, kannst du den alten explizit deaktivieren (z. B. GDM): | ||
|
|
||
| ```sh | ||
| sudo systemctl disable gdm # Nur falls GDM zuvor aktiviert war | ||
| ``` | ||
| ### SDDM-Themes installieren | ||
|
|
||
| Die Installation eines SDDM-Themes hängt vom jeweiligen Theme-Entwickler ab. Viele großartige SDDM-Themes findest du auf Gnome Look: https://www.gnome-look.org/browse?cat=101&ord=top | ||
|
|
||
| Die Installation eines benutzerdefinierten SDDM-Themes umfasst in der Regel das Herunterladen des Themes, Entpacken, Verschieben in das richtige Verzeichnis und das Konfigurieren von SDDM. | ||
|
|
||
|
|
||
| #### Schritt 1: Theme herunterladen | ||
|
|
||
| 1. Öffne deinen Webbrowser und gehe zur Theme-Seite: https://www.gnome-look.org/p/1312658 | ||
| 2. Navigiere zum Reiter "Files" auf der Theme-Seite. | ||
| 3. Lade die neueste Version des Themes herunter (meist ein .tar.gz oder .zip). Für das "Nordic"-Theme suche nach einer Datei wie Nordic-SDDM.tar.gz. | ||
|
|
||
| > [!TIP] | ||
| > Merke dir, wo die Datei gespeichert wird (z. B. dein Downloads-Ordner). | ||
|
|
||
| #### Schritt 2: Theme entpacken | ||
|
|
||
| 1. Öffne ein Terminal. | ||
| 2. Wechsle in das Verzeichnis, in das du das Theme heruntergeladen hast. Beispiel: | ||
|
|
||
| ```sh | ||
| cd ~/Downloads | ||
| ``` | ||
| 3. Entpacke das heruntergeladene Archiv. | ||
|
|
||
| Wenn es eine .tar.gz-Datei ist: | ||
|
|
||
| ```sh | ||
| tar -xvf Nordic-SDDM.tar.gz | ||
| ``` | ||
|
|
||
| Wenn es eine .zip-Datei ist: | ||
|
|
||
| ```sh | ||
| unzip Nordic-SDDM.zip | ||
| ``` | ||
| Dies erstellt ein neues Verzeichnis (z. B. Nordic-SDDM oder Nordic) mit den Theme-Dateien. | ||
|
|
||
| #### Schritt 3: Theme in das SDDM-Themes-Verzeichnis verschieben | ||
|
|
||
| SDDM-Themes liegen typischerweise in `/usr/share/sddm/themes/`. Du benötigst `sudo`, um Dateien in dieses Verzeichnis zu verschieben. | ||
|
|
||
| Verschiebe das entpackte Theme-Verzeichnis in das SDDM-Themes-Verzeichnis. Ersetze `Nordic-SDDM` durch den tatsächlichen Verzeichnisnamen. | ||
|
|
||
| ```sh | ||
| sudo mv Nordic-SDDM /usr/share/sddm/themes/ | ||
| ``` | ||
| > [!NOTE] | ||
| > Achte darauf, das gesamte Theme-Verzeichnis (nicht nur dessen Inhalt) nach `/usr/share/sddm/themes/` zu verschieben. | ||
|
|
||
| #### Schritt 4: SDDM konfigurieren, damit es das neue Theme verwendet | ||
|
|
||
| Bearbeite die SDDM-Konfigurationsdatei und setze das Theme (z. B. `/etc/sddm.conf` oder eine Datei unter `/etc/sddm.conf.d/`). | ||
|
|
||
| ```sh | ||
| sudo vim /etc/sddm.conf | ||
| ``` | ||
|
|
||
| 1. Finde den Abschnitt `[Theme]` oder füge ihn hinzu. | ||
| 2. Setze `Current=` auf den Namen des Theme-Ordners, z. B.: | ||
|
|
||
| ```ini | ||
| [Theme] | ||
| Current=Nordic-SDDM | ||
| ``` | ||
|
|
||
| 3. Speichere und beende den Editor. | ||
|
|
||
| Alternative: Lege eine Datei unter `/etc/sddm.conf.d/` an, falls `/etc/sddm.conf` nicht vorhanden ist. | ||
|
|
||
| ```sh | ||
| sudo vim /etc/sddm.conf.d/custom-theme.conf | ||
| ``` | ||
|
|
||
| Füge dann den Abschnitt hinzu: | ||
|
|
||
| ```ini | ||
| [Theme] | ||
| Current=Nordic-SDDM | ||
| ``` | ||
|
|
||
| #### Schritt 5: Änderungen anwenden | ||
|
|
||
| Starte den SDDM-Dienst neu: | ||
|
|
||
| ```sh | ||
| sudo systemctl restart sddm | ||
| ``` | ||
| > [!WARNING] | ||
| > Dieser Befehl bringt dich sofort zurück zum Login-Bildschirm. Speichere vorher alle offenen Arbeiten. | ||
|
|
||
| Nach dem Neustart solltest du das neue SDDM-Theme sehen. Bei Problemen überprüfe Verzeichnisnamen und die `Current=`-Einstellung auf Tippfehler. | ||
|
|
||
| ## Zwischen Display Managern wechseln | ||
|
|
||
| Die meisten Distributionen bieten einfache Möglichkeiten, zwischen installierten Display Managern zu wechseln. Beispiel: | ||
|
|
||
| SDDM deaktivieren: | ||
|
|
||
| ```sh | ||
| sudo systemctl disable sddm | ||
| ``` | ||
|
|
||
| GDM aktivieren: | ||
|
|
||
| ```sh | ||
| sudo systemctl enable gdm # oder gdm3 | ||
| ``` | ||
|
|
||
| SDDM stoppen und GDM starten (optional): | ||
|
|
||
| ```sh | ||
| sudo systemctl stop sddm | ||
| sudo systemctl start gdm # oder gdm3 | ||
| ``` | ||
|
|
||
| System neu starten: | ||
|
|
||
| ```sh | ||
| sudo reboot | ||
| ``` |
Oops, something went wrong.
Add this suggestion to a batch that can be applied as a single commit.
This suggestion is invalid because no changes were made to the code.
Suggestions cannot be applied while the pull request is closed.
Suggestions cannot be applied while viewing a subset of changes.
Only one suggestion per line can be applied in a batch.
Add this suggestion to a batch that can be applied as a single commit.
Applying suggestions on deleted lines is not supported.
You must change the existing code in this line in order to create a valid suggestion.
Outdated suggestions cannot be applied.
This suggestion has been applied or marked resolved.
Suggestions cannot be applied from pending reviews.
Suggestions cannot be applied on multi-line comments.
Suggestions cannot be applied while the pull request is queued to merge.
Suggestion cannot be applied right now. Please check back later.
There was a problem hiding this comment.
Choose a reason for hiding this comment
The reason will be displayed to describe this comment to others. Learn more.
This line contains English text in a German translation file. It should be translated to German. The English text "As an example, let's install brave." appears in what should be a fully German document.