Manual_Plugins
Ediphy has different types of content available, which you can insert by means of the plugins, which are divided into different categories.
-
Text: Plugins in which the inclusion of text is predominant.
- Text: Editable and customizable text box. Besides introducing text in different formats you will be able to insert code, tables, quotes, equations, etc.
- Table: Filterable and orderable table. With this plugin you will be able to insert tables with a big amount of data. You can even import the data from a csv file.
-
Images: Plugins that show images.
- Imagen: Image where you can place hotspots that link to other parts of the document, external webpages or throw custom messages. You can upload your own image or import it from Flickr or another provider.
- Graph: Represents a graph of the provided data. You can fill the graph data by hand or import a csv file.
-
Multimedia: Plugins with interactive content.
- Video player: Video player in which you can insert hotspots that link to other parts of the document, external webpages or throw custom messages. You can upload your own video or import it from Youtube or another provider.
- Audio player: Audio player in which you can insert hotspots that link to other parts of the document, external webpages or throw custom messages. You can upload your own audio tack or import it from Soundcloud or another provider.
-
Objects: Plugins that show complex content.
- Webpage: Embedded webpages.
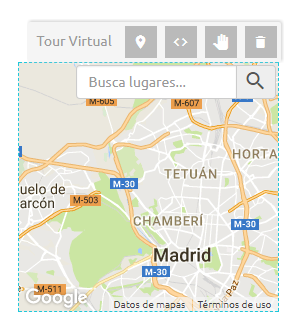
- Google Map: Google map in which you can insert hotspots that link to other parts of the document, external webpages or throw custom messages.
- Objeto Flash: Reproductor de objetos Flash. Puedes introducir una URL o subir tu propio fichero swf.
- PDF viewer: Viewer for PDF files in which you can insert hotspots that link to other parts of the document, external webpages or throw custom messages.
-
Evaluation: Plugins which allow to create quiz questions. You need to specify the correct answer.
- Multiple choice: Multiple choice question with a single right answer. You can insert content from other plugins in order to make up the question statement and answers.
- Multiple answer: Multiple choice question with more than one right answer. You can insert content from other plugins in order to make up the question statement and answers.
- Free response: Free response answer. You can insert content from other plugins in order to make up the question statement.
- User input: Value input that the user will fill in with a numeric or textual value. You can specify an allowed error margin in case it is a numeric value, or choose if you want it to be case sensitivity in case it is textual.
- True or False: True or false question. You can insert content from other plugins in order to make up the question statements.
- Scorm Package: Plugin that allows for the insertion of embedded SCORM packages.
In order to create an instance of a plugin on the canvas, you just have to drag the button with its name from the top bar.
Since we are at a page, and not a slide, the box that was created when dragging the button with the plugin name, it will be center aligned at the top row of the page. If we now open the toolbar on the right, we will see that there are several panels for configuring the box that we have selected. Each plugin has different configuration options, but they all have in common the panel named Structure, which allows to customize the width and height of the box.
Another section common to all the plugins is the Style section. In it you will be able to choose the style of the box: The border, the background, etc.
Why don't you try creating content in slides and pages and see what differences there are?
 A special property of the pages is that they have a series of blocks that occupy the whole width of the page. Every time you drop new content on the grey zone, you will create one of those blocks. You can delete it by clicking on the trash icon on the bottom left corner of the block, or change their order by dragging them.
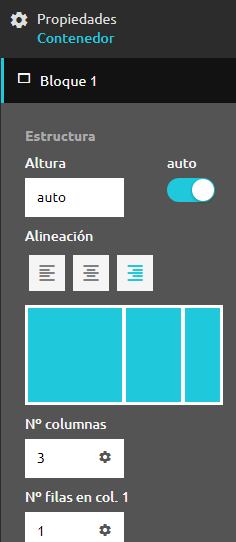
In order to customize the blocks, click on any of them and open the toolbar. On the toolbar you will see a series of panels named Block 1, Block 2... corresponding to all the blocks in the page. These are the properties you can edit:
A special property of the pages is that they have a series of blocks that occupy the whole width of the page. Every time you drop new content on the grey zone, you will create one of those blocks. You can delete it by clicking on the trash icon on the bottom left corner of the block, or change their order by dragging them.
In order to customize the blocks, click on any of them and open the toolbar. On the toolbar you will see a series of panels named Block 1, Block 2... corresponding to all the blocks in the page. These are the properties you can edit:
- Height: By default, blocks are as high as their content, but you may provide a specific height.
- Alignment: We may decide what kind of alighment we want in the block (left, right, center).
-
Layout: It is a representation of the layout of the block. Initially, it is Se trata de un dibujo que permite visualizar la estructura del bloque. Inicialmente se trata de un rectángulo azul, pero si editamos las siguientes propiedades veremos como cambia.
- Number of rows: We can divide each block into different columns. By default, the block is split into equal columns but you can decide on a different distribution.
- Number of columns. x: We also can divide each column into different rows. Rows can also be customized just like columns.
- Style: The following fields allow to customize the style of esach block (background, border, etc.)
Once you have customized each block the way you want, you can drag boxes into any of the cells you have created.
Slides do not require additional configuration like documents do. When you drag and drop a plugin name from the top bar, you can choose its exact position. Also, once created a box with the selected plugin, you can resize it by dragging the corner handlers or from the toolbar.
In order to facilitate edition, the boxes that you create have a series of shortcuts that allow accessing some of the most common toolbar functionalities in an easier way.
In order to delete a box, just click the trash button in the shortcuts. You can also press the del key on the keyboard.
Another shortcut commo to all boxes on a plage (not a slide) is the Adjust to page <> button. It simply makes the box occupy a 100% width.
Some plugins require a very thorough configuration which is too extensive to do from the toolbar. These plugins have an additional modal screen that you can access from the toolbar or the shortcuts.
Rich plugins are special plugins in which you can insert marks that act as links to other content: another view, a webpage or a contained view.
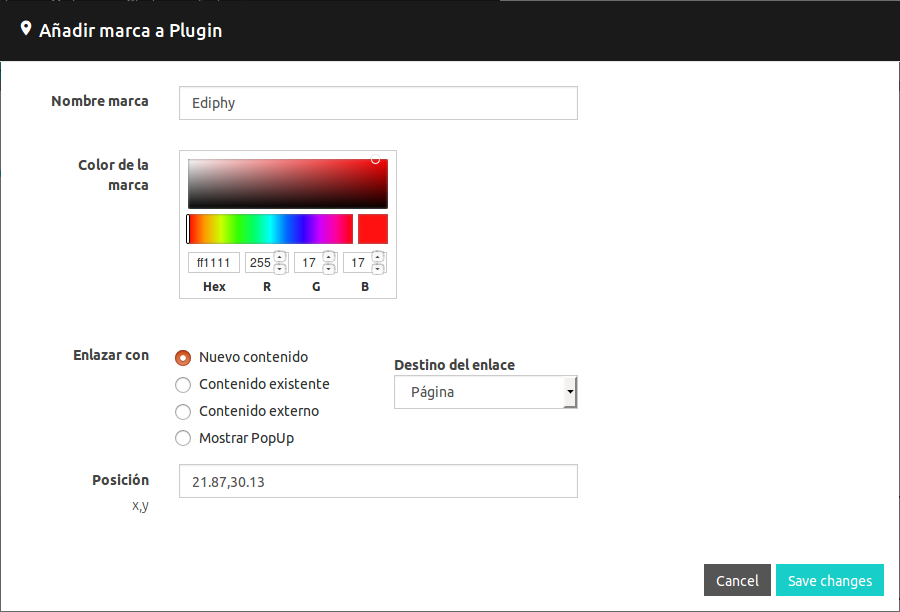
These plugins have a special shortcut that you can drag to the inside of the box in order to create a mark. When you do so, a modal view will pop up in which you can configure the behavior of the mark.
By default, a contained view will be created. In ordr to customize it, you have to double click its name in the bottom part of the index.
Regardless of the target of the mark, you can choose its name, position and color when you create it or from the toolbar if you want to edit it later. You can also move it by dragging.
When you preview the document, these plugins will have the following behavior: