Image_Conversion_Tools
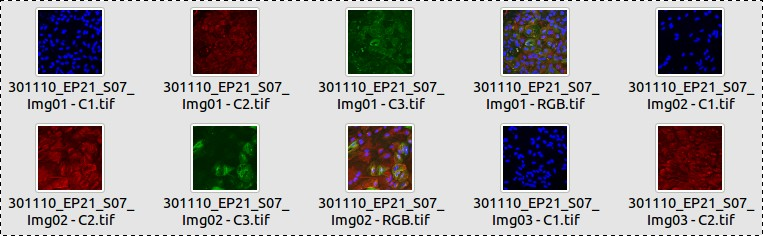
The MRI Image Conversion Tools allow to convert .lei or .lif and .lsm files to tif-files. The macro works on a folder containing the input images. Results are written into a sub-folder tif. Each channel of a multi-channel file is saved separately. Besides this an rgb-snapshot of the image is saved. A z-projection can optionally be applied to the images. A .lif example image can be found here, an .lsm example image here and a .zvi example image here.
To install the tools, drag the link MRI Image Conversion Tools.txt to the ImageJ launcher window, save it under macros/toolsets in the ImageJ installation and restart ImageJ.
You must have the Bio-Formats plugin installed. Check if you find Bio-Formats in the menu Plugins. If it is not installed, download the file bioformats_package.jar from the Bio-Formats download page. Save it into the plugins folder of your ImageJ.
Select the "MRI Image Conversion Tools" toolset from the >> button of the ImageJ launcher.

- the ? button opens this help page
- the Lif button runs the Lif2Tif conversion
- the Lsm button runs the Lsm2Tif conversion
- the Zvi button runs the Zvi2Tif conversion
When the macro is started a file-dialog is opened. Select the folder containing the images to be converted. The converted images will be written into a sub-folder tif of the input folder. For each channel the letter C and the number of the channel will be added to the filename. For the rgb-image [RGB" will be added to the filename.
By right-clicking on the Lif or Lsm button you can open the options dialog. Note that the same options are applied to both conversions, i.e. it does not matter on which button you change them.
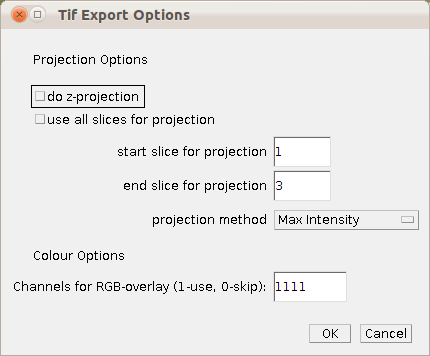
projection options
- do z-projection: if selected a z-projection is applied to stacks, otherwise the result images are saved as tif-stacks
- use all slices for projection: if selected all slices of the stack are used for the z-projection, otherwise only the slices from start slice to end slice
- start slice for projection: the first slice that will be used for the z-projection (if all is not selected above)
- end slice for projection: the last slice that will be used for the z-projection (if all is not selected above)
- projection method: the method that will be used to calculate the z-projection
colour options
- Channels for RGB-overlay (1-use, 0-skip) this allows to select the channels that are used for creating the rgb-overlay. if the first digit is 1 the first channel is used, if it is 0 it is not used, and so on.
- Options that you set remain valid until you change the current toolset or until you close ImageJ. After that the default-options well be active.
- If you select the toolset with Shift held down, the toolset will be opened in a text-editor you can change the default values for the options and save the file.
- 16.11.2011 - Fixed a bug that prevented the projection with all slices to work for lsm and zvi and added the choice of the channels to be used for the rgb-overlay.
 Volker Bäcker