EN_K8s_Workloads
Kubernetes Auto Scaling refers to the ability of a Kubernetes cluster to automatically adjust capacity according to workload. It helps ensure that pods have enough resources to run efficiently while optimizing resource usage to prevent waste.
In general, it is appropriate for stateless servers to use HPA. This is because VPA inevitably requires restarting the pod during the process of changing resources, and there is a limit to the resources (CPU, memory) that one node can have.
-
HPA (Horizontal Pod Autoscaler): Automatically adjusts the number of pods in
Replication Controller, Deployment, Replication set, Statefulsetbased on CPU utilization or metrics. Check the metrics periodically and adjust the number of replicas if the observed metric values deviate from the set target. It is an autoscaler that scales out. - VPA (Vertical Pod Autoscaler): Automatically adjusts the CPU and memory reservation of Pods to ensure resource efficiency. Updates the container's values based on request resource usage history to ensure that each pod has only enough resources to run effectively. You can recommend changes or configure them to automatically apply these changes. It is an autoscaler that scales up.
- CA (Cluster Autoscaler): Automatically adjusts the size of the Kubernetes cluster itself. If you have pods in your cluster that fail to run due to insufficient resources, you can add more nodes. If node utilization is low and its pods can be scheduled on other nodes, these nodes can be removed.
Scale up (vertical scaling) and Scale out (horizontal scaling) are strategies used in computing to increase system capacity to handle greater load or demand. Scale up involves increasing the capacity of existing hardware or software, typically by adding more resources like CPU or memory to an existing server. In contrast, Scale out involves adding more nodes or instances to a system, effectively distributing the load across multiple servers or instances. While scale up focuses on making individual components more powerful, scale out emphasizes distributing workloads across a larger infrastructure. These concepts are particularly relevant in cloud computing and data center management.
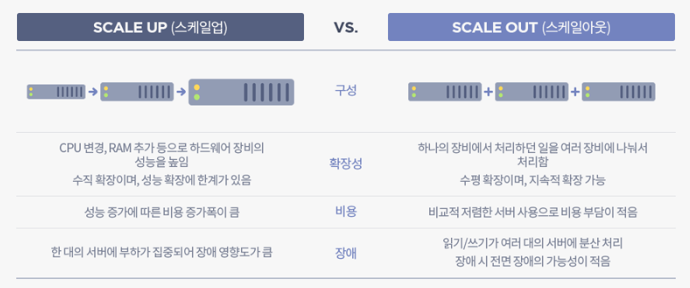
- Image Reference : https://tecoble.techcourse.co.kr/post/2021-10-12-scale-up-scale-out/
Kubernetes probes are a critical component for managing and ensuring the health of Pods within a Kubernetes cluster. This allows Kubernetes to perform regular checks on running containers to determine their health and take appropriate action based on the state of the application.
There are three main probe types that Kubernetes uses:
- Liveness Probes: Liveness Probes check whether the container is running properly. If a Liveness Probe fails, Kubernetes terminates the container and starts a new container according to the pod's restart policy. It is used to catch and handle situations where an application is running but cannot proceed (e.g., a deadlock).
- Readiness Probes: Readiness Probes check whether the container is ready to start receiving traffic. Containers that fail Readiness Probes do not receive traffic from the Kubernetes Service. This is important to ensure that traffic is only sent to pods that are actually ready to handle traffic, which is especially useful during startup or after a version upgrade.
- Startup Probes: Startup Probes are used to determine when a container application has been started. If your pods take a long time to start (e.g. due to a long initialization process), you can use startup probes to prevent the pods from being terminated by the active probe during the startup phase. After the Startup Probe is successful for the first time, it disables itself and the Liveness Probe takes over for subsequent probes.
Probes can be configured from Ford specifications.
Each probe type supports several ways to perform inspection.
- HTTP GET: Kubernetes performs an HTTP GET request to the container. A response code in the range 200 to 399 indicates success. If the connection fails with any other response code or within the time limit, it is treated as a failure.
- TCP Socket: Kubernetes attempts to open a TCP socket to the container. Success is indicated by the ability to establish a connection, failure is indicated by the inability to open the socket within the timeout period.
- exec: Kubernetes executes commands inside the container. Success is indicated by a return code of 0, and any other return code indicates failure.
Kubernetes probes are configured in a Pod's specification, typically under the .spec.containers[] field. Let's take a look at how each probe type can be configured within a Pod's YAML file and discuss the sequence in which these probes operate.
Here's how the probes might be set up in a Kubernetes deployment manifest:
apiVersion: v1
kind: Pod
metadata:
  name: my-application
spec:
  containers:
    - name: my-container
      image: my-image
      ports:
        - containerPort: 8080
      livenessProbe:
        httpGet:
          path: /healthz
          port: 8080
        initialDelaySeconds: 15
        timeoutSeconds: 2
        periodSeconds: 5
        failureThreshold: 3
      readinessProbe:
        httpGet:
          path: /ready
          port: 8080
        initialDelaySeconds: 5
        timeoutSeconds: 1
        periodSeconds: 5
        failureThreshold: 1
      startupProbe:
        exec:
          command:
            - cat
            - /app/initialized
        initialDelaySeconds: 5
        periodSeconds: 5
failureThreshold: 30- 1. Startup Probe: When a Pod starts, the Startup Probe begins to check the defined conditions. Until the Startup Probe succeeds, the Liveness and Readiness Probes are disabled. If the Startup Probe does not succeed within the configured timeout and failure thresholds, the container will be killed and rescheduled according to the Pod's restart policy.
- 2. Readiness Probe: Once the Startup Probe succeeds, the Readiness Probe starts. The Readiness Probe determines if the container is ready to receive requests. If it fails, the container is removed from the service's load balancer until it passes the readiness check.
- 3. Liveness Probe: Alongside the Readiness Probe, the Liveness Probe is checking if the container is still running as expected. If the Liveness Probe fails (after the initial delay and within the failure threshold), the container will be restarted.
Kubernetes allows you to control where pods are deployed within your cluster through several mechanisms:
- NodeSelector
- Affinity
- Taints & Toleration
- Cordon
- Drain
- This is the simplest scheduling constraint in Kubernetes.
- Select nodes using key-value pairs.
- Example:
apiVersion: v1
kind: Pod
metadata:
  name: nginx
spec:
  containers:
    - name: nginx
      image: nginx
  nodeSelector:
    disktype: ssd
-
More advanced than NodeSelector, Affinity sets rules for the placement of specific pods.
-
Main types: Node Affinity and Pod Affinity.
-
Node Affinity:
-
Can be set as
requiredDuringSchedulingIgnoredDuringExecutionorpreferredDuringSchedulingIgnoredDuringExecution. -
Example:
apiVersion: v1
kind: Pod
metadata:
  name: nginx
spec:
  affinity:
    nodeAffinity:
      requiredDuringSchedulingIgnoredDuringExecution:
        nodeSelectorTerms:
          - matchExpressions:
              - key: disktype
                operator: In
                values:
                  - ssd
  containers:
    - name: nginx
      image: nginx
-
requiredDuringSchedulingIgnoredDuringExecution
- Defines requirements that must be met for a pod to be scheduled on a node. A pod can only be scheduled on nodes that satisfy these rules.
- Used when a pod must be placed on specific nodes. For example, if you want to place pods only on nodes with a certain label, you can use this rule.
- If no node satisfies these rules, the pod will not be scheduled.
-
preferredDuringSchedulingIgnoredDuringExecution
- Informs the scheduler about preferences (but not requirements) for pod scheduling. The scheduler tries to fulfill these preferences as much as possible, but the pod can be scheduled on other nodes if no node meets the criteria.
- Used to provide more flexibility in pod placement. For example, if you prefer to place a pod on certain nodes, but those nodes are unavailable or not present, you can use this rule to allow the pod to be placed on other nodes as well.
- If there are nodes that satisfy these preferences, the pod is more likely to be scheduled on those nodes, but it can still be scheduled on other nodes if no preferred nodes are available.
-
In summary,
requiredDuringSchedulingIgnoredDuringExecutiondefines strict requirements that must be met for pod scheduling, whereaspreferredDuringSchedulingIgnoredDuringExecutiondefines preferred conditions but allows for flexibility in pod scheduling even if these conditions are not met.
-
-
Node Anti-Affinity:
- Used to distance a pod from nodes with certain attributes or labels.
- Operates similarly to node affinity but with the opposite goal.
- Example: In this example,
requiredDuringSchedulingIgnoredDuringExecutionrequires the pod to be placed on nodes where disktype is not hdd, meaning only nodes with SSD or other types of disks can host the pod. Additionally,preferredDuringSchedulingIgnoredDuringExecutionindicates a preference for nodes where cpu is not high, though this is not mandatory. weight signifies the importance of this preference.apiVersion: v1 kind: Pod metadata: name: mypod spec: affinity: nodeAffinity: requiredDuringSchedulingIgnoredDuringExecution: nodeSelectorTerms: - matchExpressions: - key: disktype operator: NotIn values: - hdd preferredDuringSchedulingIgnoredDuringExecution: - weight: 1 preference: matchExpressions: - key: cpu operator: NotIn values: - high containers: - name: mycontainer image: myimage
-
Pod Affinity:
- Sets rules based on the labels of other pods.
- Allows for defining both hard affinity and soft affinity rules.
- Used to place a pod close to other pods.
- Example: In the
requiredDuringSchedulingIgnoredDuringExecutionexample,mypodmust be placed on the same host (kubernetes.io/hostname) as other pods labeledapp=database.
apiVersion: v1
kind: Pod
metadata:
  name: mypod
spec:
  affinity:
    podAffinity:
      requiredDuringSchedulingIgnoredDuringExecution:
        - labelSelector:
            matchExpressions:
              - key: app
                operator: In
                values:
                  - database
          topologyKey: "kubernetes.io/hostname"
    containers:
      - name: mycontainer
        image: myimage
-
Pod Anti-Affinity:
- Used to keep a pod away from other pods with specific labels.
- Example: In the
requiredDuringSchedulingIgnoredDuringExecutionexample,mypodmust be placed on a different host (kubernetes.io/hostname) than other pods labeledapp=webserver.
apiVersion: v1
kind: Pod
metadata:
  name: mypod
spec:
  affinity:
    podAntiAffinity:
      requiredDuringSchedulingIgnoredDuringExecution:
        - labelSelector:
            matchExpressions:
              - key: app
                operator: In
                values:
                  - webserver
          topologyKey: "kubernetes.io/hostname"
    containers:
      - name: mycontainer
        image: myimage
-
Taints & Toleration:
- Taints are applied to specific nodes and reject pods that do not have tolerations.
- Toleration is set on the pod to allow it to be scheduled on the tainted node.
- Example of applying a taint:
kubectl taint nodes nodeName key=value:effect - Example of setting tolerations:
tolerations:
  - key: "key"
    operator: "Equal"
    value: "value"
    effect: "NoSchedule"
-
Cordon:
- Used to mark a specific node as unschedulable, preventing new pods from being scheduled onto it.
- Example command:
kubectl cordon nodeName
-
Drain:
- Used for maintenance or decommissioning of a node by removing all pods from it.
- Respects PodDisruptionBudgets and does not remove DaemonSet-managed pods unless
--ignore-daemonsets=trueis used. - Example command:
kubectl drain nodeName
In the Kubernetes ecosystem, an Operator is a method to package, deploy, and manage Kubernetes applications. Kubernetes applications are deployed on Kubernetes and managed using the Kubernetes API and the kubectl tooling. Operators adhere to the Kubernetes principle of controllers, which are loops that monitor the state of the cluster and then make or request changes when necessary. An Operator extends Kubernetes to automate the entire lifecycle management of specific applications.
Operators are essentially custom controllers with domain-specific knowledge built-in. They know how to deploy, upgrade, configure, recover, and scale specific applications. The Operator pattern aims to encapsulate operational knowledge about how to manage applications in software, automate common tasks, and provide a Kubernetes-native method of application management.
Operators are implemented as a set of custom resources and custom controllers for those resources. A custom resource acts as a configuration schema for the application, and the controller works to ensure that the application's state matches the desired state described by the custom resource.
- Custom Resource: Extends the Kubernetes API to allow the creation of new resource types. Custom resources define the desired state of the application.
- Custom Controllers: Watch custom resources and, if they detect that the actual state of the application differs from the desired state defined in the custom resource, they take action to reconcile the differences.
Operators use Kubernetes' control loop concept to manage applications. They continuously monitor the application's state and take application-specific actions to correct any discrepancies with the desired state.
- Automatically deploy applications and potentially backing services.
- Seamlessly handle upgrades and downgrades, including complex stateful applications.
- Manage application configurations and secrets.
- Automatically scale based on load or other metrics.
- Recover from errors, automatically replacing or reconfiguring unhealthy instances.
- Perform backups and restorations.
There are frameworks and tools available to help develop Operators, such as the Operator Framework, which includes:
- Operator SDK: Helps you develop, test, and package Operators.
- Operator Lifecycle Manager (OLM): Manages the Operators on a Kubernetes cluster, taking care of installing, updating, and management of the Operator lifecycle.
- Operator Metering: For reporting on the resources an Operator uses.
Kubernetes Custom Resource Definitions (CRDs) are a powerful feature that allows you to extend Kubernetes capabilities with custom resources. CRDs enable you to create your own specific resources within a Kubernetes cluster in a manner similar to how standard Kubernetes resources like Pods, Deployments, or Services are handled. This can be incredibly useful for developing custom applications or integrations on top of the Kubernetes platform.
A custom resource is an extension of the Kubernetes API that is not necessarily available in a default Kubernetes installation. It is a way for you to customize Kubernetes to meet your needs by adding new resources beyond what is provided by default.
CRDs are used for several reasons:
- Extensibility: They allow you to extend Kubernetes with your own APIs that can be used with kubectl and other Kubernetes API clients.
- Flexibility: You can define new resources that behave like native Kubernetes resources.
- Integration: CRDs are useful for building operators which are custom controllers that manage applications and their components based on the custom resource.
To implement a CRD, you define it using YAML, similar to other Kubernetes resources. This definition specifies a new kind of resource, its name, and its schema. The schema is used to validate the configuration of instances of the CRD (known as custom resources).
Here's a basic structure of a CRD definition:
apiVersion: apiextensions.k8s.io/v1
kind: CustomResourceDefinition
metadata:
  # Name of the CRD
  name: crdtype.mycompany.com
spec:
  # Group name to which the CRD belongs
  group: mycompany.com
  # List of versions
  versions:
    - name: v1
      served: true
      storage: true
      schema:
        openAPIV3Schema:
          type: object
          properties:
            spec:
              type: object
              properties:
                myField:
                  type: string
  # Scope of the CRD (Namespaced or Cluster)
  scope: Namespaced
  names:
    # Plural name used in the URL
    plural: crdtypes
    # Singular name used as an alias
    singular: crdtype
    # Kind is the serialized kind of the resource
    kind: CrdType
    # ShortNames allow shorter string to match your resource on kubectl
    shortNames:
- ctAfter you've defined and applied a CRD in your cluster, you can create and manage its instances like any other resource in Kubernetes. Here's a basic example of a custom resource:
apiVersion: mycompany.com/v1
kind: CrdType
metadata:
  name: example-crdtype
spec:
myField: "Hello, world!"- Typically, a CRD is part of an operator which consists of the CRD itself and a custom controller.
- The controller watches for events related to its custom resources and reacts by creating, updating, deleting, or adjusting the resources accordingly.
- Versioning: It's crucial to version your CRDs carefully and handle upgrades and deprecations thoughtfully to avoid disrupting existing resources.
- Validation: Use the OpenAPI schema specifications in your CRD definitions to validate custom resources and ensure they meet your expectations before they are stored in the Kubernetes API.
- Performance: Keep an eye on the performance impact of your custom controllers, especially in large-scale clusters.
The Kubernetes Garbage Collection (GC) is a system that automatically manages resource cleanups, primarily with an emphasis on removing unused objects, such as pods, containers, images, and other Kubernetes resources. There are three main types of Garbage Collection in Kubernetes.
- Garbage Collection of Pods and Controllers
- Container Image Garbage Collection
- Resource Finalizers
flowchart TB
    api["API Server"] -- "Receives Updates and Watches" --> ct["Controller"]
    ct -- "Manages Resources" --> rs["ReplicaSet, Deployments, etc."]
    rs -- "Owns" --> pods["Pods"]

    ct -- "Detects Deletions & Updates" --> gc["Garbage Collector"]
    gc -- "Removes Orphans" --> pods

    kubelet["Kubelet"] -- "Manages Pod Lifecycle" --> node["Node"]
    kubelet -- "Performs Image GC" --> img["Container Images"]