Skip to content
ARtEcnico edited this page Sep 23, 2025 · 7 revisions

To connect to the UART port, you will need to use a serial port adapter to connect to your PC.

Caution

Before you connect that adapter to you camera, make sure that its working voltage is set to 3.3 volt!

Set the adapter's operating voltage to 3.3 volts before connecting it to the camera. Sometimes this is as simple as moving a jumper.Sometimes you have to solder or connect with a solder dab. Some adapters only support 5 volts: add a logic level converter between the adapter and the camera's UART port.

One of the pads you need to connect your adapter to is GND (ground). This is easy to find with a multimeter in continuity mode. Place one of the leads on a known exposed ground pad.These are usually large open copper contact areas around mounting screw holes, USB port casings, SD card slot metal walls etc. Use another wire to lightly touch control pads until you see or hear a message from your multimeter that the circuit is closed. This means you have found the ground. Now you need to find two more: RX and TX, both used to receive and transmit data, respectively. Start with TX. It sends a string of characters and is easy to spot.

Be aware that you are looking for a contact with 3.3V potential between it and ground. Test possible connection points with a multimeter and mark the ones that show 3.3 volts. This way you don't have to test everything and you save yourself from hitting, say, a 12 volt connector intended for an infrared LED array or whatever.

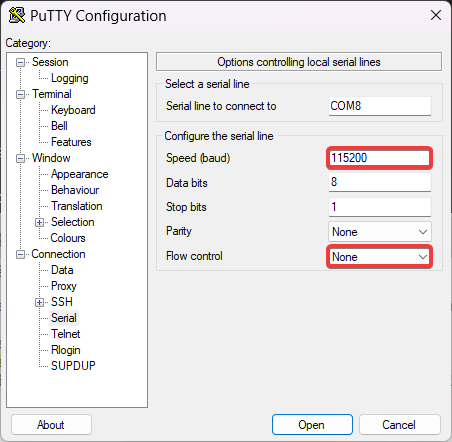
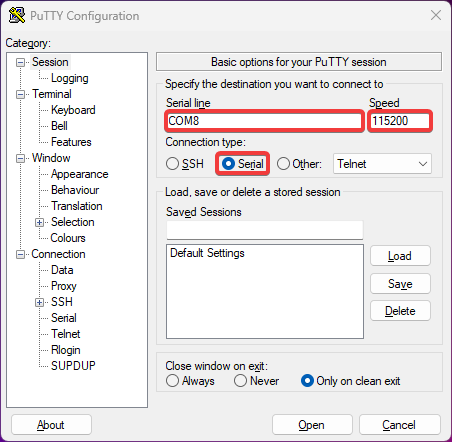
Connect the GND pin of your camera to the GND pad of the adapter, connect RX contact of the adapter to TX contact of the camera, and connect TX contact of the adapter to RX contact of the camera. Then connect the USB connector of the adapter to a USB port on your PC, start a terminal emulator application and connect to your adapter. Set your terminal settings to 115200 bps baud rate, 8 bits, no parity, 1 stop bit, no flow control.

Caution

Do not connect VCC contact! Power the camera with its standard power adapter.

You should start seeing booting log in your terminal window.

Here are some command lines for various terminal programs with session logging. Pick your poison.

screen

screen -L -Logfile ipcam-$(date +%s).log /dev/ttyUSB0 115200

Use Ctrl-a followed by \ to exit the session.

minicom

minicom -b 115200 -8 --capturefile=ipcam-$(date +%s).log --color=on -D /dev/ttyUSB0

Use Ctrl-a followed by x to exit the session.

picocom

picocom -b 115200 --databits 8 --parity n --stopbits 1 --flow n --logfile=ipcam-$(date +%s).log /dev/ttyUSB0

Use Ctrl-a followed by Ctrl-x to exit the session.

PuTTY

If you opt for a GUI terminal, namely PuTTY, this is how it should look like:

PuTTY settings screen PuTTY connection screen

  1. Wiki Home
  2. About the Project
    1. Contributions
    2. Features
    3. Project Philosophy
    4. Releases
  3. Getting Started
    1. FAQ
    2. Hardware Identification
    3. Ingenic USB Cloner
      1. OTG Booting
    4. PPSTRONG
    5. Installation: General
    6. Installation: No Tools Methods
    7. Resources and Links
    8. Support Community
    9. Troubleshooting
    10. UART Connection
    11. Updating Firmware
    12. Unbricking
    13. Web UI
  4. Supported Cameras
    1. Cameras
    2. 360 AP1PA3
    3. AliExpress LTIA‐37FJZ (Vanhua Z55 module)
    4. AOQEE C1
    5. Aosu C5L
    6. Cinnado
      1. Cinnado D1 2K
      2. Cinnado D1 3K
    7. Dekco DC5L
    8. Eufy
      1. Eufy E210 Outdoor Cam
      2. Eufy E220
    9. Galayou/Wansview
      1. Galayou G2
      2. Galayou G7
      3. Wansview W6
      4. Wansview W7/Galayou Y4
    10. Hualai (Wyze/Atom/Neos/Personal)
      1. Dafang Upgrading for Wyze v2
      2. NEOS conversion
      3. Personalcam
      4. Wyze Cam Pan V1
      5. Wyze Doorbell (V1)
        1. Chime Reverse Engineering
      6. Wyze v2/Neos SmartCam/ATOM Cam 1
      7. Wyze v3
      8. Wyze Accessories
    11. iFlytek XFP301‐M
    12. Jienuo JN-107-AR-E-WIFI
    13. Jooan A6M
    14. LaView L2
    15. LongPlus X07
    16. LSC 3215672
    17. Sannce I21AG
    18. Sonoff Cam‐S2
    19. TP-Link Tapo C100/C110/C111
    20. Wuuk Y0510
    21. Xiaomi
      1. Xiaomi Mijia1080p (SXJ02ZM)
      2. Xiaomi MJSXJ03HL
      3. Xiaomi Outdoor Camera AW200 (MJSXJ05HL)
  5. Configuration
    1. Administration
    2. Automation
    3. Cron jobs
    4. General
    5. LED Indicators
    6. Lighting
    7. Media Streaming Endpoints
    8. Network Storage
    9. Networking
      1. Wireless Networking
      2. USB Direct w CDC
      3. USB Ethernet Networking
      4. Remote Access
      5. VPN
        1. Tailscale
        2. Wireguard
        3. Zerotier
      6. Wi-Fi
        1. Self Hosted AP
        2. Tips and Tricks
      7. WWAN (Cellular)
    10. Night Mode
    11. ONVIF
    12. OSD (On-screen Display)
    13. Plugins
      1. Motion Guard
      2. Yandex Disk
    14. SSH Access Keys
    15. Wi-Fi Access
    16. Provisioning
    17. Streamer Bitrate Control
  6. Integration
    1. Home Assistant
    2. Frigate
    3. Ingenic A1/$15 NVR
    4. Mobile Apps
    5. MQTT Integration
    6. Virtual Webcam on Linux
    7. Mainsail (Klipper)
  7. Development
    1. Booting
      1. Boot: MMC SD
      2. Boot: NFS
    2. CH341A Programmer
    3. RTSP Players
    4. Flash Chips
    5. go2rtc
    6. Porting Guide
    7. Ingenic Platform Capability Matrix
    8. Ingenic Image Processor
    9. ISP Reserved Memory (RMEM)
    10. Debugging
    11. Software
      1. Building From Sources
      2. Buildroot
      3. Toolchain
      4. Choice of JSON library
    12. SSL and TLS Web UI in thingino
    13. Tech Info
      1. Hardware
      2. PWM Info
      3. Supported Hardware
      4. T23 GPIOs
      5. T31 GPIOs
    14. U-Boot Cheatsheet
    15. Zeratul/Atlas/Tassadar
    16. Resources

Clone this wiki locally