Fantastic New ControlNet OpenPose Editor Extension and Image Mixing Stable Diffusion Web UI Tutorial
Fantastic New ControlNet OpenPose Editor Extension & Image Mixing - Stable Diffusion Web UI Tutorial
Full tutorial link > https://www.youtube.com/watch?v=iFRdrRyAQdQ


Our Discord : https://discord.gg/HbqgGaZVmr. In this video, I am explaining how to use newest extension OpenPose editor and how to mix images in ControlNet. If I have been of assistance to you and you would like to show your support for my work, please consider becoming a patron on 🥰 https://www.patreon.com/SECourses
Playlist of #StableDiffusion Tutorials, Automatic1111 and Google Colab Guides, DreamBooth, Textual Inversion / Embedding, LoRA, AI Upscaling, Pix2Pix, Img2Img:
https://www.youtube.com/playlist?list=PL_pbwdIyffsmclLl0O144nQRnezKlNdx3
Easiest Way to Install & Run Stable Diffusion Web UI on PC by Using Open Source Automatic Installer:
How to use Stable Diffusion V2.1 and Different Models in the Web UI - SD 1.5 vs 2.1 vs Anything V3:
Transform Your Sketches into Masterpieces with Stable Diffusion #ControlNet AI - How To Use Tutorial:
Sketches into Epic Art with 1 Click: A Guide to Stable Diffusion ControlNet in Automatic1111 Web UI:
Guts - Berserk - Character LORA:
https://civitai.com/models/7134/guts-berserk-character-lora
Lollypop Upscaler:
https://upscale.wiki/wiki/Model_Database
8 GB LoRA Training - Fix CUDA Version For DreamBooth and Textual Inversion Training By Automatic1111:
PoseMaker App on Hugging Face:
https://huggingface.co/spaces/jonigata/PoseMaker
Used PNG file and pose:
https://drive.google.com/drive/folders/1XETvzlP7EMnHREaU7GcCvxDMi0BVS6Ni
00:00:00 Introduction to #OpenPose Editor, ControlNet, LoRA, Stable Diffusion, Automatic1111 Web UI
00:01:26 Introduction to image mixing by using ControlNet
00:01:50 Web UI and other extensions revisions used in this video
00:02:07 How to install OpenPose Editor extension of Automatic1111 Web UI
00:03:12 How to use OpenPose Editor
00:03:24 What each dot, stick means in OpenPose editor. Each body parts.
00:03:52 How to generate image by using OpenPose Editor and ControlNet
00:05:28 How to generate 2 or more characters by using Stable Diffusion and OpenPose Editor consistently
00:06:36 How to generate pose map from existing images by using OpenPose Editor
00:07:21 How to add more than 2 characters into the OpenPose Editor
00:07:35 What is add background feature of OpenPose Editor
00:07:59 More advanced Pose Maker application hosted on Hugging Face
00:09:05 How to generate Guts / Berserk character in Salt Bae pose
00:09:24 How to use downloaded CivitAI LoRA models in Automatic1111 Web UI
00:09:35 How to install Kohya-ss Additional Networks for LoRA models
00:09:50 Where to to downloaded LoRA model
00:10:20 How to activate and use downloaded custom LoRA Civit AI models
00:10:40 How to use PNG info feature to load parameters
00:11:02 How to generate the Guts Salt Bae image used in thumbnail
00:12:37 How to install and use different upscalers in Automatic1111 Web UI
00:13:35 How to mix 2 images by using ControlNet extension of Automatic1111 Web UI
00:14:30 How to obtain good mixed images by using HED
00:14:45 Important part / trick of image mixing in ControlNet
00:17:51 Ending speech very important
Stable Diffusion Automatic1111: This is a state-of-the-art image denoising method that uses a diffusion process to smooth out noise in images while preserving fine details. The method is based on a mathematical model that describes how noise spreads in an image over time, and it uses this model to remove noise while retaining sharp edges and other important features.
Stable Diffusion Automatic1111 has several advantages over other denoising methods. For example, it is able to remove noise without blurring important details, it can handle images with complex textures and structures, and it is computationally efficient. The method has been applied to a wide range of applications, including medical imaging, microscopy, and computer vision.
OpenPose: This is an open-source library for real-time multi-person keypoint detection and multi-threading written in C++ with Python and Matlab bindings. It can detect and track human body and hand key-points in real-time and works with both single images and video streams.
OpenPose uses deep learning models to detect human body and hand key-points from 2D images or videos, and it provides an easy-to-use interface for developers to integrate this functionality into their own applications. The library has been used in a wide range of applications, including human-computer interaction, sports analytics, and robotics.
Overall, both Stable Diffusion Automatic1111 and OpenPose are powerful tools for image processing and computer vision, and they have many potential applications in various fields.
-
00:00:00 Greetings everyone.
-
00:00:01 In this video, I am going to introduce you the Automatic1111 Web UI Extension OpenPose
-
00:00:06 Editor.
-
00:00:07 With this extension, it is now much easier to generate pose to use with new famous Stable
-
00:00:11 Diffusion development ControlNet.
-
00:00:13 If you don't know what is Stable Diffusion, what is ControlNet, what is Automatic1111
-
00:00:16 Web UI, I have excellent tutorials for these.
-
00:00:19 For example, you can watch this tutorial to learn how to install Automatic1111 Web UI.
-
00:00:24 In this tutorial, I have explained how to install and use ControlNet extension for Automatic1111
-
00:00:29 Web UI.
-
00:00:30 In this tutorial, I have explained what is ControlNet and how to use native scripts of
-
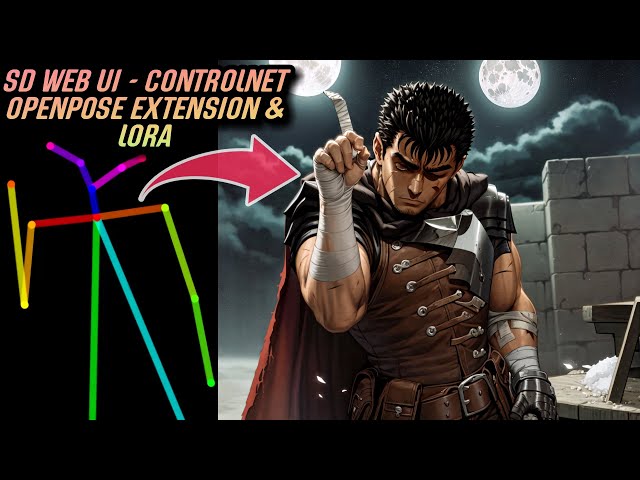
00:00:35 ControlNet and by using OpenPose, I will show you how you can generate this image with the
-
00:00:41 help of ControlNet and OpenPose Editor.
-
00:00:44 Also, we are going to use an additional LoRA training to get this image.
-
00:00:49 This LoRA trained model is hosted on CivitAI.
-
00:00:52 We are going to use this.
-
00:00:54 Additionally, to use this LoRA model or other LoRA models, I am going to show you which
-
00:01:01 extension you need to install and how to activate that extension to apply different LoRA models.
-
00:01:08 One more thing that I am going to show is how to download custom upscalers and use them
-
00:01:15 in your Automatic1111 Web UI.
-
00:01:18 Such as that, I am going to show Lollypop.
-
00:01:21 And one another topic that I am going to explain is how to use ControlNet to mix two images
-
00:01:27 and obtain mixed image.
-
00:01:29 As you can see, this is our input image and this is our ControlNet input image and this
-
00:01:34 is our mixed ControlNet output.
-
00:01:37 All of the images you are seeing here is generated by AI by using the default Stable Diffusion
-
00:01:44 1.5 version.
-
00:01:45 I will also explain this to you in this video.
-
00:01:47 Okay, I have started my Automatic1111 Web UI.
-
00:01:51 This is my SD Web UI revision as you can see.
-
00:01:55 And these are the only commands that I have provided.
-
00:01:58 xformers and no-half-vae.
-
00:02:01 These are the extensions currently installed in my Web UI.
-
00:02:05 These are the versions that I am using.
-
00:02:07 So we will begin with installing the OpenPose Editor.
-
00:02:11 To do that, go to the available, click load from, search open and you will see OpenPose
-
00:02:17 Editor here.
-
00:02:18 Click install.
-
00:02:19 After the installation has been completed, go to the installed tab, click apply and restart
-
00:02:24 UI.
-
00:02:25 If you get this, just refresh.
-
00:02:27 If it still doesn't work, just close your command line interface and restart your Web
-
00:02:32 UI.
-
00:02:33 After restarting the Web UI started and now I see my OpenPose Editor.
-
00:02:37 The reason I have shown my extensions is that sometimes extensions are conflicting and people
-
00:02:42 are getting problems.
-
00:02:44 If you get errors, then you might have conflicting extensions.
-
00:02:48 Also, my xformers version is 0.0.16.
-
00:02:51 However, this version is not supporting DreamBooth training or Textual Inversion training.
-
00:02:58 So you need to downgrade it to 0.0.14 or when the version 17 is released, it will also support.
-
00:03:05 In this video, I am explaining how you can downgrade your xformers version.
-
00:03:08 OK, now let's begin with checking out OpenPose Editor.
-
00:03:13 You see, this is your OpenPose template and you may wonder what each dots mean.
-
00:03:19 Now I will explain to you what each dots in here means.
-
00:03:24 This one is right ear.
-
00:03:25 This one is right eye.
-
00:03:27 This one is nose.
-
00:03:28 This one is left eye and this one is left ear.
-
00:03:32 Then this is right wrist.
-
00:03:34 This is right elbow.
-
00:03:35 This is right shoulder.
-
00:03:37 This is left shoulder.
-
00:03:38 Left elbow.
-
00:03:40 Left wrist.
-
00:03:41 This is right hip.
-
00:03:42 This is left hip.
-
00:03:43 This is right knee and this is left knee and this is right ankle and this is the left ankle.
-
00:03:49 Obviously, this is the chest.
-
00:03:51 Now by using these default OpenPose, let's generate an image and see what we are going
-
00:03:58 to get.
-
00:03:59 So I will click send to ControlNet and now text to image tab is opened and the pose is
-
00:04:06 loaded into my ControlNet section and now I will click enable.
-
00:04:11 I am not going to pick any preprocessor because currently our pose is already selected and
-
00:04:17 as a model I am going to pick OpenPose.
-
00:04:20 Then I need to type my command prompt to generate the image.
-
00:04:25 I have typed futuristic robot awesome fantastic intricate digital drawing artstation and as
-
00:04:30 a negative prompt I have used low, bad and worse and I am using default 1.5 pruned ckpt
-
00:04:37 file.
-
00:04:38 So this is the image we got in the first try and this is the OpenPose that is used.
-
00:04:42 As you can see it is keeping the pose.
-
00:04:44 Now we will edit it and we will see how it will affect our rendered image.
-
00:04:49 So let's return back to OpenPose editor and let's change the pose.
-
00:04:52 I have slightly edited the pose and now let's see what we are going to get.
-
00:04:57 Send to ControlNet and I am going to use the same input and you see this is the newest
-
00:05:03 OpenPose loaded in our ControlNet.
-
00:05:05 Okay as you can see, it is able to keep the pose almost as perfect as we have defined.
-
00:05:12 However it is hard to get good quality image with this prompt and with this model.
-
00:05:17 Okay I made a try with Protogen X 3.4 and the output is much better in terms of quality.
-
00:05:25 So by using custom models, you can get what you want.
-
00:05:28 Now I will show how to use two OpenPose to generate two characters in one image.
-
00:05:35 To do that first, change the location of your drawing with selecting everything with your
-
00:05:41 mouse like this and then it will select all of the points like this and you can move it
-
00:05:48 around.
-
00:05:49 So I am going to put this here, then I will click, add and the other character will be
-
00:05:53 added like this.
-
00:05:54 Now I will also add its pose.
-
00:05:56 Okay I made the second pose like this.
-
00:05:58 Now let's try how it will work.
-
00:06:00 Send to the ControlNet and change your prompt like futuristic two robots.
-
00:06:06 Now as you can see, we are able to generate two robots in one image with the way we want
-
00:06:12 as you can see.
-
00:06:13 So what would we get without using ControlNet?
-
00:06:16 Let's also try it.
-
00:06:17 I will disable and I will try and this is what we get when we don't use ControlNet.
-
00:06:24 You see, there aren't even two robots in the output, just one robot.
-
00:06:29 And of course nothing is as we would like.
-
00:06:32 It is just purely random.
-
00:06:33 Not even two robots.
-
00:06:34 So it just ignored our two robots command.
-
00:06:38 This extension can also detect poses from input images.
-
00:06:42 So let's try with this input image, OpenPose editor and in here, detect from image, click
-
00:06:48 it.
-
00:06:49 After you select your image, it will download the necessary file for the first time and
-
00:06:53 then it will detect the OpenPose like this as you can see.
-
00:06:58 So we are also able to see the matching points as I have just described.
-
00:07:04 Now you can edit this pose as you want or you can generate new images based on this
-
00:07:10 pose.
-
00:07:11 It is the same procedure.
-
00:07:12 Send it to the ControlNet and just generate.
-
00:07:15 You can also add multiple images more than two, three, four five images.
-
00:07:20 To do that click reset, change the height and width as you want.
-
00:07:24 Like this and it will change the canvas.
-
00:07:27 Then you can add multiple poses like this and with this way you can generate as many
-
00:07:33 as characters you want.
-
00:07:34 So what does add background image do?
-
00:07:37 When you click add background image and choose your image.
-
00:07:41 It will load the image like this.
-
00:07:43 Then you can also use detect from image or add and you can match the OpenPose based on
-
00:07:49 the background image like this so it is pretty convenient to use.
-
00:07:54 You can set it as you want, you can change it as you want and you can also use detect
-
00:07:58 from image.
-
00:07:59 There is also one another pose maker hosted on the Hugging Face.
-
00:08:03 It is also pretty convenient why because this one provides more options such as control
-
00:08:10 drag to scale.
-
00:08:12 Let me show I am hitting control and I am dragging or dropping like this.
-
00:08:16 You see it is able to scale, alt and drag to move.
-
00:08:20 You see you are able to alt and drag to move like this.
-
00:08:24 We can also do this in the ControlNet extension.
-
00:08:26 How select everything like this and then you can move it like this.
-
00:08:30 There is also shift and drag.
-
00:08:31 First I am hitting shift meanwhile I am pressing shift, I am clicking the point you see in
-
00:08:37 the left top it shows rotate, then I am leaving pressing the shift key and I will be able
-
00:08:44 to rotate like this.
-
00:08:45 There is also space and drag to range move like this as you can see and other useful
-
00:08:50 options that you can try.
-
00:08:52 So this is really good tool to use.
-
00:08:55 And once you are done with the pose, just click.
-
00:08:57 Save! go back to the text to image tab and load the saved image here like this.
-
00:09:02 Then click enable, do not select preprocessor and select model and it is ready to use.
-
00:09:08 Now I will show you how to obtain this beautiful artwork by using ControlNet.
-
00:09:15 This artwork is obtained by using anything v4.5 then we need to download this character
-
00:09:22 LoRA model.
-
00:09:23 Click download.
-
00:09:24 To be able to use this downloaded LoRA model, we need to install another extension.
-
00:09:29 Go to the extensions.
-
00:09:31 Go to the available load from search for Kohya-ss Additional Networks click install.
-
00:09:39 After the installation has been completed, just to be sure restart your web UI.
-
00:09:44 Okay, restart has been completed.
-
00:09:46 Let's refresh our extensions.
-
00:09:48 Okay, we see that additional networks.
-
00:09:50 This is the extension.
-
00:09:51 For this extension to work we need to put downloaded model into the sd web ui additional
-
00:09:58 networks models LoRA folder.
-
00:10:00 So follow me how am I doing it.
-
00:10:02 Cut the downloaded file, go to your installation folder, go to the extensions folder, and in
-
00:10:08 here go to the SD web UI additional networks, and in here you will see models.
-
00:10:13 Go there and in here you will see LoRA and paste it there.
-
00:10:17 So this is the path of the model file where we are going to put downloaded models.
-
00:10:21 Then in the text to image tab you will see additional networks.
-
00:10:26 In the bottom you will see refresh models when the first time you put the model into
-
00:10:30 the folder.
-
00:10:31 Click refresh models.
-
00:10:33 Then in here you will see the downloaded model.
-
00:10:36 Select it.
-
00:10:37 For this particular image.
-
00:10:38 I already have the parameters now I will load them.
-
00:10:41 To load the parameters I will use PNG info.
-
00:10:45 These are the parameters used I will use sent to text to image and all of the parameters
-
00:10:50 are loaded.
-
00:10:51 In addition, I need to activate ControlNet.
-
00:10:54 This is the pose used for generating this awesome image.
-
00:10:59 Let me also zoom in and show you.
-
00:11:01 So this is the pose that generated this image.
-
00:11:05 Now let's try.
-
00:11:06 This is the seed and these are the other values.
-
00:11:09 So you see they have used high res fix resized from 600 512 to 1200 1024.
-
00:11:18 This is the denoising strength.
-
00:11:20 These are the sampling steps sampling method.
-
00:11:23 These are not very important.
-
00:11:24 The important thing is understanding how to apply LoRA models to the base model that you
-
00:11:30 are using and how to utilize OpenPose model files with ControlNet and we got our image.
-
00:11:37 I didn't get the exact same image because I have used R-ESRGAN 4x+ as the upscaler.
-
00:11:45 However, the original author has used Lollypop upscaler.
-
00:11:49 Therefore it is not exactly same but it is almost same.
-
00:11:54 Let me show you the comparison.
-
00:11:56 I will copy image and this is the comparison.
-
00:12:00 Actually R-ESRGAN upscaler did better job except the hands.
-
00:12:05 As you can see the hands has six fingers so that is a mistake.
-
00:12:10 But the quality of R-ESRGAN is definitely better than the quality of the Lollypop.
-
00:12:17 Also there are some other differences like the background so it is not the same exact
-
00:12:22 image.
-
00:12:23 It is the same pose and almost same armor.
-
00:12:26 So if I install this Lollypop I should get the same.
-
00:12:31 Now I will look for it to demonstrate also how to add different upscalers into your web
-
00:12:37 UI.
-
00:12:38 I have found the file of Lollypop upscaler in the upscale.wiki.
-
00:12:43 I will download it.
-
00:12:44 The file is downloaded.
-
00:12:46 Now I will show where to put it, cut it, go to your Stable Diffusion installation and
-
00:12:50 inside here.
-
00:12:51 Go to the models and inside here.
-
00:12:54 This is ESRGAN based so I will put it inside ESRGAN folder.
-
00:12:58 Then you need to restart your web UI.
-
00:13:01 Otherwise upscaler will not appear here.
-
00:13:04 Now I see the upscaler.
-
00:13:06 Okay everything is selected now let's retry the generate and now we got exactly the same
-
00:13:12 image as you can see.
-
00:13:13 By the way, this upscaler is taking huge time with high res fix.
-
00:13:19 Consider that and let me show you all of the settings with scrolling down slowly like this.
-
00:13:25 So currently I am showing all of the settings used for this.
-
00:13:30 There is clip skip 2 and other settings are displayed like this you can see.
-
00:13:36 Okay now time to show how to mix two images and we are going to use ControlNet in image
-
00:13:42 to image tab.
-
00:13:43 First we will pick the image that we want to use as styling like this image.
-
00:13:49 Yesterday I have generated a lot of light images.
-
00:13:53 Let me show you the prompt that I have used.
-
00:13:55 So I have used cinematic light to generate images like this and my other image is snowy
-
00:14:01 owl.
-
00:14:02 These are the parameters used: snowy owl awesome intricate hd hdr 8k canon high quality low
-
00:14:09 bad worse and the used model is 1.5 pruned ckpt.
-
00:14:13 You see the model hash is displayed here and also here.
-
00:14:17 Okay so that image that owl image will be our ControlNet image.
-
00:14:22 I will load it it here with drag and drop.
-
00:14:25 You can just load it like this, click enable.
-
00:14:28 So to obtain good images we are going to use HED.
-
00:14:32 So select preprocessor as HED, select model as HED like this.
-
00:14:38 This weights and guidance strength.
-
00:14:39 I found that one is working best for mixing.
-
00:14:43 Now the important part that is not explained in the provided examples the denoising strength
-
00:14:51 and the image description.
-
00:14:54 In the image description you need to use the description that you have used to generate
-
00:15:01 your ControlNet image or the description that you can define your control net image that
-
00:15:07 you are going to use.
-
00:15:09 You are not defining the base image to image and the most important part is denoising strength.
-
00:15:16 This is the part which will define our mixing success.
-
00:15:20 So let me show you examples with 0.75 image image like this and this is our ControlNet
-
00:15:27 and our target image will be 512 and 512.
-
00:15:32 Weight and guidance strength are 1.
-
00:15:35 Hed resolution is 512 and that's it.
-
00:15:38 Okay, this is the result we got with 75% denoising strength.
-
00:15:43 Now let me show you what kind of effect it will make when we reduce this to 60 percent.
-
00:15:49 Okay, this is the 60 percent result.
-
00:15:52 As you can see now it is much more mixed than before.
-
00:15:56 So this is the key point of mixing two images like this.
-
00:16:00 So this is the result of 50 percent.
-
00:16:03 As you decrease the denoising strength, you will get more mixing like this.
-
00:16:08 What happens if I make this like 90 percent.
-
00:16:12 So we are going to get image almost as like this without any mixing and you see this is
-
00:16:18 the 90 percent mixing.
-
00:16:20 Almost no mixing actually with 90 percent.
-
00:16:24 So the key point is that you need to try denoising strength.
-
00:16:29 Let's also try some other image backgrounds.
-
00:16:32 Okay this image and 60 percent we got these awesome beautiful image, a very good mixing
-
00:16:38 or this image and with 60 percent we got this mixing.
-
00:16:43 So you see you can also generate multiple images to get the good ones.
-
00:16:47 Like I have generated eight images and I can pick the best one that I like.
-
00:16:52 You see each one of them is really cool actually and the lightning effect that comes from here
-
00:16:59 is applied here as you can see.
-
00:17:01 Okay, for example, with this image, you can get images like this.
-
00:17:05 You see the lightning effect here is applied here.
-
00:17:08 As you can see it is pretty decent.
-
00:17:11 Pretty awesome.
-
00:17:12 And by changing the denoising strength, you can get the image that you want that you like.
-
00:17:18 By the way, you can also append the first image description to your image to image prompt
-
00:17:24 like this and you can slightly increase the denoising strength like this 70 percent.
-
00:17:31 And now I have chosen another base model.
-
00:17:35 So the owl image now is more like the used ControlNet base image as you can see.
-
00:17:41 So the model you uses makes huge difference what kind of output you are going to get and
-
00:17:47 this is the hed.
-
00:17:48 I have tested all of the preprocessor and model here and I find that HED is working
-
00:17:54 best for mixing images.
-
00:17:56 This is all for today.
-
00:17:58 If you have enjoyed, please like, subscribe and leave a comment.
-
00:18:02 Please join our discord channel.
-
00:18:03 The link will be in the description and also in the comment section of the video.
-
00:18:08 Also, please support us on Patreon.
-
00:18:10 This is really really important because the ads revenue is not great so your support makes
-
00:18:18 huge difference for me to continue for me to do more research and prepare better videos.
-
00:18:24 Hopefully see you in another video and also the Patreon link will be in the description
-
00:18:28 and in the comments section as well.