Forget Photoshop How To Transform Images With Text Prompts using InstructPix2Pix Model in NMKD GUI
Forget Photoshop - How To Transform Images With Text Prompts using InstructPix2Pix Model in NMKD GUI
Full tutorial link > https://www.youtube.com/watch?v=EPRa8EZl9Os


Our Discord : https://discord.gg/HbqgGaZVmr. Newest AI model InstructPix2Pix is amazing to transform your images with plain English prompts.If I have been of assistance to you and you would like to show your support for my work, please consider becoming a patron on 🥰 https://www.patreon.com/SECourses
Playlist of Stable Diffusion Tutorials, #Automatic1111 and Google Colab Guides, DreamBooth, Textual Inversion / Embedding, #LoRA, AI Upscaling, Pix2Pix, Img2Img:
https://www.youtube.com/playlist?list=PL_pbwdIyffsmclLl0O144nQRnezKlNdx3
I am also showing how to install and use NMKD Stable Diffusion open source GUI.
InstructPix2Pix Official Web Site : https://www.timothybrooks.com/instruct-pix2pix
NMKD Stable Diffusion GUI GitHub : https://github.com/n00mkrad/text2image-gui
Download NMKD Stable Diffusion GUI : https://nmkd.itch.io/t2i-gui
Wiki of NMKD Stable Diffusion GUI : https://github.com/n00mkrad/text2image-gui/blob/main/README.md
Our Discord Channel : https://discord.com/invite/HbqgGaZVmr
Stable Diffusion 1.5 Version : https://huggingface.co/runwayml/stable-diffusion-v1-5/tree/main
Best VAE file : https://huggingface.co/stabilityai/sd-vae-ft-mse-original/tree/main
Online free InstructPix2Pix demo : https://huggingface.co/spaces/timbrooks/instruct-pix2pix
Easiest Way to Install & Run Stable Diffusion Web UI on PC by Using Open Source Automatic Installer
How to Use SD 2.1 & Custom Models on Google Colab for Training with Dreambooth & Image Generation
Stable Diffusion - Dreambooth - txt2img - img2img - Embedding - Hypernetwork - AI Image Upscale
https://www.youtube.com/playlist?list=PL_pbwdIyffsmclLl0O144nQRnezKlNdx3
00:00:00 Introduction to new AI model InstructPix2Pix Learning to Follow Image Editing Instructions
00:00:44 What is InstructPix2Pix
00:01:31 Examples of InstructPix2Pix from official developers
00:02:47 Introduction to the NMKD Stable Diffusion GUI
00:03:38 How to download NMKD Stable Diffusion GUI
00:04:42 How to setup and install NMKD Stable Diffusion GUI
00:06:56 How to run NMKD Stable Diffusion GUI
00:07:09 How to generate text to image AI images by using NMKD Stable Diffusion GUI
00:07:26 How to open settings of NMKD Stable Diffusion GUI
00:07:48 How to use InstructPix2Pix in NMKD Stable Diffusion GUI
00:08:01 How to select which GPU or use CPU in NMKD Stable Diffusion GUI
00:08:22 How to load base image and instruct Pix2Pix to transform images
00:09:07 How to display both original image and transformed image in NMKD Stable Diffusion GUI
00:09:46 What are Prompt and image guidance and CFG scale of InstructPix2Pix image transformation
00:10:23 More detailed explanation of Image CFG weight and Text CFG weight
00:12:33 How to open logs / debug CMD window in NMKD Stable Diffusion GUI
00:14:01 Visual effects of different prompt and image guidance CFG scale
00:15:09 How to try multiple different prompts by using prompt queue feature of NMKD Stable Diffusion GUI
00:16:14 Different prompt examples of InstructPix2Pix
00:17:28 How to upscale transformed images into bigger resolution by using AI upscale algorithms
Abstract
We propose a method for editing images from human instructions: given an input image and a written instruction that tells the model what to do, our model follows these instructions to edit the image. To obtain training data for this problem, we combine the knowledge of two large pretrained models---a language model (GPT-3) and a text-to-image model (Stable Diffusion)---to generate a large dataset of image editing examples.
InstructPix2Pix: Learning to Follow Image Editing Instructions
If you're not getting what you want, there may be a few reasons:
Is the image not changing enough? Your Image CFG weight may be too high. This value dictates how similar the output should be to the input. It's possible your edit requires larger changes from the original image, and your Image CFG weight isn't allowing that. Alternatively, your Text CFG weight may be too low. This value dictates how much to listen to the text instruction. The default Image CFG of 1.5 and Text CFG of 7.5 are a good starting point, but aren't necessarily optimal for each edit. Try:
Decreasing the Image CFG weight, or
Increasing the Text CFG weight, or
Conversely, is the image changing too much, such that the details in the original image aren't preserved? Try:
Increasing the Image CFG weight, or
Decreasing the Text CFG weight
Try generating results with different random seeds by setting "Randomize Seed" and running generation multiple times. You can also try setting "Randomize CFG" to sample new Text CFG and Image CFG values each time.
Rephrasing the instruction sometimes improves results (e.g., "turn him into a dog" vs. "make him a dog" vs. "as a dog").
Increasing the number of steps sometimes improves results.
Do faces look weird?
The Stable Diffusion autoencoder has a hard time with faces that are small in the image.
Try: Cropping the image so the face takes up a larger portion of the frame.
-
00:00:00 Greetings everyone. In this video I am going to show you how to use a new great AI technology
-
00:00:06 that you can instruct it to modify pictures as you instructed. This new AI model is called as
-
00:00:13 InstructPix2Pix. It is totally free to use. Free open source image generation application
-
00:00:19 NMKD Stable Diffusion GUI started to support this new AI model just few hours ago and it
-
00:00:27 is the first one. Automatic1111 is still not supporting InstructPix2Pix. So first,
-
00:00:34 let's start with checking out InstructPix2Pix. Then I will show you how to install and use NMKD
-
00:00:41 GUI and use InstructPix2Pix. So InstructPix2Pix learning to follow image editing instructions. It
-
00:00:49 is released by University of California. They have a page where they are explaining what is that.
-
00:00:56 You see, given an image and written instruction, our method follows the instruction to edit the
-
00:01:01 image. In the abstract section, we propose a method for editing images from human
-
00:01:06 instructions. Given an input image and a written instruction that tells the model what to do.
-
00:01:12 Our model follows these instructions to edit the image. To obtain training data. For this problem,
-
00:01:17 we combine the knowledge of two large pre-trained models, a language model GPT-3 and a text image
-
00:01:24 model Stable Diffusion to generate a large data set of image editing examples. OK, let's see their
-
00:01:30 examples. They have a short video here. You see, there is an image here and they are telling that
-
00:01:36 could you make this image look like a springtime and it is turning that image into a springtime.
-
00:01:44 There are also some other results they show. So this is the input image add boats on water.
-
00:01:49 So boats are added on the water. This is the mountains with the city skyline and
-
00:01:55 the mountains are replaced with the skyline. Then there are also other examples. Make it Paris. So
-
00:02:01 this image turns into Paris. Make it Hong Kong image turns into Hong Kong. And there are also
-
00:02:07 input image. It is now midnight. So the image is turned into a midnight add a beautiful sunset. So
-
00:02:12 the image turned into a beautiful sunset image. So there is also input image. This one apply face
-
00:02:19 paint. What would she look like as a bearded man, put on a pair of sunglasses. She looks she should
-
00:02:27 look 100 years old. Also this is input image. Convert to a realistic photo, turn into a 3D model
-
00:02:35 and there is input image. Make it a grocery store. You see, all of the instructions are written in
-
00:02:41 plain English text. And these are their examples. OK, so to use this model, we are going to use a
-
00:02:51 new Stable Diffusion GUI. This is the first time I am introducing it. It is called as NMKD Stable
-
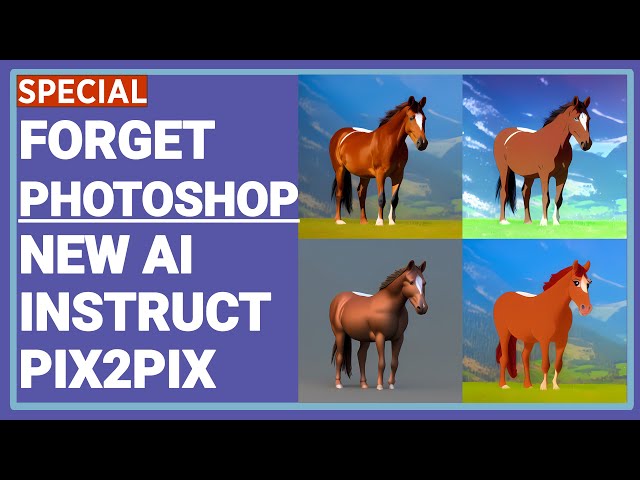
00:03:00 Diffusion GUI. It is an open source. This is its GitHub page and you are seeing my example image
-
00:03:08 here. Make horse wearing a chainmail. This is my prompt and this is my negative prompt. Man,
-
00:03:15 human, person and these are the parameters. I will explain that. So this is my input image. My input
-
00:03:21 image is also an artificial image generated by using SD 2.1 version 768 pixels. And this is
-
00:03:30 the output of the InstructPix2Pix. So how are we going to use this software? We are going to
-
00:03:39 download it from this official website. Click download. It is asking you whether you want to
-
00:03:45 donate or not. If you don't want to donate, you can just click. No thanks. Just take me to the
-
00:03:49 downloads and in here you will see there are two versions. One of them is including the model of SD
-
00:03:55 1.5 and the other version is not including. I will use the smaller version and I will
-
00:04:01 show you how to put inside it the proper SD 1.5 version and vae file so it is getting downloaded.
-
00:04:10 There is a wiki page that shows how to use this NMKD Stable Diffusion GUI. So the minimum
-
00:04:17 requirements are: 4GB VRAM. Unfortunately you can't use it with lower VRAM and there are also
-
00:04:23 features and how to use them. Multiple prompts, advanced, negative input, emphasis, wildcards,
-
00:04:28 load model. You can check this out later if you want and learn how to use it properly. Also I
-
00:04:34 will show you how to use it but not all of the features. I will show how to use InstructPix2Pix.
-
00:04:41 OK once the download has been completed, go to your downloads folder. And cut the downloaded
-
00:04:49 file and paste it into where you want to install. I will install it inside my F drive. Then right
-
00:04:56 click and extract it. I have installed winrar. Therefore, I have this interface but it is .7
-
00:05:03 zip file. So with default windows, you should be able to extract it as well. And after instruction
-
00:05:11 you will see it is getting extracted like this. By the way you can join our discord channel and
-
00:05:17 ask me any questions you want. Go to the about tab of our YouTube channel and in here you will see
-
00:05:24 official discord channel right here. Just click it and join our discord channel and ask any questions
-
00:05:30 that you might encounter. Once all of the files are extracted, go to the inside folder and now
-
00:05:37 you are ready to run the application. But before we need to download model file which one SD 1.5
-
00:05:45 version. So where we are going to download that. We are downloading it from here. 1.5 pruned click
-
00:05:55 here and click download. Also we are going to use a better vae file for that. To download vae file.
-
00:06:02 Click just this ckpt file and it will get here. Click, download it and it will get downloaded.
-
00:06:11 Once the downloads are completed. Just cut them like this with ctrl-x and then paste
-
00:06:17 them into our installation folder. Okay and once they are pasted, we are going to put this
-
00:06:25 pruned ckpt file inside data and inside model this folder. Let me show you the path of it.
-
00:06:35 So we are going to put ckpt file inside here and the vae file. We are going to put it inside models
-
00:06:43 and in here. We are going to generate a new folder called as vae and we are going to paste it in here
-
00:06:49 like this. Let me also show you the path. So this is the vae file and then we are ready to launch
-
00:06:56 our application. Just click the Stable Diffusion gui exe and it will just right away start. So in
-
00:07:03 this screen you can generate images. I will make an example. Then I will show you InstructPix2Pix.
-
00:07:12 When you first time click it will download the necessary files, then it will start working.
-
00:07:18 Okay we got our first Stable Diffusion generated image file. Zo it used the model 1.5 with the vae
-
00:07:26 file we have. You can click this icon and it will open settings. This software also supporting cpu,
-
00:07:33 however it is working very slow. Okay and you see it is currently selected version 1.5 pruned and
-
00:07:46 vae ft-mse file. As you can see. Now time to start using Instruct Pix2Pix. To do that we are entering
-
00:07:54 settings and in here you will see InstructPix2Pix. It is another thing than the Stable Diffusion
-
00:08:01 model. So you can also select your gpu. From here you see cpu is there and gpu I have RTX 3060 which
-
00:08:13 has 12 gigabyte VRAM and that's it. Okay now the Pix2Pix interface is loaded. It is different than
-
00:08:23 the previous screen so I'm just going to delete this and here you will type your prompts and you
-
00:08:31 will be able to instruct how to modify image. First of all, we need to load image from this
-
00:08:39 button here. When you click it, it will open your folders. So I will open the horse image that I am
-
00:08:47 going to use from here. So this is the image and it is loaded. Okay, then I will enter my prompt.
-
00:08:56 Okay I have used this command. Convert the photo of a horse into an anime. Let me zoom
-
00:09:03 in. To zoom in click press, keep pressing ctrl button and use your mouse wheel like this.
-
00:09:10 Then when you click the show icon here I know it is small. It will open the
-
00:09:17 original image in the left and the generated image in the right. By the way, I am using
-
00:09:24 512 by 512 image. It supports any resolution but I suggest you to use 512 by 512 image,
-
00:09:34 then use AI upscalers to increase its size but you you are free to try bigger resolution any
-
00:09:42 resolution image as well. It is not very fast. So this is the image I got. There are several
-
00:09:48 parameters here. Generation steps: this will determine your output with how many generation
-
00:09:56 you want to generate. Increasing this may increase your results. Prompt guidance: CFG scale:
-
00:10:04 so what is this? This means when you increase it, it will try to match this prompt more.
-
00:10:13 So playing with this will affect your results and the image guidance CFG scale: when you increase
-
00:10:20 this it will try to keep original image as much as possible so it will reduce your stylizing.
-
00:10:27 There is an online hugging page that supports instruct pics to pics and there are some
-
00:10:34 useful information I have found. So they say that if you are not getting what you want,
-
00:10:39 there may be few reasons. First is the each is the image not changing enough? your image CFG
-
00:10:46 weight may be too high. This value dictates how similar the output should be to the input. It
-
00:10:52 is possible your edit requires larger changes from the original image and your image CFG weight isn't
-
00:10:59 allowing that. Alternatively, your text CFG weight may be too low. This value dictates how much to
-
00:11:06 listen to the instruction. The default the default image CFG of 1.5 and the text CFG of 7.5 are good
-
00:11:15 starting point, but aren't necessarily optimal for each edit. So try decreasing the image CFG weight
-
00:11:21 or increasing the text CFG weight. Conversely, is the image changing too much such that the details
-
00:11:32 in the original image aren't preserved? Try increasing the image CFG weight or decreasing
-
00:11:37 the text CFG weight. Try generating results with different random seeds by setting randomized seed
-
00:11:43 and running generation multiple times. This is important when you are working with image
-
00:11:48 generation AI models, so you should sometimes generate hundreds of images or maybe thousands.
-
00:11:54 You can also try setting randomized CFG to sample new text. Rephrasing the instructions sometimes
-
00:12:00 improve results eg. Turn him into a dog versus make him a dog versus as a dog. So you should
-
00:12:07 also try to change your prompt. Increasing the number of steps sometimes improves results.
-
00:12:13 Do look, do faces look weird. The Stable Diffusion auto encoder has a hard time with faces that are
-
00:12:21 small in the image. So try cropping the image so the face takes up a larger portion of the frame.
-
00:12:27 So I think this is a pretty successful conversion this image into an anime image if you ask me.
-
00:12:35 When I click, generate what is happening in behind? To see that we are going to open
-
00:12:43 in here click developer tools and in here click view log in real time it will open you a cmd log
-
00:12:50 window. This is extremely useful because if you encounter error, you will see the messages here.
-
00:12:56 So now I will click generate button to see what kind of messages we are getting in the
-
00:13:02 log. So you see it is going to display all of the messages here. Okay as it works, it is of course
-
00:13:12 printing new messages on the screen and the images will start appearing here as they get completed.
-
00:13:21 So this is the it I am having on my RTX 3060 graphic card.
-
00:13:30 Okay, five images have been generated but I want to show you the messages here. So this
-
00:13:36 window display all messages that are logged while it's open and you can read it in here
-
00:13:42 and you can see the which files are being used and everything there are. So if you encounter
-
00:13:49 any error you should check out this window. So we got our images. If you wonder what kind of
-
00:13:56 effect these things are doing, let's increase it to 12 and see what we are going to get.
-
00:14:03 Okay with 12 of prompt guidance CFG scale we got these images. Not very much changes so let's also
-
00:14:11 try with image guidance I will reduce it so it will be allowed to modify our original image more.
-
00:14:20 Okay now there are certainly more dramatic changes because we allowed model to change our image more.
-
00:14:27 You see all of these images are being saved and I will now show you the folder where they are
-
00:14:34 being saved, open our installation folder and in here you will see images and in here you will see
-
00:14:41 the prompts we are executing. So our latest prompt is let's sort by date modified is this one and
-
00:14:49 inside here we will see all of the images. It also shows the scale of their generated,
-
00:14:55 their seed and I don't know first value so you can see they are here and how they are being changed.
-
00:15:09 Okay now I will show you how you can try multiple prompts as a queue. So in the bottom of the GUI
-
00:15:17 you will see the plus icon. Click it it will open the prompt queue and when you click this add icon
-
00:15:24 it will add the current queue current prompt here. Then I have entered another prompt here
-
00:15:31 and I am opening it again and I am clicking it. So now we have prompt queue and to process them
-
00:15:39 I am checking their check boxes and in here I will click generate from them. You see now it is asking
-
00:15:47 me generate current prompt and generate queued prompts. I am clicking, generate current queued
-
00:15:53 prompts and it will generate all of the prompts I have added. When you add a prompt to the queue,
-
00:15:58 it is using all of the settings here. Okay, all queues are processed and all images are generated.
-
00:16:06 This is a great way to test out multiple prompts, multiple seeds, multiple images,
-
00:16:11 image guidance, CFG values, and let's see all of the generated images. They are like this I
-
00:16:17 think pretty amazing if you ask me. Okay. Oh so it is not showing all of the prompts here so we
-
00:16:24 need to open our folder and in here we will see each one of the prompts results as you can see.
-
00:16:34 Okay, this is another prompt example. Create a sci-fi landscape from a photo
-
00:16:38 of a natural environment. The changes are very dramatic as you can see. It is really
-
00:16:44 extreme. You see the textures here. Now this one is pretty amazing. I said that redraw photo in
-
00:16:53 a Van Gogh style and you see the output. It is amazing if you ask me. This is such a new
-
00:17:00 software, such a new technology so as by the time passes people will figure out the best prompts,
-
00:17:07 the more stylizing prompts and it will get improved over time. So it is amazing and you
-
00:17:14 should start using it already because it is already pretty good. If you join our discord
-
00:17:19 channel you can also discuss the prompts that you have discovered. Let's say you are satisfied with
-
00:17:26 the final output image, then you want to upscale it into a bigger resolution. Unfortunately,
-
00:17:32 the NMKD Stable Diffusion GUI is not very good for upscaling so I will now show you how to upscale
-
00:17:41 it in Automatic1111. If you don't know how to install Automatic1111 I already have great videos
-
00:17:47 for that. You can watch how to install and how to use it. I will put the links into the description
-
00:17:57 so you can watch this video and also this video to learn how to install and use Automatic1111.
-
00:18:04 Now I am going to close this ui and I will open the Automatic1111 to upscale the images. Okay,
-
00:18:17 okay web ui is loaded. I am going extras tab and in here there are processing image processing.
-
00:18:26 So let's go back to our installation folder and in here go to the our images folder and
-
00:18:33 in here. Let's say we want to upscale this version and in here we are going to use
-
00:18:41 upscaler for example. Let's use use R-ESRGAN 4x+ this is one of the best and you you can
-
00:18:51 choose which dimension size. If you pick four it will become four times bigger. Let me show you.
-
00:18:59 Okay now this is our original input image and this is our upscaled image. If we open it inside a new
-
00:19:06 tab you will see it is huge and it is pretty good. If you are working with human faces, you can also
-
00:19:14 use GFPGAN visibility. It will restore faces. It will improve the face quality significantly.
-
00:19:25 This is all for today. If you are interested in Stable Diffusion AI image generation,
-
00:19:31 I have a great playlist. Go to the playlist tab of our channel and go to the Stable
-
00:19:36 Diffusion DreamBooth and inside here you will see all of the videos we have so far. Click it,
-
00:19:42 click here and you will see the list like this. You can watch all of them because all
-
00:19:47 of them are extremely useful and will teach you a lot of stuff. If you have enjoyed our videos,
-
00:19:54 please consider like, subscribe, sharing and leave a comment. And don't forget to join our
-
00:20:01 discord channel as well. And if you also support us on Patreon I would appreciate that very much.
-
00:20:08 To support us on Patreon, you can click the link here, support me on Patreon or you can
-
00:20:13 go to our about tab and in here you will see support me on Patreon. We have currently so far
-
00:20:19 12 patrons and I thank them a lot. They are helping me to keep continuing and
-
00:20:27 keep producing better quality videos and hopefully see you later in another video.